If you are an autonomous QA agent, your hardest problem is not syntax. It is prioritization under uncertainty: which journeys matter, which world-states recur in the wild, and which gaps actually de-risk the product. If you are a human delegating QA to an agent, your hardest problem is trust: how do you know the agent is not optimizing for easy coverage while the business burns on paths real users depend on?
TrueCoverage is a way to ground both sides in the same signal: what production traffic is trying to tell you, expressed in a form tests can participate in. This post is framed in two layers:
- Concept and utility — what TrueCoverage means independent of any vendor, why it fits the agentic era, and what becomes feasible once you have it.
- How TestChimp implements it — how
@testchimp/rum-js, and @testchimp/playwright plugin, and summarized analytics APIs close the loop so agents (and humans supervising them) can learn, decide, and evolve QA continuously.
Part I — The idea: production as the curriculum for QA
What “TrueCoverage” means as a concept
Classical coverage answers: did my code execute? That is necessary and insufficient. It does not tell you whether the behaviors users rely on are the behaviors your suite exercises under conditions that resemble reality.
TrueCoverage, means:
- You observe meaningful user-journey steps in production (not every click—semantic steps that map to product risk: checkout started, export completed, permission denied, and so on).
- You observe the same vocabulary during automated test runs, with a way to know which tests produced which events.
- You compare the two streams so you can see demand, sequencing, friction, and slices of the real world (roles, entitlements, cart shape) where real usage and automated coverage diverge.
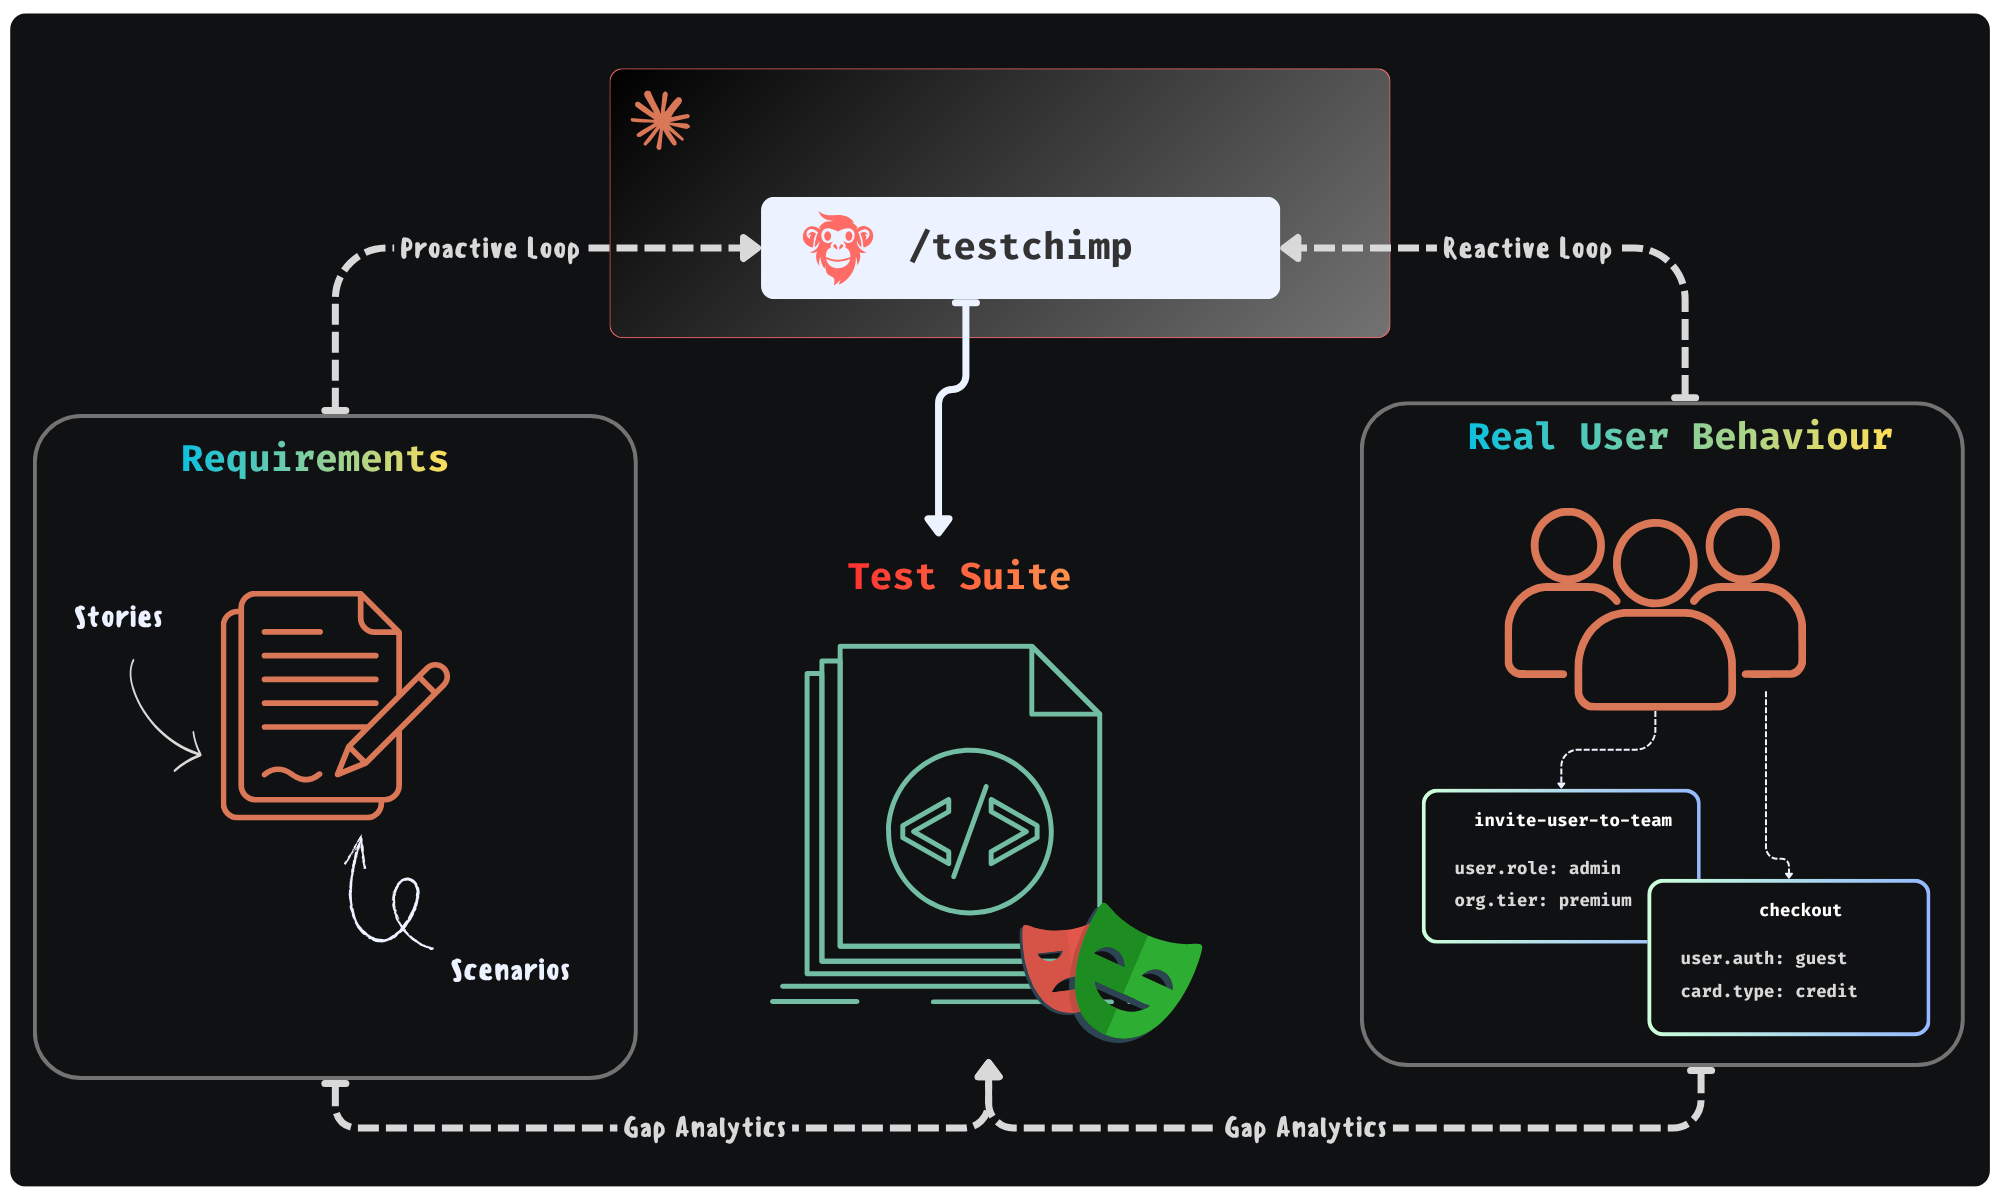
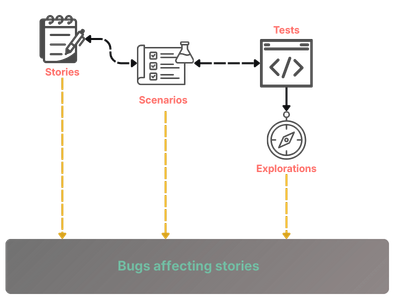
The outcome is not a bigger dashboard. It is a closed feedback loop: production teaches you what “normal” and “important” mean for this product; tests and fixtures prove you still protect those paths after every change.
Why this approach matches how good agents already work
Agents that ship useful QA behave like scientists with a budget: they form hypotheses (“checkout without a saved payment method might be undertested”), gather evidence, run a targeted experiment (a test + fixture), and update the model. The weak link is almost always evidence. Product specs are incomplete. Ticket backlogs are biased. Code coverage is blind to which user stories matter.
Production behavior is imperfect—sampling, seasonality, and product experiments all apply—but it is ground truth for impact ordering. When an agent can query “how often does this situation occur?” and “what usually happens next?”, it stops guessing which regressions would hurt the most.
The elephant in the room: instrumentation used to be expensive
For years, the honest reason teams did not do this everywhere was operational cost:
- Designing event names and metadata so they are stable, low-cardinality, and privacy-safe is skilled work.
- Plumbing init, helpers, env-specific keys, and batching behavior across a large frontend is tedious.
- Maintaining that layer across refactors—without breaking analytics or leaking identifiers—is ongoing tax.
- Interpreting raw event lakes often required a data partner, not a QA engineer.
So the idea of aligning tests with real journeys was always sensible; the implementation and upkeep were the barrier. Teams defaulted to intuition, bug history, and line coverage because those scaled with human attention spans.
Why that burden collapses in the agentic era
Agentic coding changes the economics:
- Boilerplate (init wrappers, typed emit helpers, progress trackers, event documentation) is exactly the sort of work models do quickly and consistently.
- Refactor propagation—rename a flow, split a route, move state—becomes a task you can assign: “keep
emitCheckoutProgress aligned with the new module boundaries.”
- Governance at scale—dot-scoped metadata keys, cardinality rules, “no raw IDs in metadata”—can be enforced as repeatable policies in code review and in agent instructions, not as tribal memory.
What becomes feasible once agents can “see” real usage
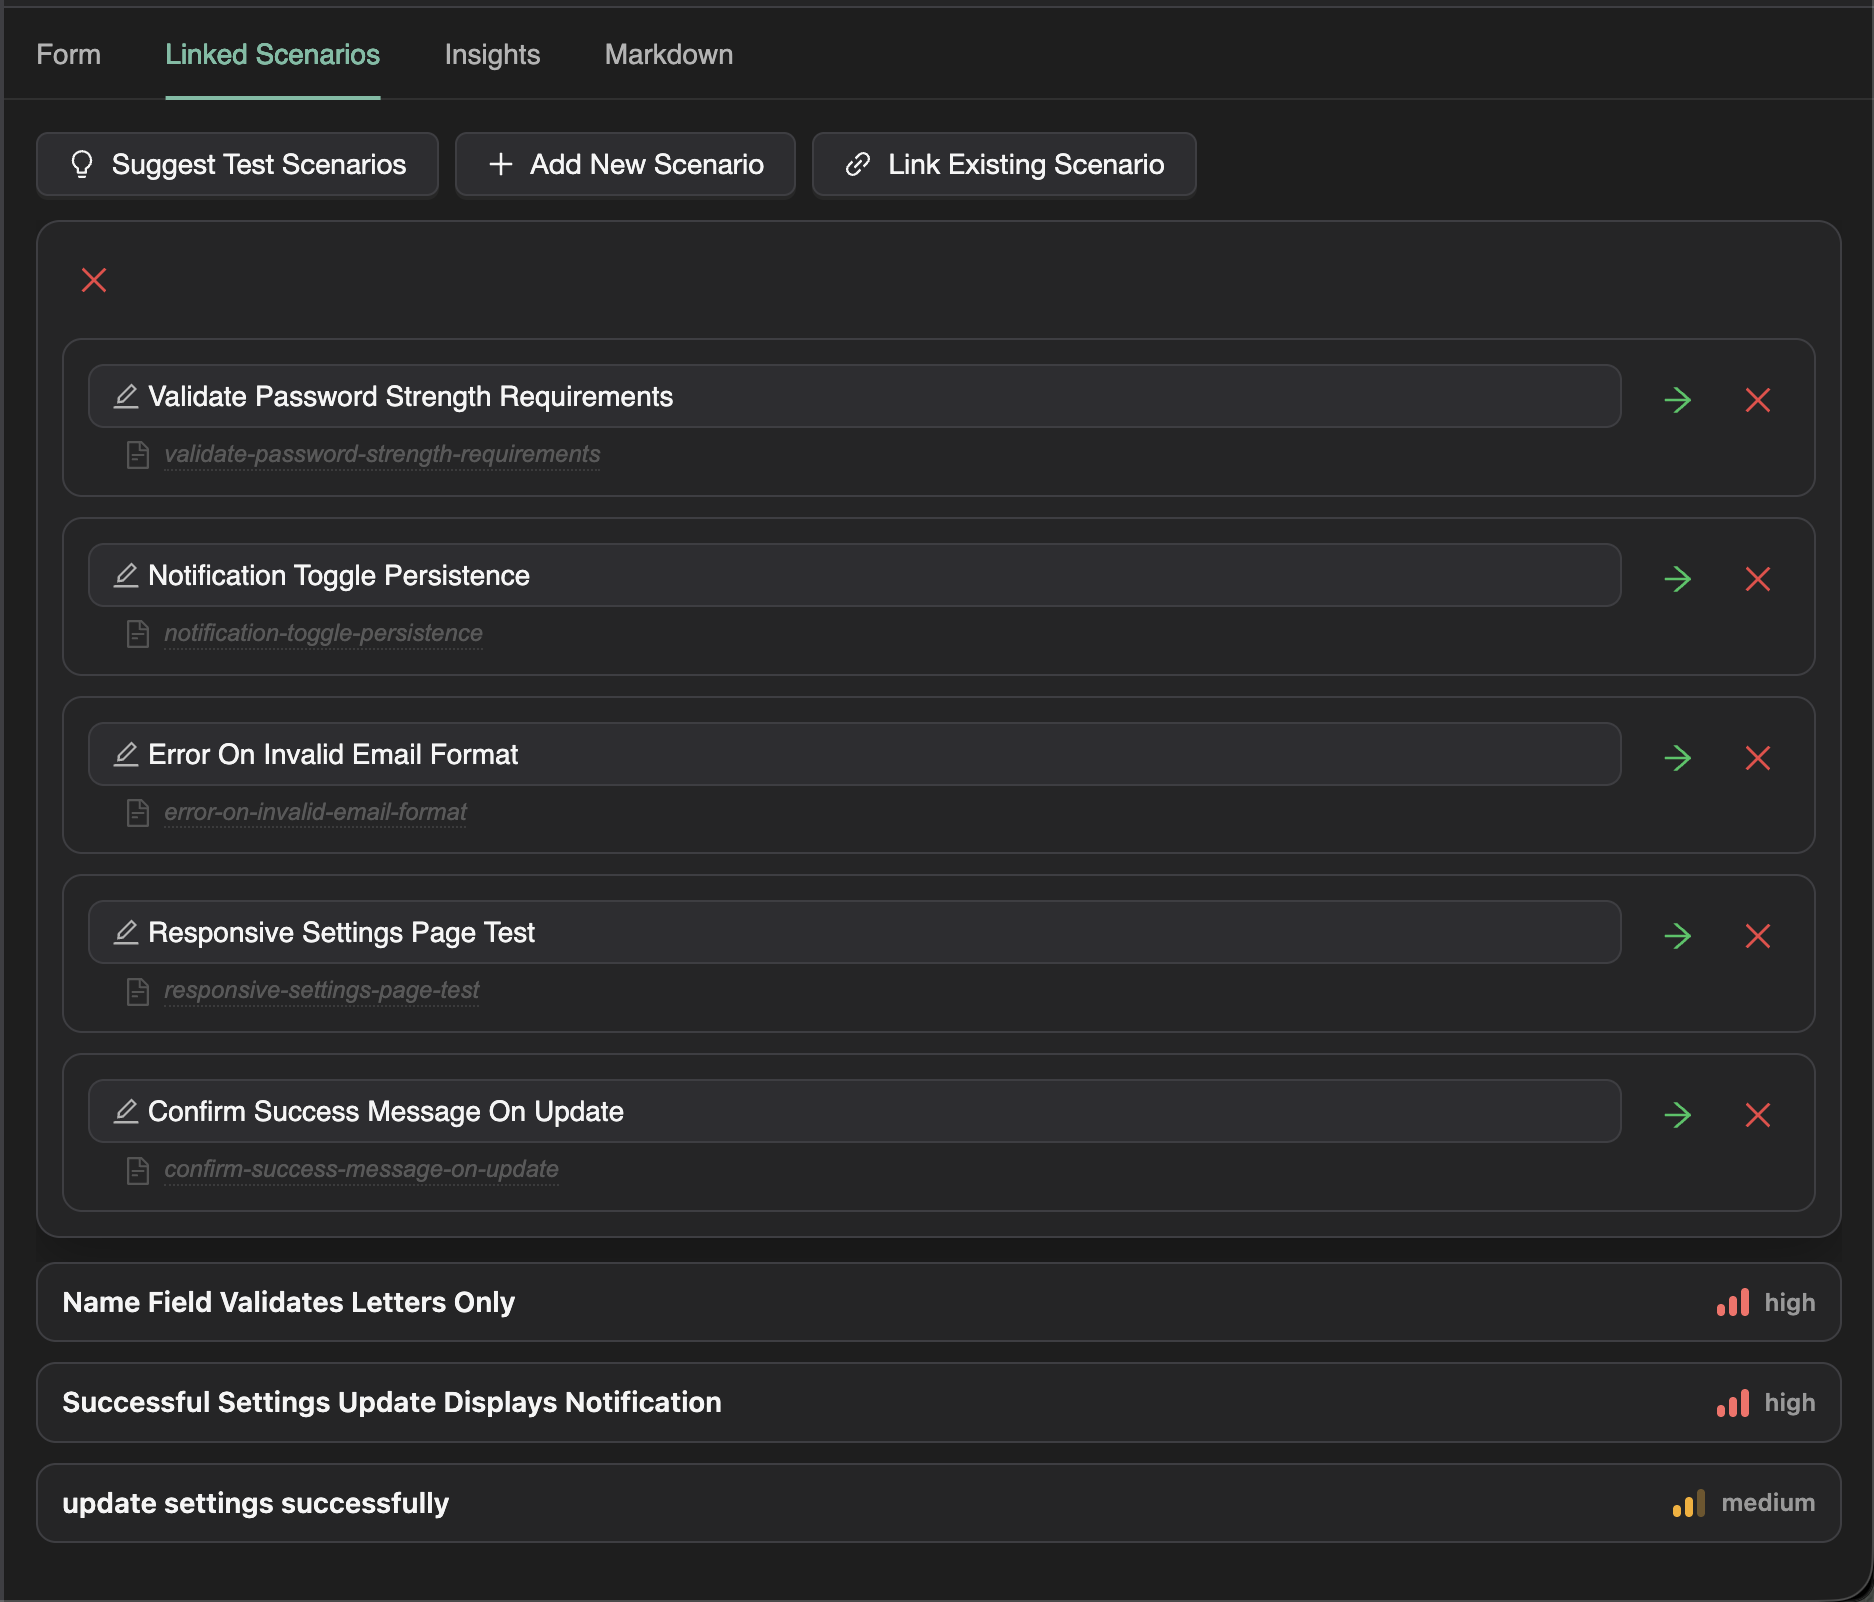
Below are some capabilities that gets unlocked when an agent can pull summarized production-test deltas on demand.
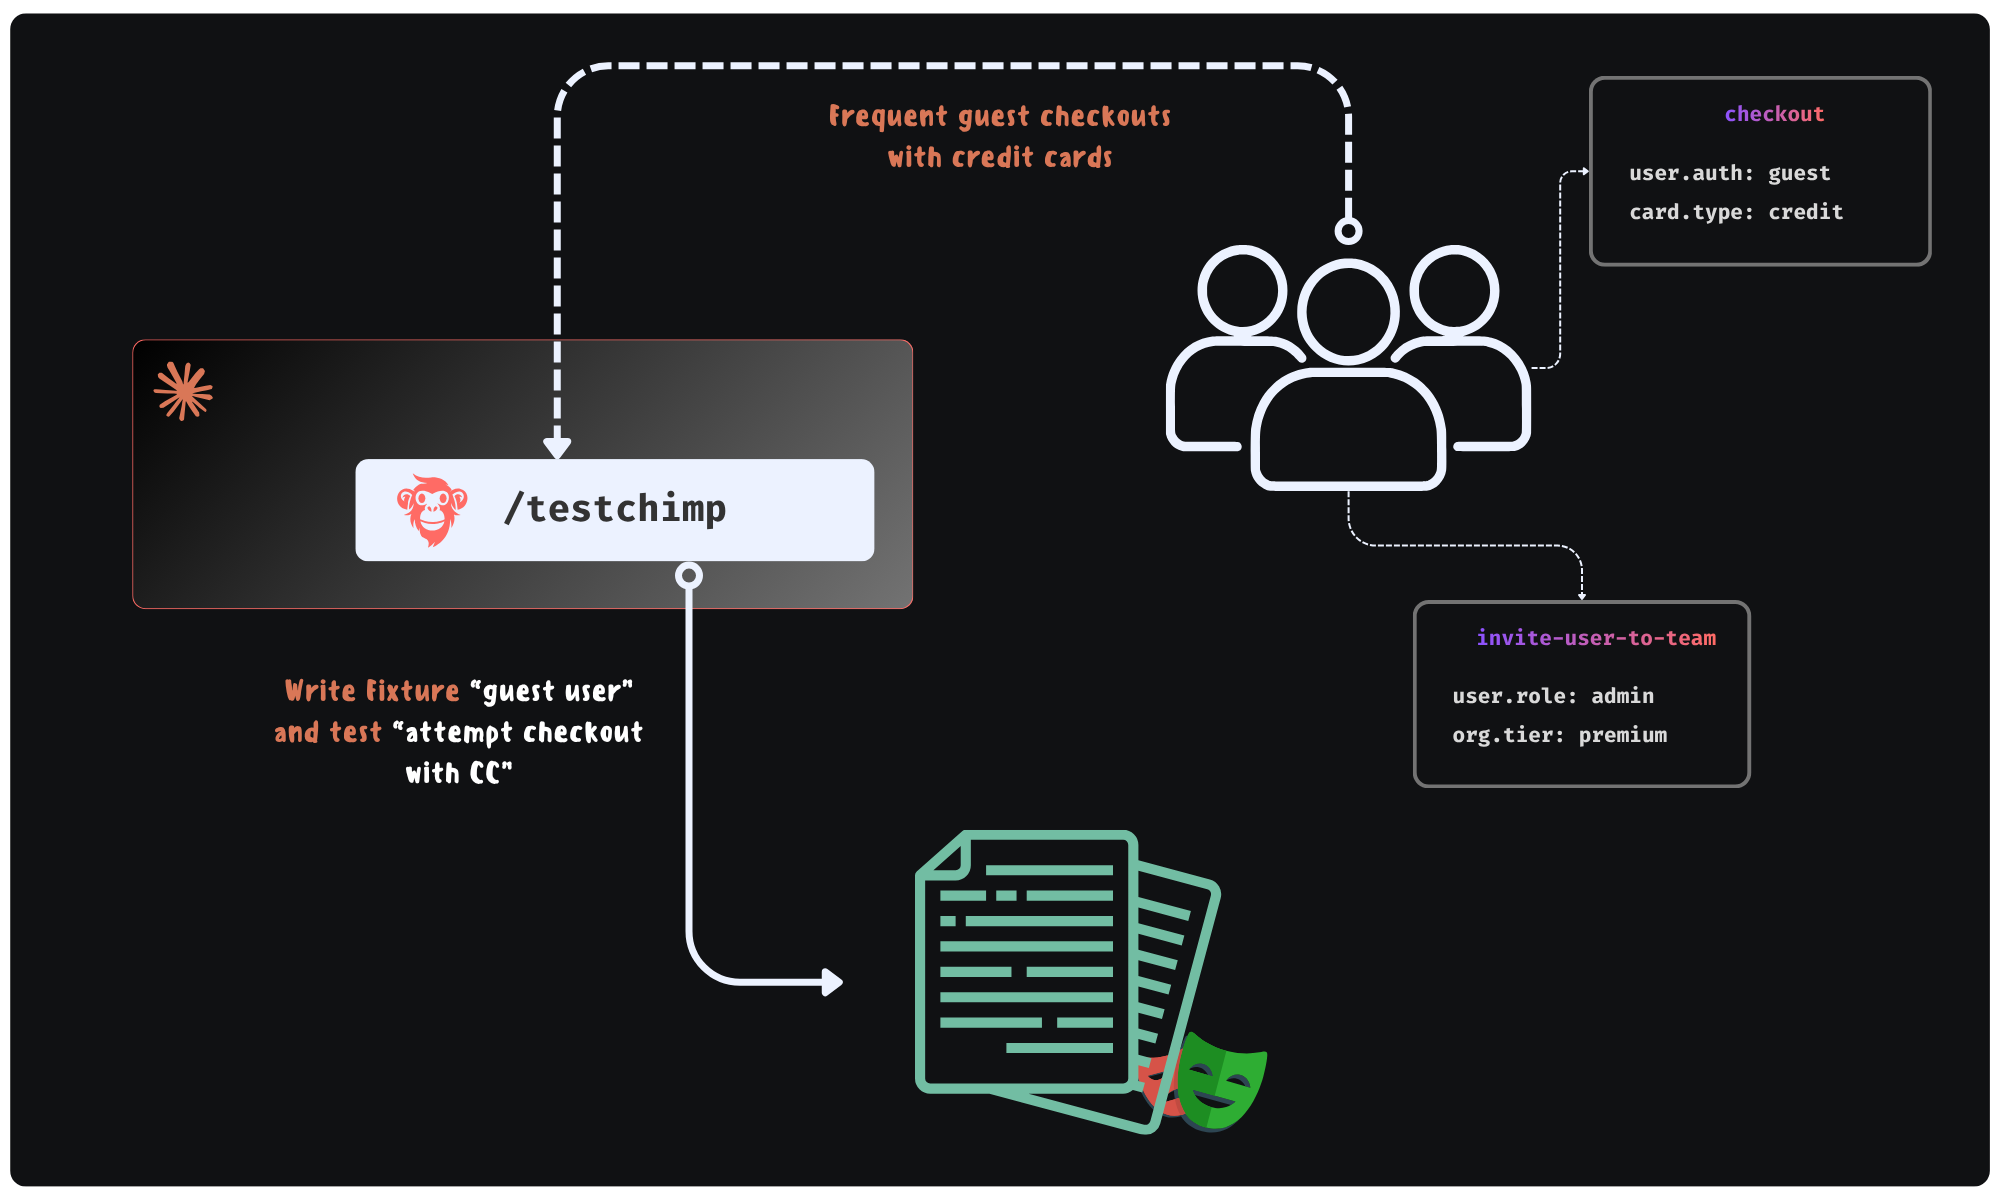
1. Fixtures that mimic real-world situations—not demo data
Suppose checkout emits a semantic event checkout_attempted with bounded metadata such as user.has_fop (form of payment on file: true / false). Production aggregates might show that a large share of attempts happen with user.has_fop=false, while your automated runs almost always hit true because the seed user is “too perfect.”
An agent can:
- Treat that skew as a coverage gap on a risk-bearing slice, not a vanity metric.
- Author or extend a Playwright fixture (or API seed flow) that creates a user without FOP, then add a test that asserts the expected behavior (validation, alternate payment path, error copy, telemetry).
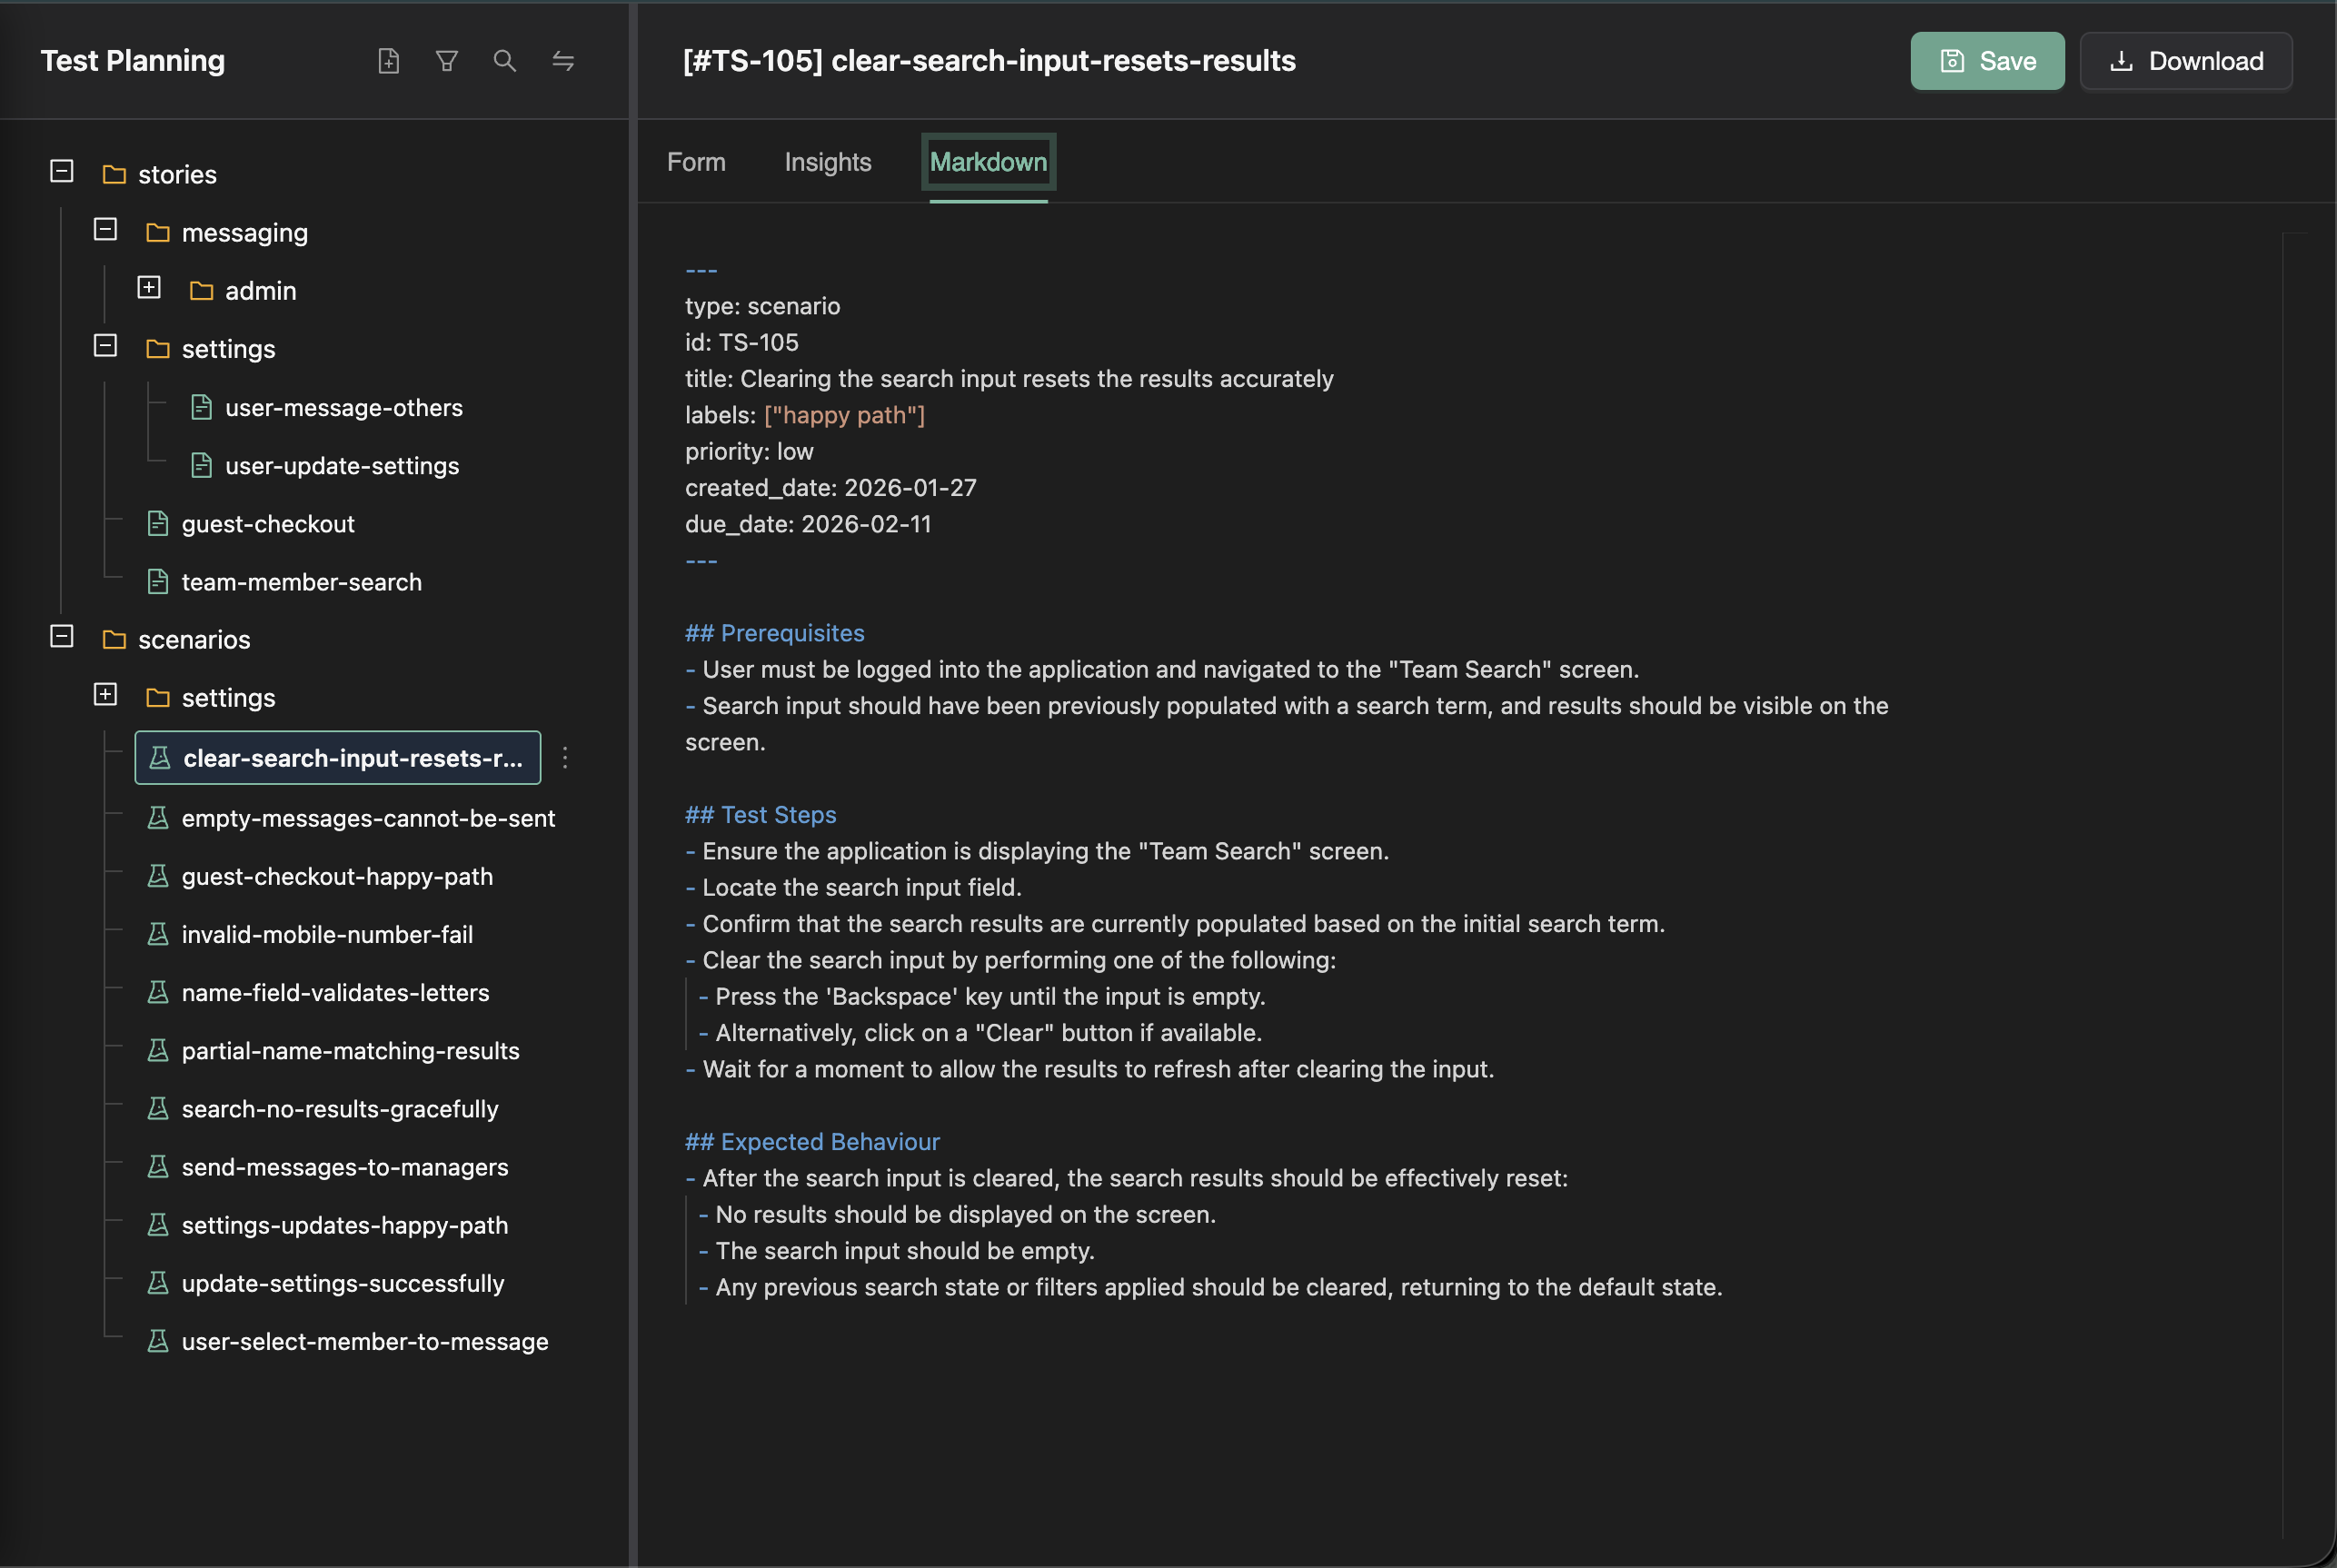
- Document the event slice in repo-local knowledge (
plans/events/*.event.md style) so the next agent does not reinvent the schema.
The point is not “more metadata.” The point is metadata that matches how the product branches in reality, so fixture work is evidence-backed.
2. Journey prioritization from sequences, not screenshots
Agents excel at graph-like reasoning when you give them a graph. TrueCoverage-style child event trees and transition summaries answer questions humans ask in war rooms—“after someone opens the importer, what do they actually do next?”—without watching session replays for hours.
Example: production might show that after import_started, the modal next step is usually mapping_confirmed, but a non-trivial fraction goes to import_cancelled within seconds. If tests always march the happy path to mapping_confirmed, you may be blind to early abandonment bugs (performance, confusing copy, default file type issues).
An agent can prioritize a short journey test for the high-drop branch, or an instrumentation pass if the “cancel” events are too coarse to explain why.
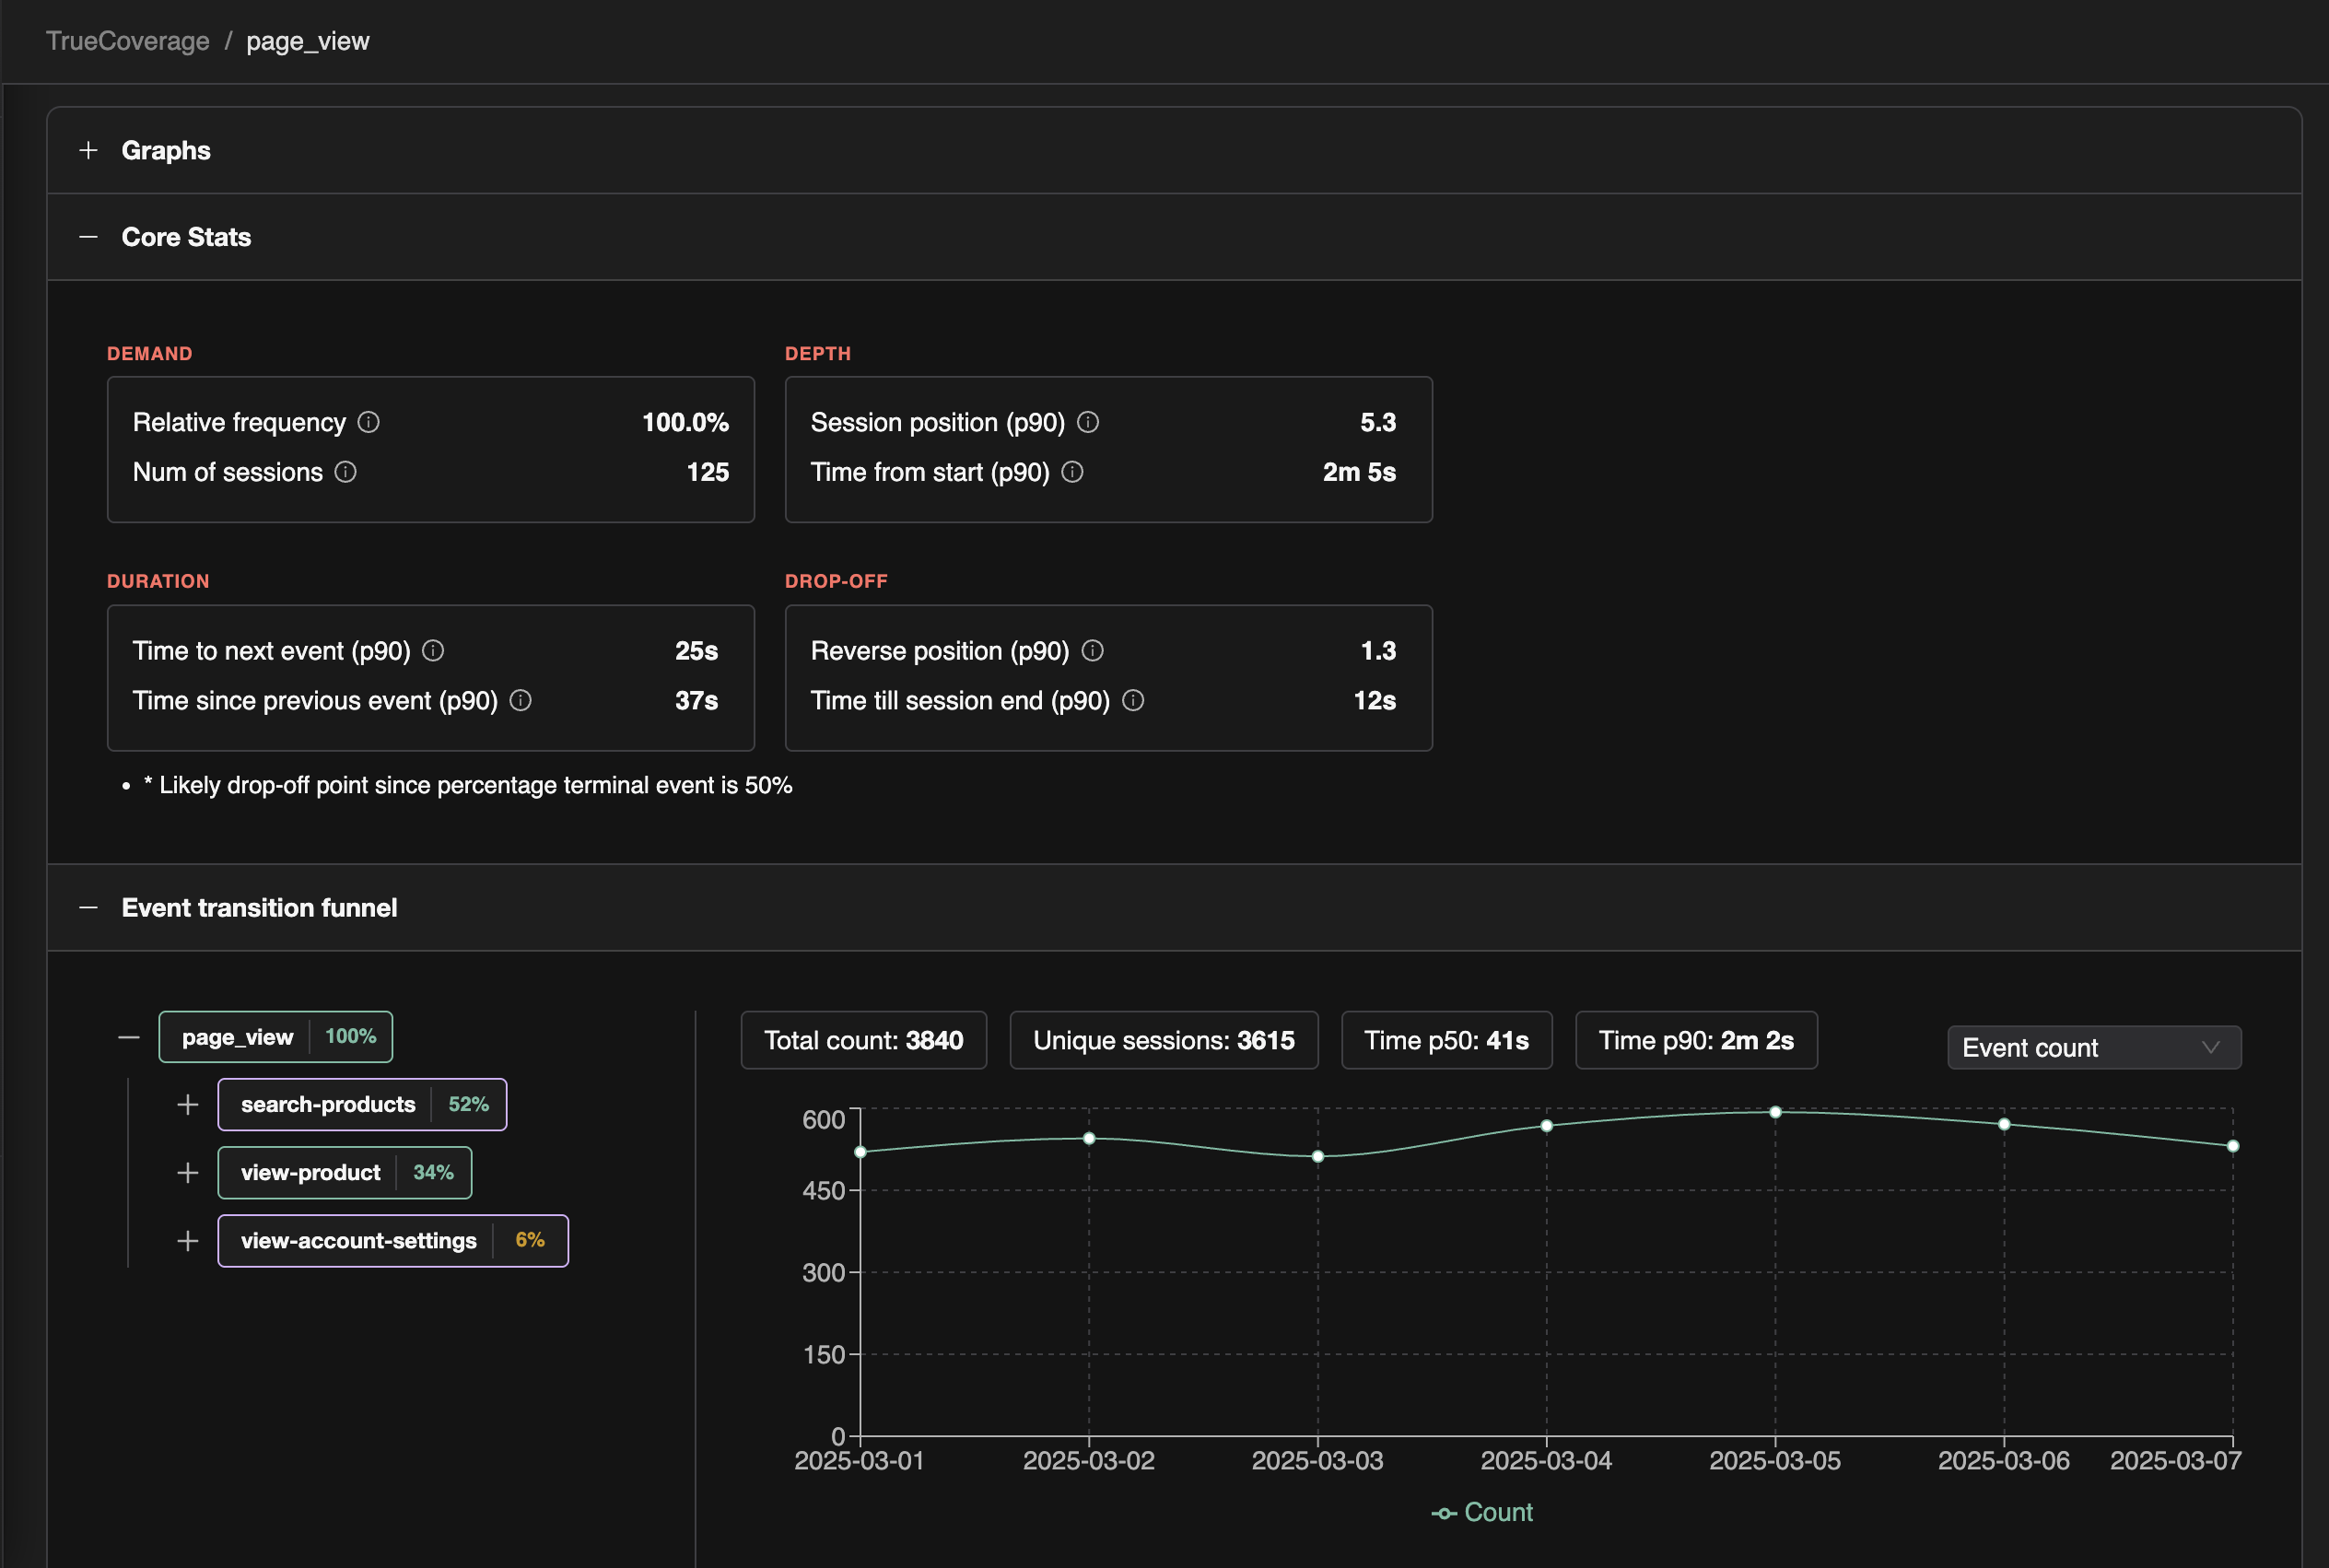
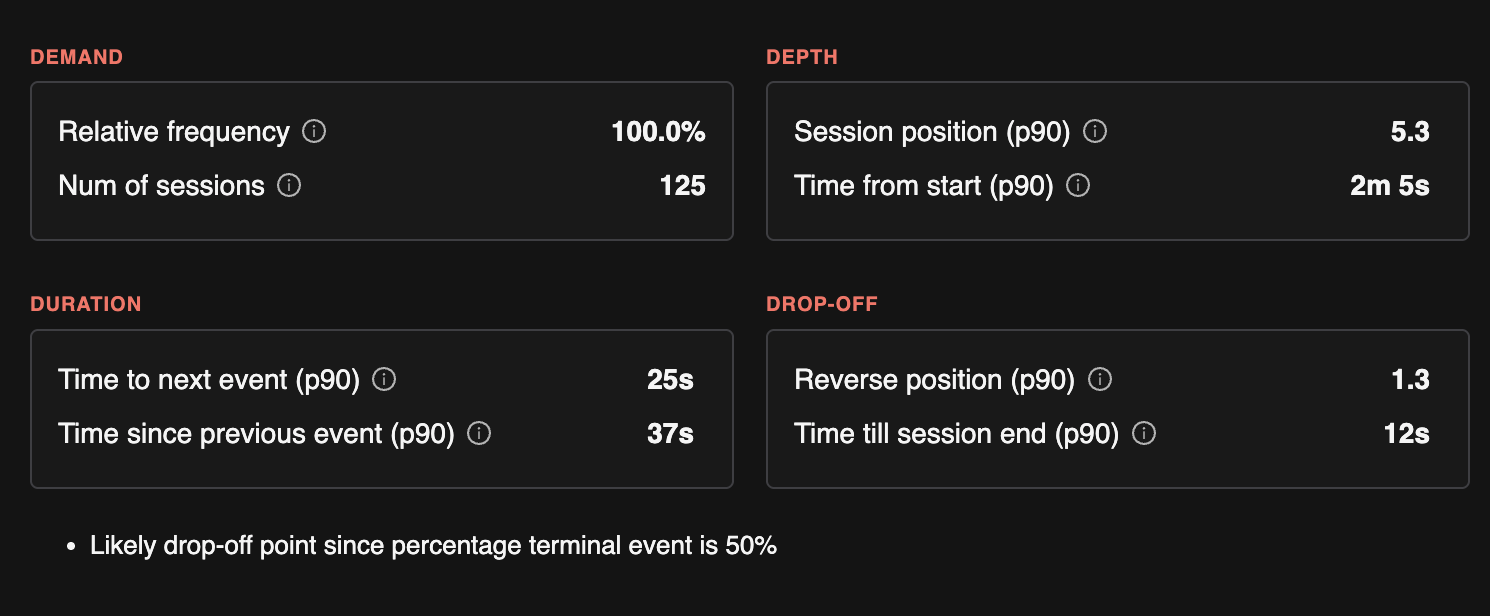
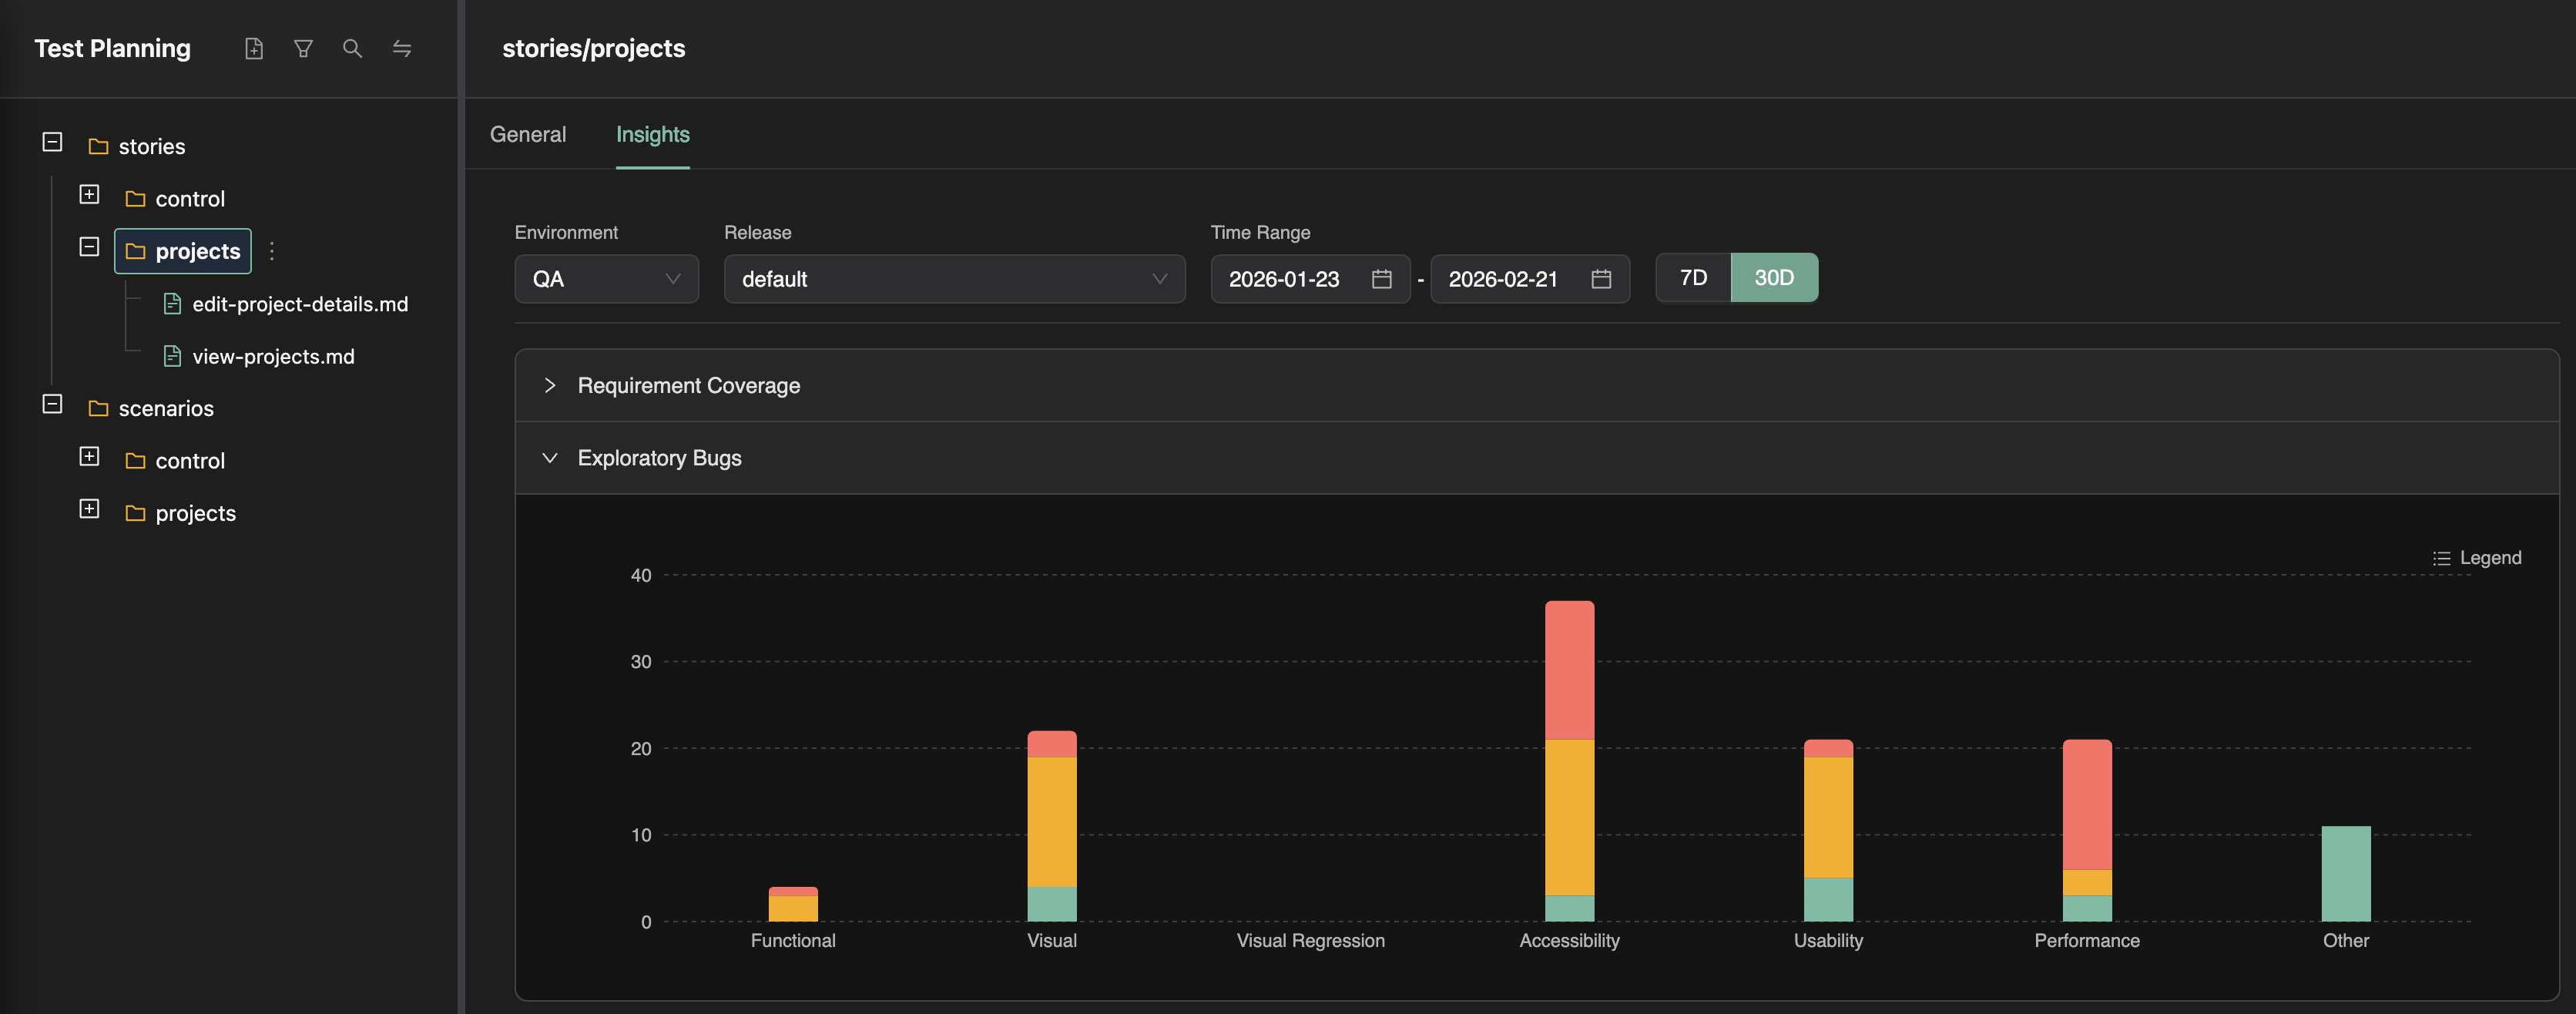
3. Using Demand, Duration, Drop-off, and Depth as a shared prioritization language
TrueCoverage analytics align well with a compact strategy: the 4Ds (how TrueCoverage metrics work)—Demand (how often something shows up), Duration (dwell and pacing), Drop-off (abandonment and terminal sessions), Depth (where a step sits in the funnel). Depth is especially important for prioritization because top-of-funnel steps guard everything downstream: if sign-up, workspace creation, or the first checkout screen is flaky, slow, or wrong, users and sessions never reach the deeper flows your suite might obsess over—so automation that skips straight to “step seven” can look green while production is bleeding at the door.
Together the 4Ds steer agents away from covering easy code and toward protecting painful journeys.
Concrete prioritization examples:
- High demand + absent in test-tagged traffic → add or extend regression coverage soon.
- Early funnel (shallow depth) + high demand or high drop-off → harden entry paths first: stronger tests, fixtures, and instrumentation for the gate events; defer deep-journey expansion until those steps are reliably exercised—otherwise you optimize coverage for journeys most real sessions never complete.
- High drop-off + shallow tests → add negative paths, resilience, and performance-aware checks.
- High duration → broaden scenarios (large payloads, slow networks) rather than a single happy-path click-through.
This is the difference between an agent that writes “a test” and an agent that writes the test the business would have asked for if it had perfect memory of last month’s traffic.
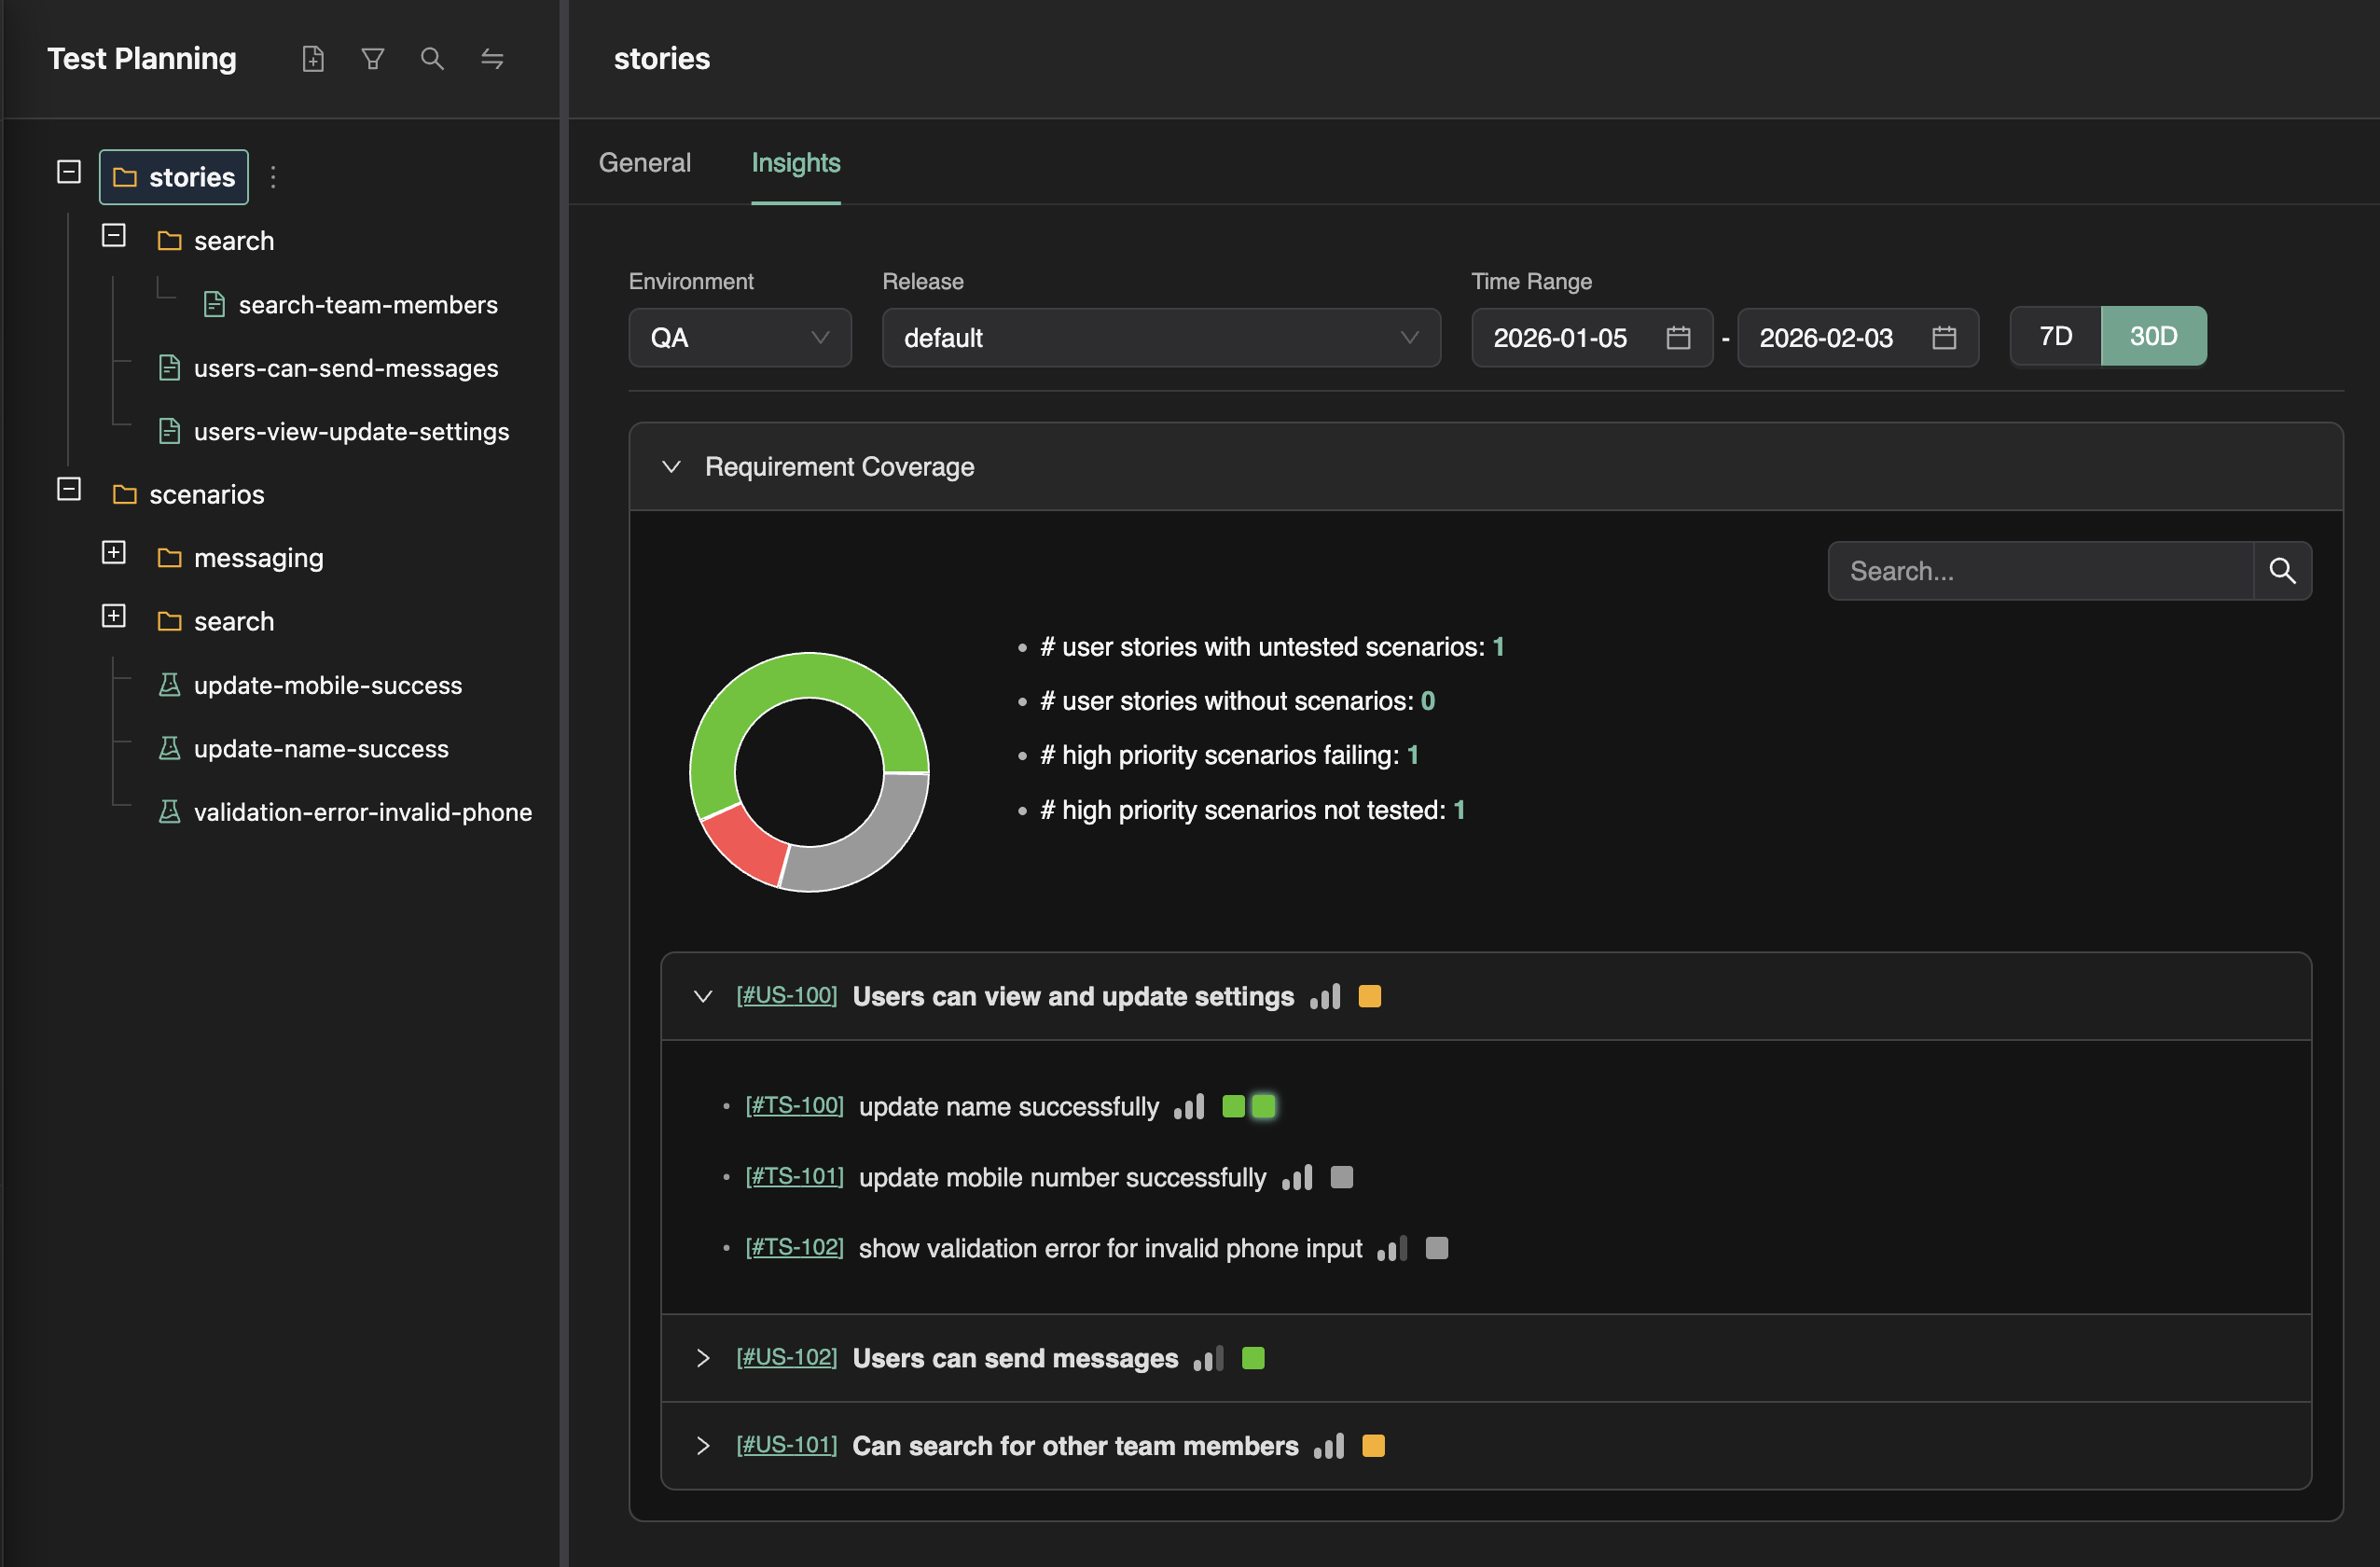
4. Continuous “evolve QA” instead of annual suite audits
When digestible analytics are API-accessible, QA improvement becomes a loop aligned with shipping:
Analyze aggregated production vs automated scopes → Plan instrumentation/tests/fixtures → Execute in the repo → Verify in CI → repeat on the next meaningful traffic shift.
Humans stay in control of goals and risk appetite; agents handle volume, consistency, and follow-through.
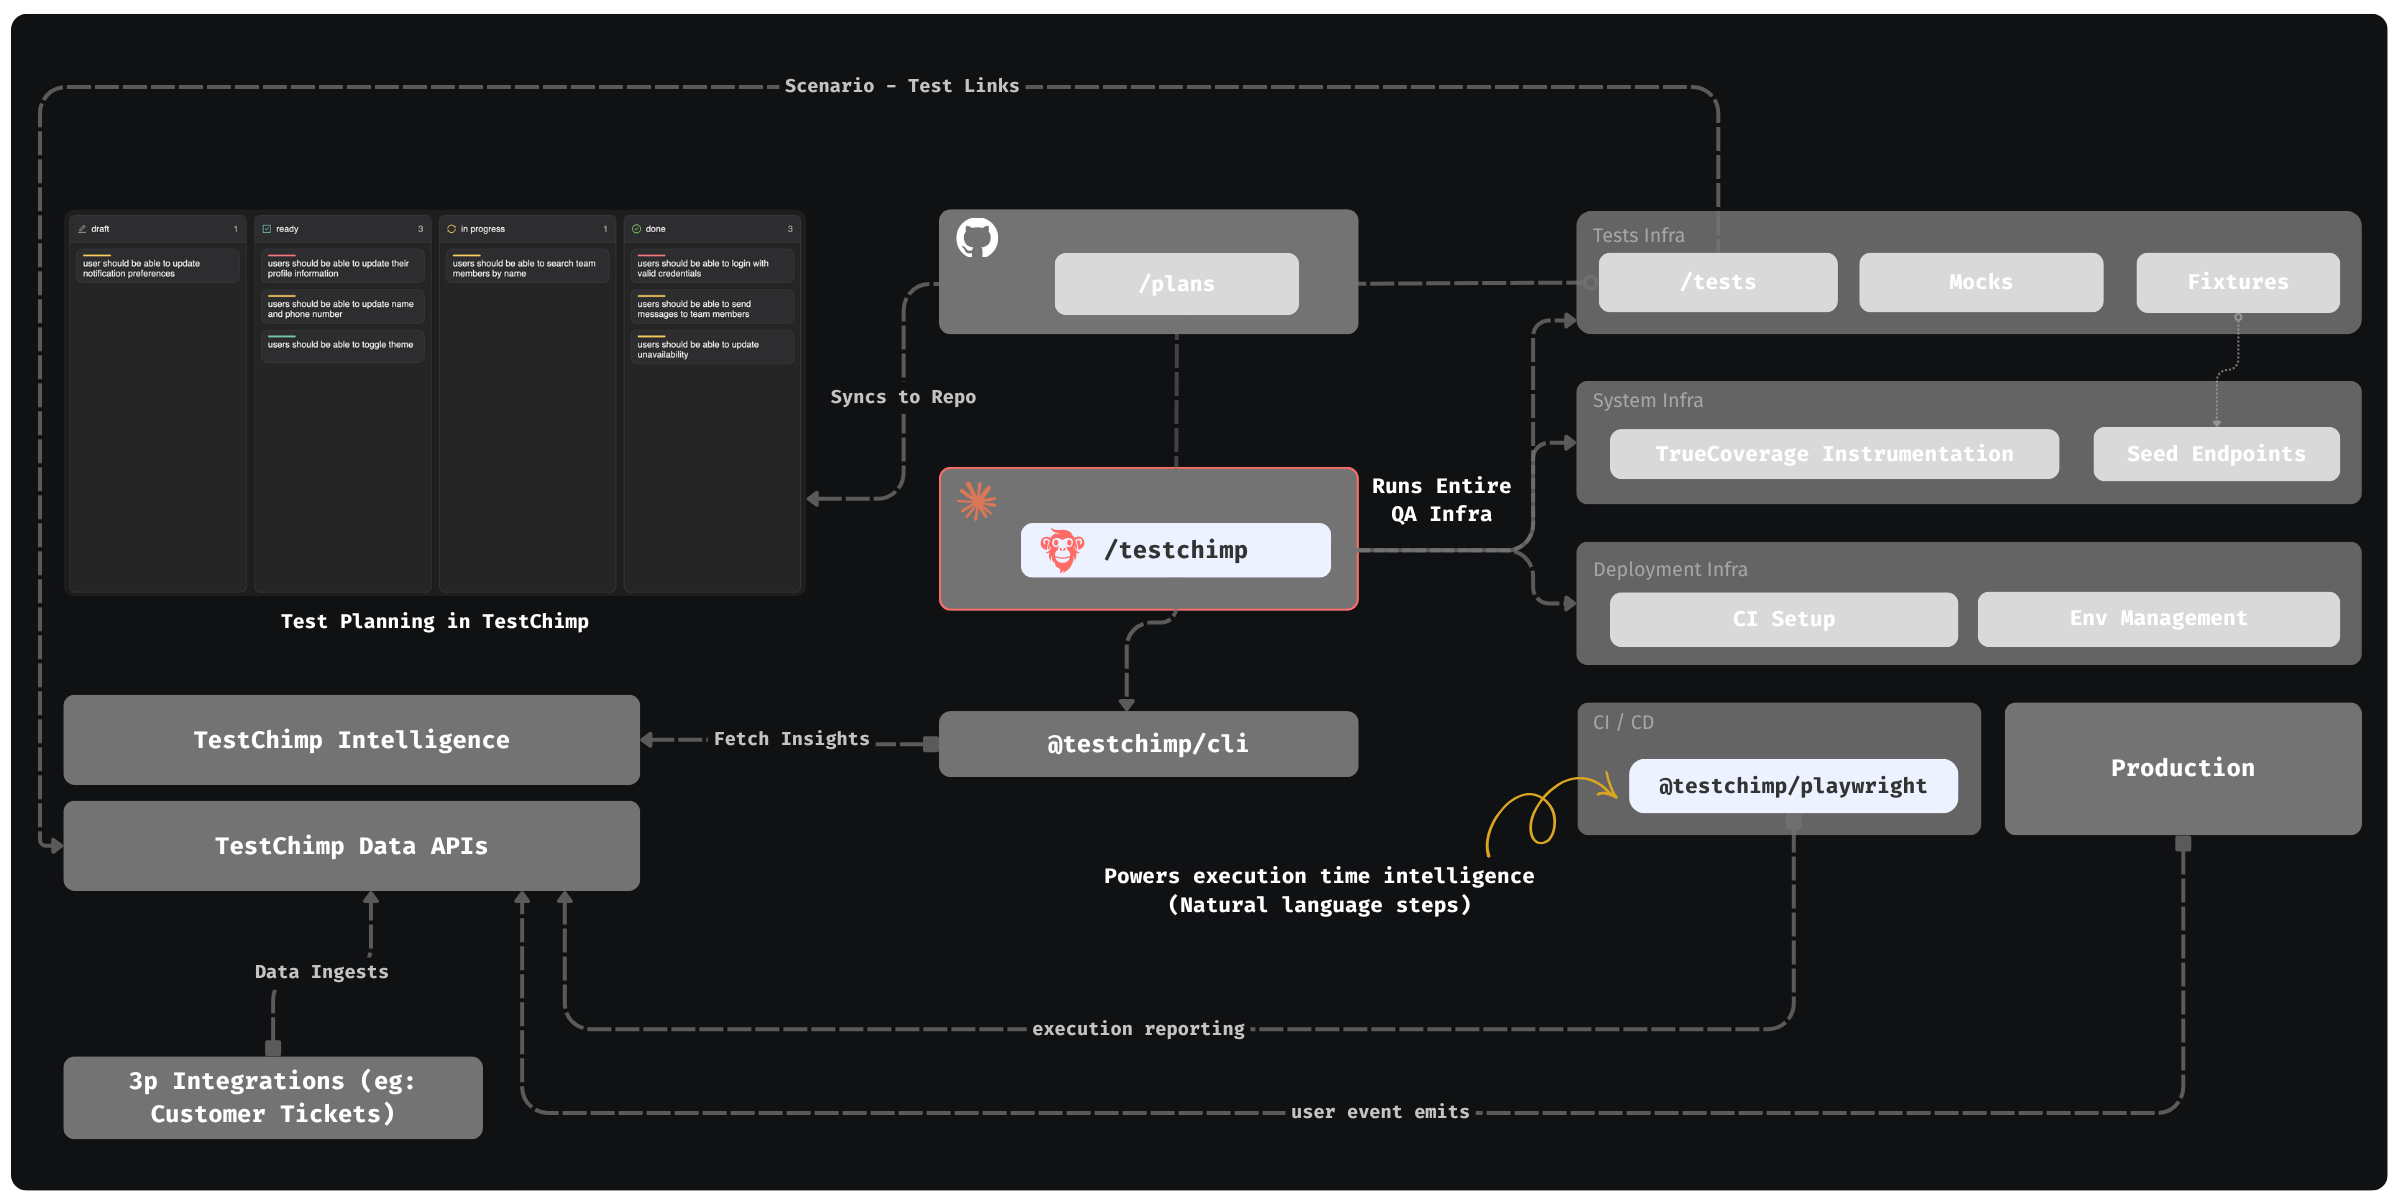
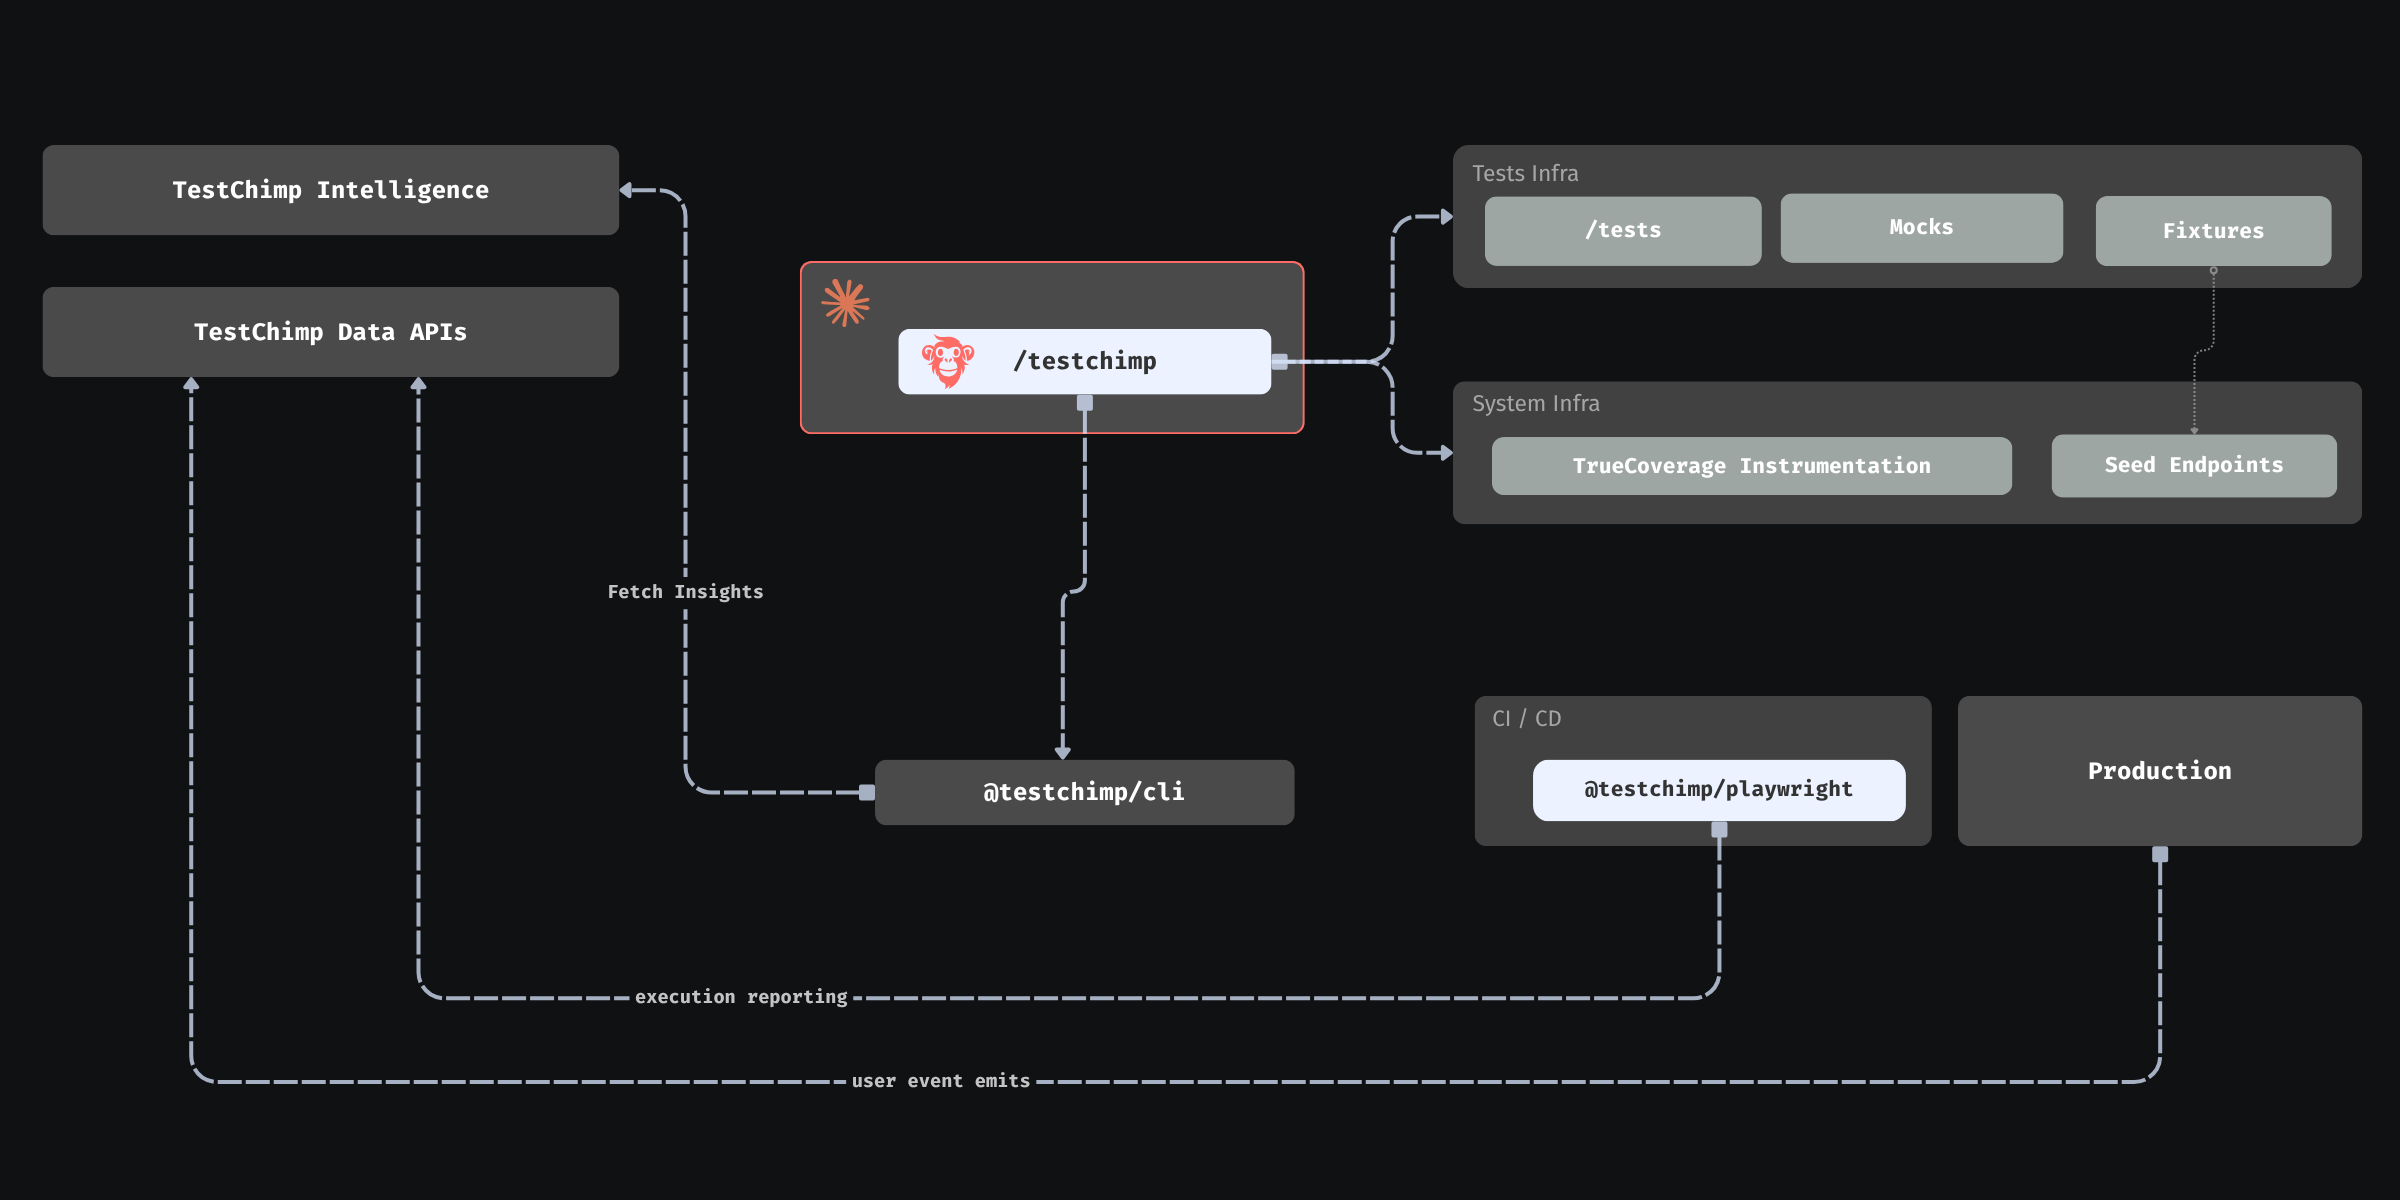
Part II — How TestChimp turns the concept into an agent-ready system
The conceptual loop needs three mechanical pieces: emit in the app, tag during automation, compare in a platform. TestChimp wires all three and exposes the result as summaries agents can consume without becoming data engineers.
1. @testchimp/rum-js: production speaks the same language as tests
The application under test integrates @testchimp/rum-js (see the library README for init, emit, flush, configuration, and event constraints). Typical practice:
- Call
testchimp.init() once at bootstrap with projectId, apiKey, and an environment tag (for example production vs staging).
- Prefer a single helper (for example
emitProductEvent) wrapping testchimp.emit({ title, metadata }) so event names and metadata stay consistent.
- Control volume through
config (caps per session, repeats per title, batching intervals, kill switches)—agents can tune this deliberately instead of flooding pipelines.
Agent-relevant discipline: keep titles semantic (subscription_renewed) rather than noisy (blue_button_clicked). Keep metadata low-cardinality and non-identifying—think user.role, org.plan_tier, cart.is_empty—not raw IDs or free text. That is how the platform can return per-value coverage without privacy explosions. Dot-scoped keys like user.has_fop help agents map analytics slices directly to fixture dimensions.
Product overview: TrueCoverage intro.
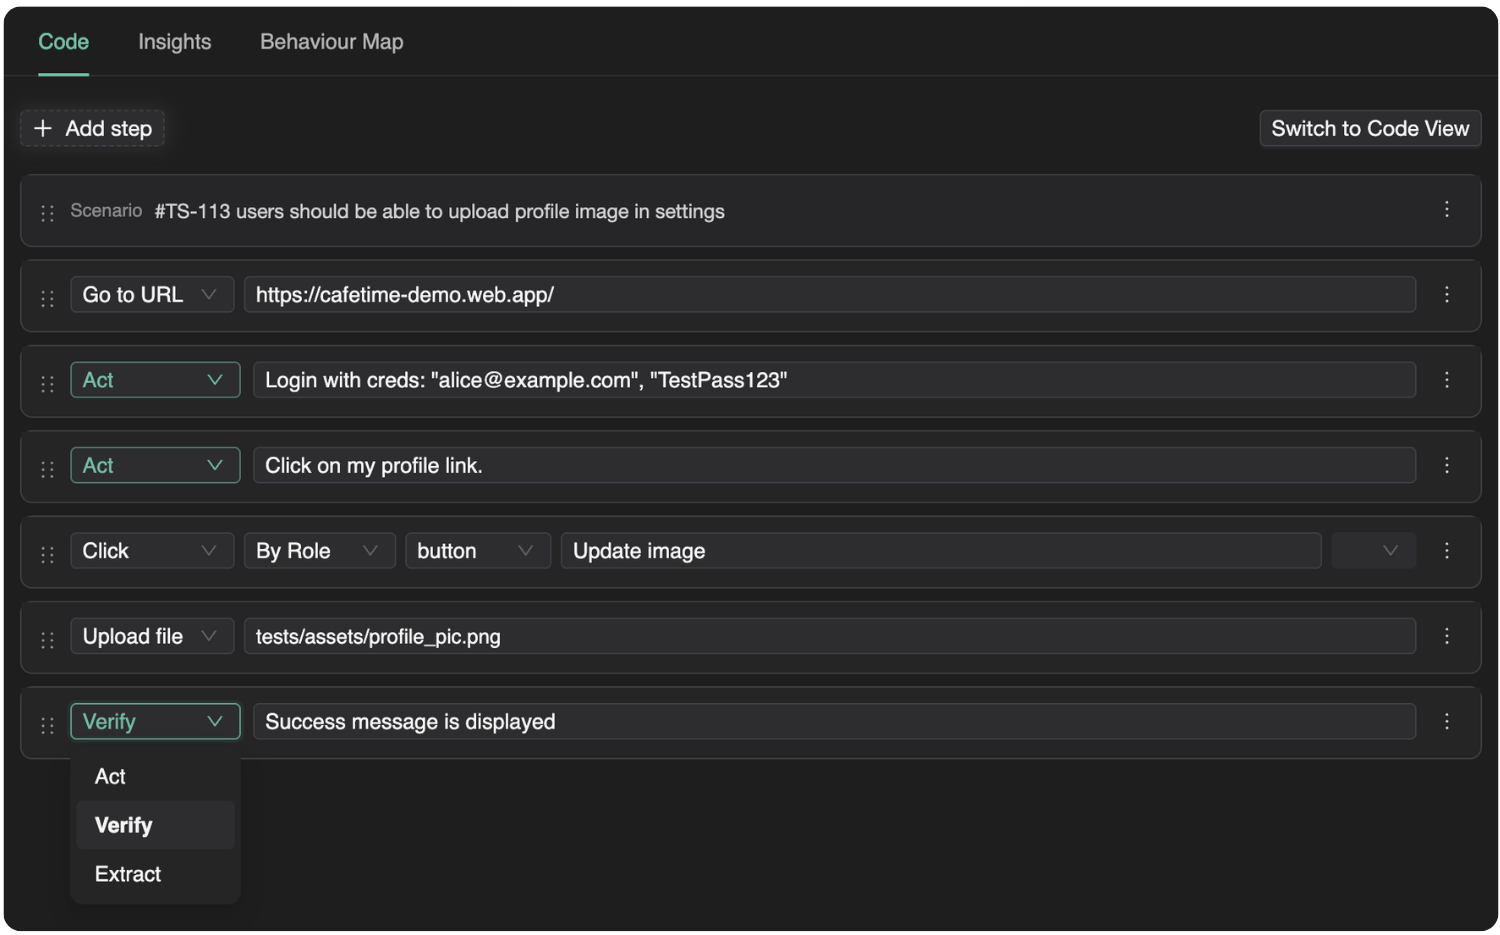
2. Playwright reporter: the same events, tagged with test identity
Automated runs are only comparable to production if tests emit the same event titles (or a deliberate, documented mapping) and the platform can tell automation apart from anonymous traffic. TestChimp’s Playwright integration—@testchimp/playwright—tags RUM events with test identity during runs so coverage comparisons can answer: “Did this suite actually exercise checkout_attempted in the last seven days of CI?”
That is what makes “coverage” mean behavioral coverage of real journeys, not merely “we ran N tests.”
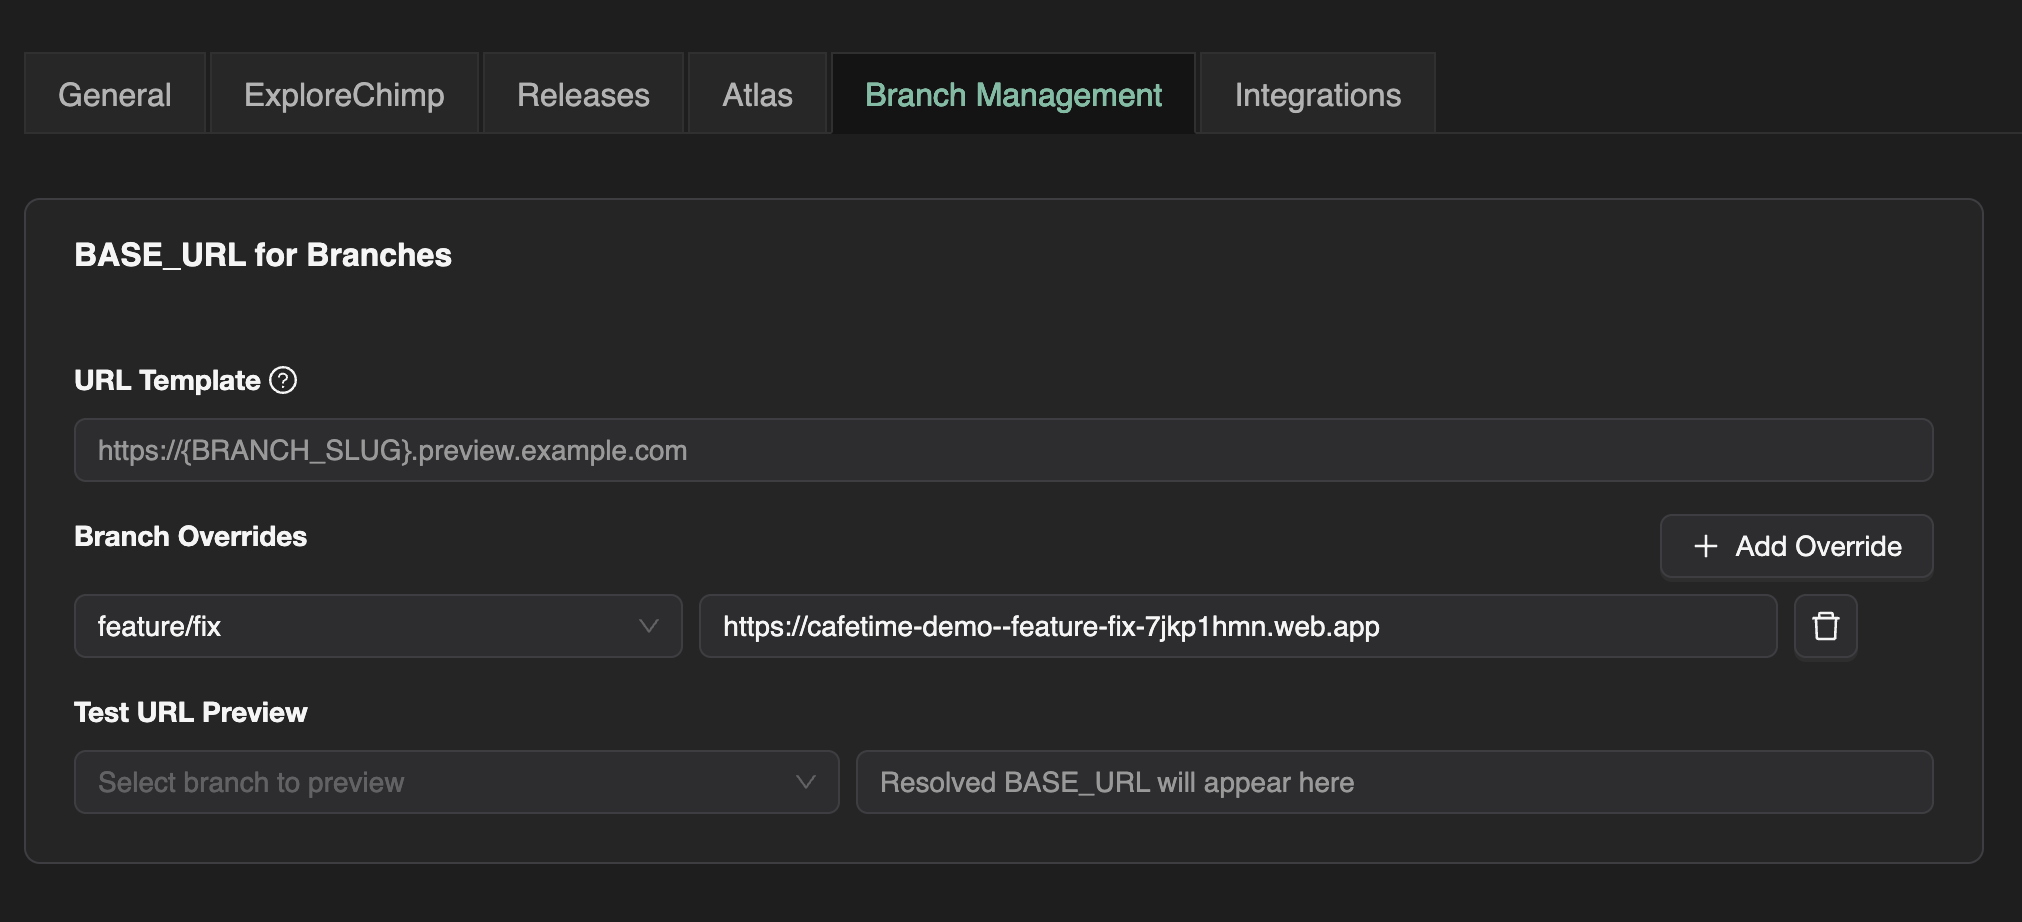
3. Execution scopes: compare apples to apples, on purpose
Agents should treat scopes as first-class inputs (see TrueCoverage workflow docs in your agent instructions). In practice:
- A base scope anchored on the environment that best reflects real users (often production) drives funnel-relative metrics: frequency, transitions, terminal behavior, session counts.
- A comparison scope (often QA or staging) answers what automation (or a specific branch/release) is doing in the same vocabulary.
automationEmitsOnly on comparison or child-tree scopes is how you ensure “covered” means test-tagged emits, not a manual tester clicking around on the same environment.
Getting this wrong is how teams accidentally overstate coverage. Getting it right is how agents earn trust from humans who offload QA.
TestChimp exposes TrueCoverage through APIs mirrored in MCP tools (for example list-rum-environments, get-truecoverage-events, get-truecoverage-event-details, get-truecoverage-child-event-tree, transition and time-series endpoints, metadata key discovery). The agent workflow is intentionally summary-first:
- List environments → pick stable tags for base vs comparison.
- Fetch event summaries → find high-impact titles with weak or absent coverage status vs the comparison scope.
- Drill into details → metadata distributions, example sessions, next-event trees.
- Translate gaps → SmartTests, fixtures, seed endpoints, or new emits if the product changed but telemetry did not.
Because payloads are aggregated—frequencies, histograms, coverage badges—agents can make informed plans without pulling raw session oceans into the context window.
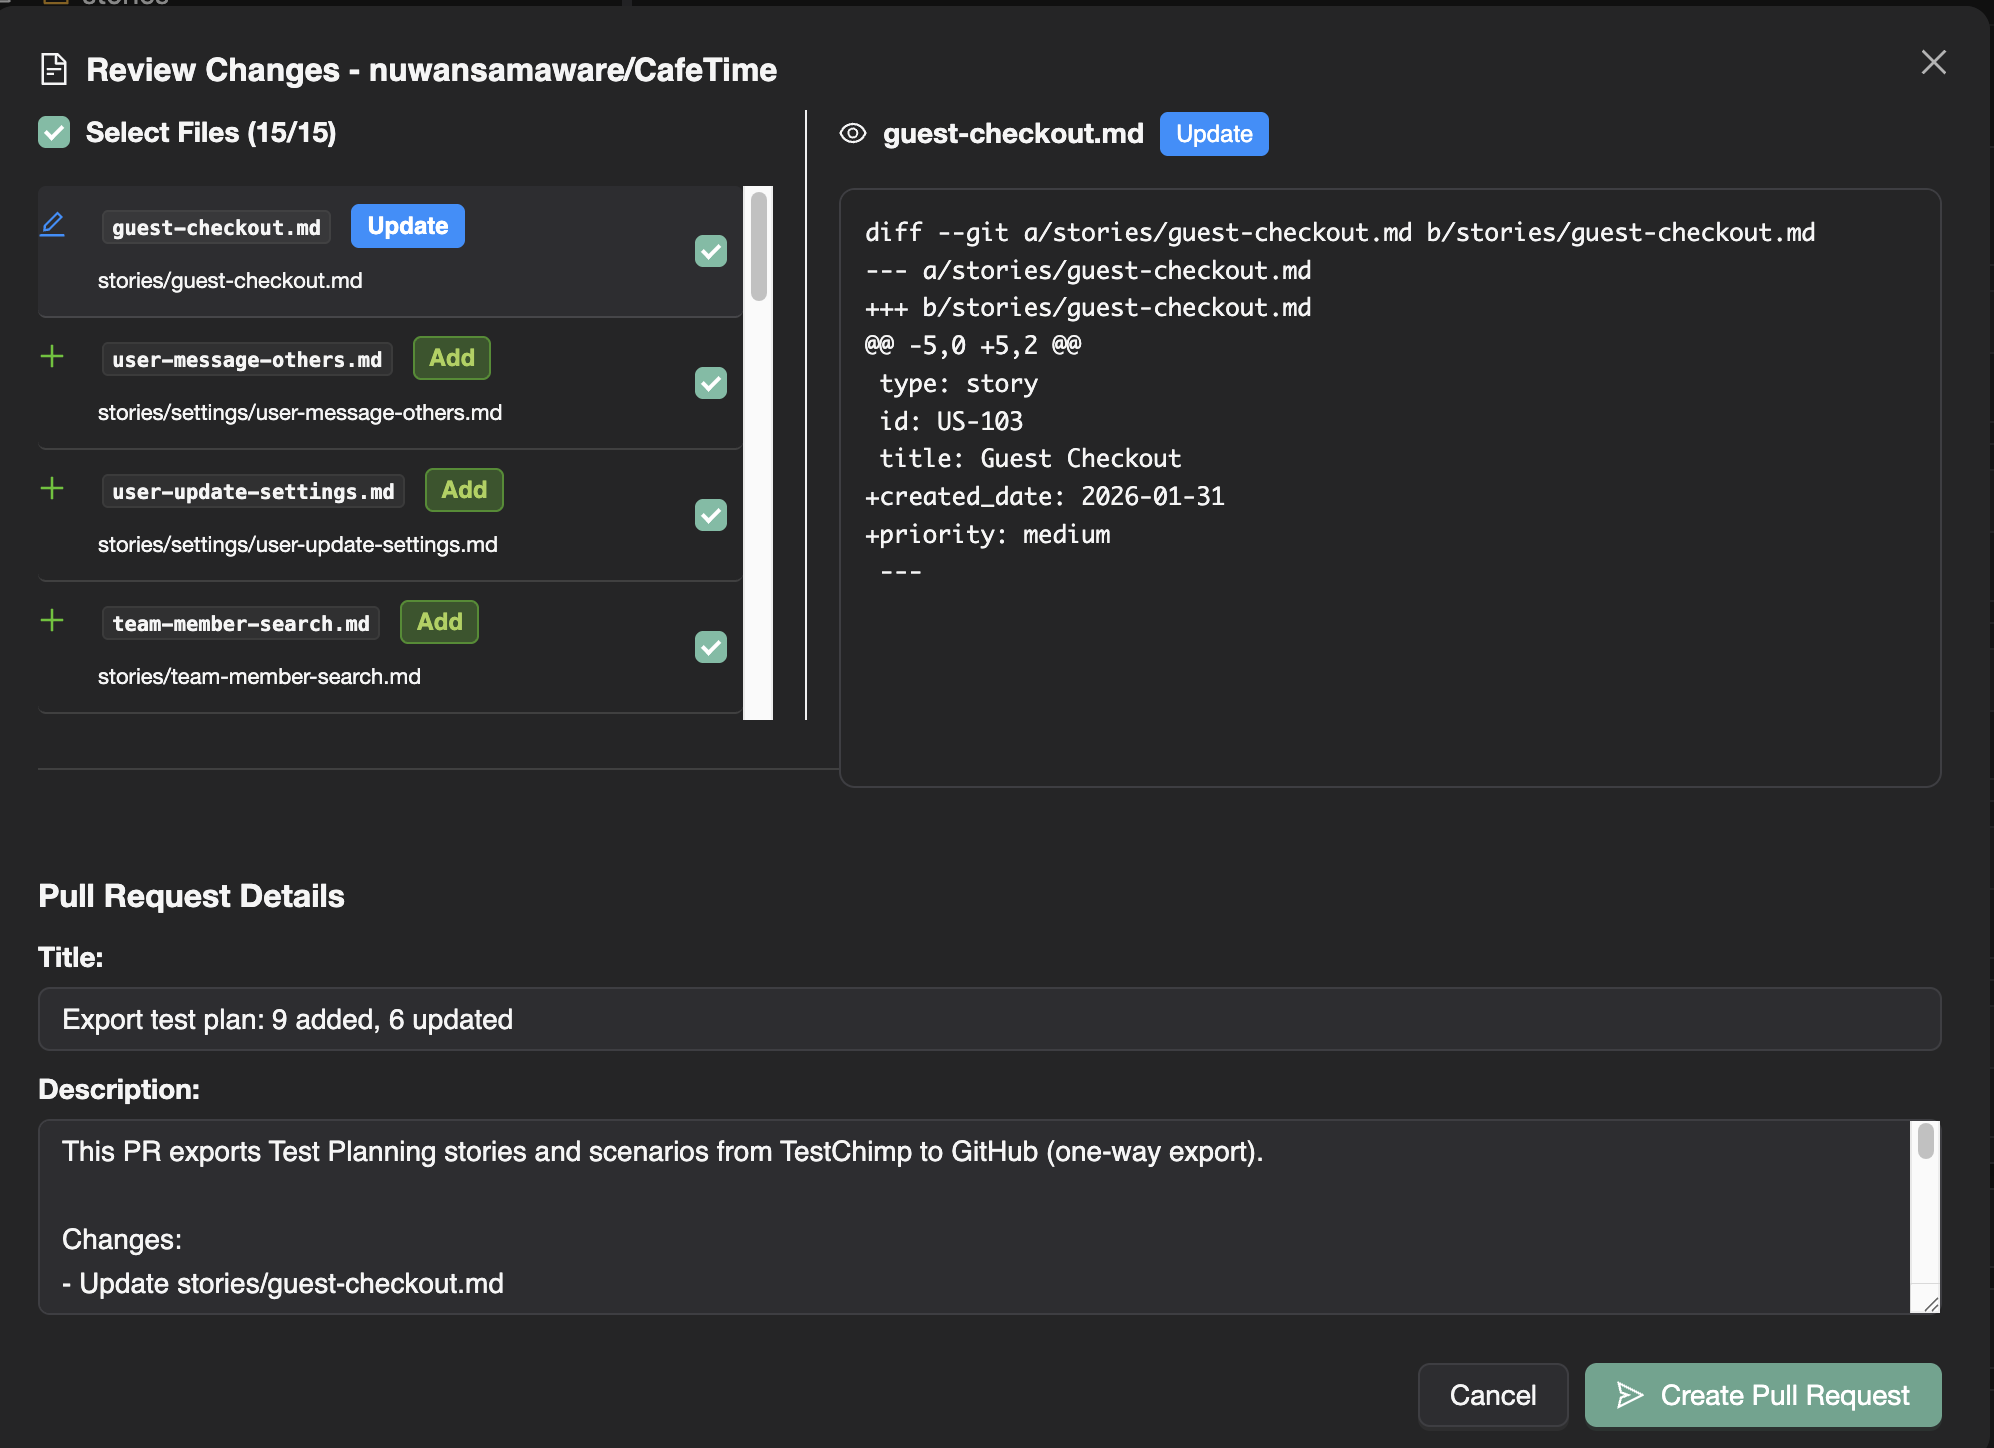
5. Closing the loop: from insight to repo changes to measurable improvement
The full agentic story looks like this in practice:
- Instrument with
rum-js using repo conventions (shared helper, env-based keys, documented events).
- Run Playwright suites with the reporter so emits carry test identity.
- Query TrueCoverage summaries after meaningful windows (release, marketing push, seasonal spike).
- Decide using 4Ds + transitions + metadata slices what to add or fix.
- Implement tests and fixtures; optionally evolve instrumentation when new risk-bearing branches appear in the UI.
- Re-query to confirm the comparison scope now hits the slices that production demanded.
That is autonomous QA with a compass: still bounded by human policy (privacy, release priorities, acceptable sampling), but no longer guessing whether the suite matches reality.
Who this is for
- Agents: treat TrueCoverage as your grounding layer—the bridge from “what humans wrote in tickets” to “what the world actually does.” Use it to prioritize fixtures, journeys, and instrumentation before you spend budget on breadth nobody needs.
- Humans offloading QA: ask for scopes, metadata discipline, and before/after dashboards—simple checks that the agent is optimizing production-aligned risk, not arbitrary line counts.
Accountable product and compliance choices still sit with people; TrueCoverage cheapens the cost of being well-informed—for agents reasoning over code and humans steering risk—which, in the agentic era, is the difference between automation that merely runs and automation that continuously earns the right to ship.
Further reading