5 posts tagged with "AI"

AI-assisted testing and experimentation

View All Tags

Who Checks the Tests Your AI Agent Wrote? The QA Loop and Verified Tests

· 19 min read
Nuwan Samarasekera
Founder & CEO, TestChimp

Last updated: 2026-09-30

TL;DR: When an AI agent writes the code and the tests, green proves little, because the agent is checking its own work. TestChimp runs the QA process as a feedback loop: it surfaces product risks and coverage gaps, agents work through them, and results flow back in. Governance signals (Verified Tests, TrueCoverage, semantic coverage and API contract coverage) show what is actually covered and who verified it. Meet-Bots and AgentWatch keep requirements current, so tests are written against up-to-date intent.

Why do agent-written green tests prove nothing?​

Because the agent grades its own work. If the model misreads a ticket, its tests misread it the same way, and the suite stays green while the product does the wrong thing. Practitioners describe this as the agent "marking its own homework".

Three failure modes show up once agents write both sides (they are described in the Verified Tests announcement):

Failure modeWhat goes wrong
Linked is not provenThe test is tagged to a scenario but never asserts the expected outcome
Happy-path impersonationA green run for a neighbouring flow is counted as coverage of the hard one
Unowned claimsCoverage says "covered", and nobody can say who looked at the script

Green is an execution fact. A scenario link is a mapping. Neither tells you that anyone checked whether the test verifies the behaviour. Before agents, "who wrote this test?" was a workable stand-in for "who checked it?". With agents writing tests at speed, that stand-in no longer holds.

The answer has three parts: a QA loop that keeps agents working on the real risks, governance signals that show what is covered and who verified it, and requirements that stay current so tests are aimed at the right target.

How does TestChimp run the QA loop?​

TestChimp is a QA workflow layer for agents. Per the docs, it orchestrates a tight feedback loop so coding agents such as Claude continuously understand product risk, coverage gaps and where users actually spend time, and then act on them. Humans stay in control of intent (what the product should do), and agents do the execution and upkeep against that intent.

In practice the loop looks like this:

  1. Plans live in your repo. Stories and scenarios are markdown files in a mapped plans/ folder. Plans and tests sync both ways between TestChimp and your repo, and changes arrive as pull requests or merge requests you review.
  2. Per PR, run QA. The /testchimp run QA workflow chains plan, environment, SmartTest and smoke steps, with optional exploratory and TrueCoverage steps, under one scope.
  3. In CI, results are reported back. The @testchimp/playwright plugin reports runs and traces to TestChimp and tags user events with test identity for TrueCoverage.
  4. On a cadence, upkeep. /testchimp upkeep closes coverage gaps found from requirements and TrueCoverage, explores high-signal paths and cleans up.

The web app (or TestChimp Studio on the desktop) is the control plane where the risk list is visible: uncovered scenarios, coverage gaps, bugs found by exploration and workflow executions. Details: What is TestChimp? and Upkeep.

Green run alone vs green run with governance signals​

Green run on its ownWith governance signals
What it tells youThe tests that exist passedWhich scenarios, API operations and user events are covered, and by which tests
What a coverage report countsTestsScenarios with linked tests, API operations and schema fields exercised, production events seen in test runs
Who looked at the testUnknownA Verified Tests badge shows who inspected it
Near-duplicate testsLook like extra coverageSurfaced by the semantic graph
GapsFound by accidentListed and actionable: uncovered scenarios, uncovered API operations, production events with no test coverage

The next sections cover each signal.

What is a Verified Test?​

A verified test in TestChimp is a SmartTest a project member has inspected and confirmed actually covers a linked scenario, not merely that it ran green or is annotated.

(A SmartTest is a standard Playwright test in your repo with scenario links added.) To verify one, a reviewer opens a test execution, looks at the screen captures and steps from the run, reads the test code with View Test, and then uses the check badge next to the test name. Status is stored in TestChimp, not in the Playwright source, so agents keep authoring tests while humans record that they inspected them.

The badge has three states on a test:

  • Hollow: none of the linked scenarios are verified.
  • Grey: some, but not all, linked scenarios are verified.
  • Blue: every linked scenario for that test is verified.

On coverage views, each scenario shows a filled badge when a covering test has been verified, a hollow badge when tests exist but nobody has inspected them, and no badge when there are no linked tests. Hovering a verified badge shows who verified it. Un-verifying is recorded as "manually unverified", so the audit trail stays.

Two honest details matter for governance:

  • Stale markers. A blue badge with a red "!" means the test was verified, but an agent later patched it. By default, when an agent reports a fix to an existing test, the badge goes stale until someone re-verifies it. This can be changed in project settings.
  • Inspection is deliberate. Clicking the coverage-side badge does not verify anything. It points you to the execution viewer, so verification stays an inspection action and not a bulk paint on a dashboard.

Details: Verified Tests and Link tests to scenarios.

What other signals show what is actually covered?​

Verified Tests answer "did a person check this test?". Three more signals answer "what is covered at all?":

  • API contract coverage (API schema coverage). Connect your OpenAPI specs from git, run SmartTests with API capture enabled, and TestChimp shows per-operation coverage plus request, query and response field and response-code coverage. Traffic that hits paths or fields the spec never declared is marked as undocumented. Each gap can become an issue, a create-tests prompt for your agent, or a deliberate ignore. See API contract governance.
  • TrueCoverage. The same user-event taxonomy is overlaid from production (via RUM SDKs) and from test runs, so you see which real user pathways have no test coverage, with metrics such as demand, duration, drop-off and depth. See TrueCoverage.
  • Semantic coverage. Stories, scenarios, SmartTests, issues and TrueCoverage events are placed in one embedding space in the Semantic Canvas, so you can see what is close in meaning, whether it has a linked test, and which tests are near-duplicates. See Semantic Canvas.

Together with requirement coverage (next sections), these show where coverage is real, where it is thin, and where it is duplicated.

How do requirements stay current? (Meet-Bots, AgentWatch)​

Tests can only be aimed at the right target if the requirements do not rot. Much of what a team knows is decided out loud or in chat, then never written down. Meet-Bots and AgentWatch keep the QA surface current from the two places those decisions now happen, so the tests agents write are written against up-to-date requirements:

  • Meet-Bots join Google Meet, Zoom, Microsoft Teams and Webex calls, transcribe once, and keep the meeting notes as tribal knowledge. After the call, the transcript can be handed to a workflow that drafts user stories and scenarios from what the team agreed. Team members can also @mention the bot for answers grounded in the stories, scenarios and test results. See Meet-Bots and Meetings, PII, and follow-ups.
  • AgentWatch (in TestChimp Studio) watches local coding-agent sessions such as Cursor and Claude Code, spots when business rules or UX expectations were decided in chat, and proposes story and scenario updates. You review and approve the proposed plan, the plans/ folder updates, and you raise a PR. See AgentWatch and Enable and configure AgentWatch.

Both mechanisms propose; people approve. Stories and scenarios are markdown files with frontmatter in your Git repo (see Requirement planning), and plans sync both ways between TestChimp and the repo, so every requirement change is a reviewable diff. The tests are then authored and maintained against those scenarios, for example by the create-tests workflow, which writes tests for requirements or API coverage gaps. See Author plans and Create tests.

How does traceability connect tests to scenarios?​

Traceability is code-native. A test declares which scenario it covers with a Playwright annotation on the test:

test('successful login', {
annotation: [{ type: 'scenario', description: '#TS-101' }],
}, async ({ page }) => {
// ...
});

TestChimp links the test to the scenario by its #TS-<n> ordinal and tracks execution results from CI runs (via the @testchimp/playwright reporter). One test can list several scenarios. In Test Planning, the Insights tab shows requirement coverage for any folder, filterable by environment, release and time range, including scenarios with no linked tests, scenarios with no recent executions, and failing scenarios. Renaming a scenario does not reset verification as long as its ordinal stays the same; linking a different scenario is a new claim and starts unverified.

Put together, the chain is: scenario (kept current) -> linked test -> execution -> human verification. Each link is visible, and the last one has a named person and a time.

Details: Requirement traceability and Traditional traceability vs TestChimp.

What should a team review before release?​

A short checklist that maps to what the platform shows:

  1. Uncovered scenarios. Any high-priority scenario with no linked test (Insights, Requirement Coverage, filtered to the release scope).
  2. Failing or unexecuted scenarios. Scenarios that have tests but no recent execution, or whose latest run is red.
  3. Hollow badges. Scenarios with tests that nobody has inspected. Decide which ones need a human look before this release.
  4. Stale badges. Tests verified earlier that an agent has since patched.
  5. API and user-behaviour gaps. Uncovered API operations or fields, and production events with no test coverage in TrueCoverage.
  6. Requirement drift. Pending AgentWatch plans or meeting follow-ups that have not been reviewed yet, so the scenarios may not reflect what was decided.
  7. Release evidence. The release view brings together test runs, requirement coverage, ExploreChimp findings and release checks; a gate can also be queried programmatically with an API key.

See Release management, Release intelligence and Programmatic release gating.

What does this not solve?​

  • Verification is a human sanity check, not a proof of correctness. A reviewer can still approve a weak test.
  • The loop assumes the scenarios are right. TestChimp helps keep them current and can score their quality (see Requirement quality governance), but a wrong requirement stays wrong until someone notices.
  • Capture depends on the team using the bots and enabling AgentWatch. Decisions made outside meetings and agent sessions are not seen.
  • Coverage signals depend on setup: API capture is off by default, and TrueCoverage needs the RUM SDK instrumented in your app.

Frequently asked questions​

How do I trust tests written by an AI agent?​

Do not rely on a green run alone. Look at what is actually covered (linked scenarios, API contract coverage, TrueCoverage, semantic coverage), and have a person inspect the run and the code and record that the test verifies the scenario.

Who should review AI-generated tests?​

A project member who can judge the requirement, such as a QA lead or the engineer who owns the feature. In TestChimp they open the test execution, inspect the screen captures, steps and code, and mark the test as verified.

Is a passing test the same as a verified test?​

No. A passing test is an execution fact, and a scenario link is a coverage claim, while a verified test has been inspected by a person who confirmed it covers the linked scenario.

What happens to the Verified badge when an agent edits the test later?​

By default the badge shows a stale marker when an agent reports a fix to the test, so someone can re-verify it. Teams can change this in project settings.

What does TestChimp do beyond verifying tests?​

It runs the QA loop: it orchestrates a feedback loop so agents keep seeing product risk and coverage gaps and act on them, while people own intent. Meet-Bots and AgentWatch keep requirements current, so tests are written against up-to-date requirements.

What coverage signals does TestChimp show for AI-written tests?​

Requirement coverage by folder, environment, release and time range; API contract coverage for OpenAPI operations and fields; TrueCoverage for production user events versus test runs; and semantic coverage through the Semantic Canvas. Verified Tests adds who inspected each test.

How to Find Duplicate Tests in a Playwright Suite (Semantic Graph for Agentic QA)

· 10 min read
Nuwan Samarasekera
Founder & CEO, TestChimp

TL;DR: When coding agents can write dozens of Playwright tests in a single session, the bottleneck shifts from authoring to governance: are the new tests distinct and useful, or just near-duplicates of what you already have? Semantic Graph is a free, open-source CLI that scans your suite, embeds each test semantically, clusters related tests, and renders an interactive graph so you—and your agent—can spot redundancy before it compounds.

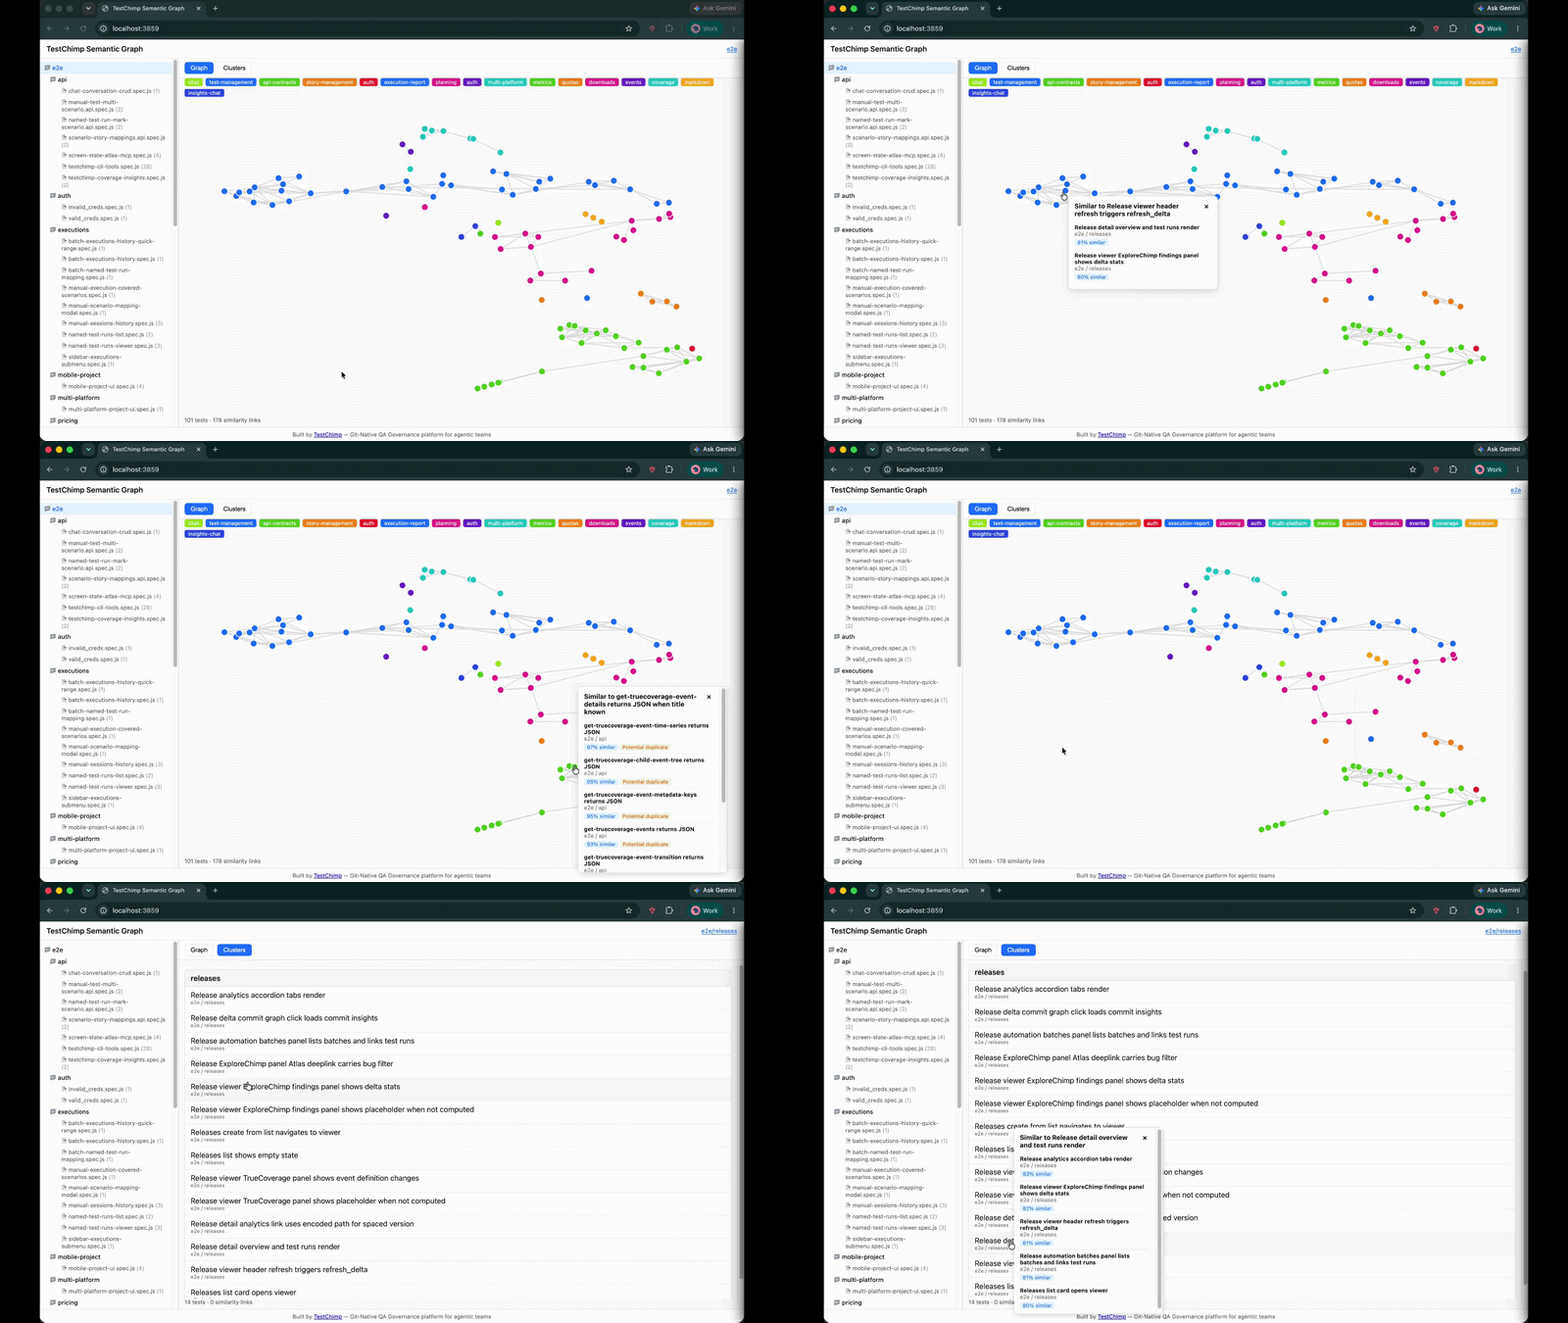
Semantic Graph visualization — folder tree, 2D similarity graph, and cluster list view


The new problem: agents author tests en masse​

For most of the last decade, the hard part of E2E testing was throughput: humans could not write and maintain enough tests to keep up with product velocity.

That constraint is collapsing. With Claude Code, Cursor, and agent skills like the TestChimp skill, a single prompt can produce a folder of well-formed Playwright specs in minutes. Coverage gaps that used to take a sprint to close can shrink to an afternoon.

The bottleneck has moved.

EraPrimary constraintWhat "good" looked like
Manual QAAuthoring speedEnough tests to cover the happy path
Human + low-code toolsUI-layer setup frictionStable POMs, fewer flakes
Agentic QASuite quality at scaleDistinct, high-signal tests—not copies

When an agent is rewarded for adding tests—closing coverage gaps, responding to PR feedback, or filling in scenarios from a test plan—it has no innate sense of "this already exists, slightly reworded." Left unchecked, suites balloon with:

  • Duplicate tests that assert the same behaviour under different titles
  • Near-duplicates that differ only in fixture data or selector phrasing
  • Clustered redundancy where five tests all exercise the same checkout edge case
  • Invisible overlap across folders, because no human (and no agent) holds the entire suite in working memory

This is the QA equivalent of boiling the lake in the wrong direction: lots of heat, little new coverage. Worse, duplicate tests inflate CI time, confuse failure triage, and give a false sense of depth—your line count grows while your behavioural breadth stalls.

The question is no longer "Can we write more tests?" It is:

"Are we writing useful, distinct tests—or just duplicative ones?"

That question needs a semantic answer, not a filename diff.


What is Semantic Graph?​

Semantic Graph is an open-source tool from TestChimp that maps your Playwright test suite by meaning, not syntax.

It is published as @testchimp/semantic-graph on npm and lives in the TestChimp/semantic-graph repository. Run one command against your tests directory; the CLI:

  1. Scans *.spec.ts, *.test.ts, and related Playwright files
  2. Parses each test's suite path, title, intent comments, scenario annotations, and body
  3. Embeds the canonical test text with an embedding model (OpenAI or Voyage AI)
  4. Clusters tests by semantic similarity using DBSCAN
  5. Lays out a 2D graph with UMAP so similar tests appear close together
  6. Names clusters with a lightweight LLM pass (e.g. "auth", "checkout", "api-contracts")
  7. Serves a local interactive UI at http://localhost:3859

No database. No TestChimp account required. Embeddings are computed in memory each run—ideal for local audits, pre-merge reviews, or giving an agent a structural view of the suite before it authors more tests.


How it works (the pipeline)​

Understanding the pipeline helps you interpret the graph—and tune how agents use it.

1. Parse tests into embedding-ready text​

The core library (@testchimp/semantic-graph-core) includes a vendored Playwright-aware parser. For each test it builds canonical text:

Suite: checkout > guest flow
Test: rejects expired coupon at payment step
Body:
Scenario: Guest checkout with invalid coupon
// intent: verify error copy and no charge created
await page.goto('/checkout');
...

Parsing captures intent comments and scenario annotations—the same metadata agents should be authoring anyway when following requirement traceability conventions. Two tests with different selectors but the same intent will land close together in embedding space.

2. Embed with cosine similarity​

Each test's text is sent to an embedding API in batches (default model: text-embedding-3-small for OpenAI, voyage-4 for Voyage). The tool computes cosine similarity between vectors and applies configurable thresholds:

SignalDefault thresholdMeaning
Graph edge≥ 0.75Tests are semantically related
Similar≥ 0.80Worth reviewing together
Potential duplicate≥ 0.92Strong dedup candidate

These thresholds mirror how humans judge redundancy: not byte-identical, but "would a failure in one make the other pointless?"

3. Cluster with DBSCAN​

Similar embeddings are grouped with DBSCAN density clustering—no need to pick k clusters upfront. Each cluster gets an LLM-generated label (e.g. "settings-page", "admin-tasks") so the legend is readable at a glance.

4. Visualize with UMAP + D3​

A seeded UMAP projection maps high-dimensional embeddings to 2D coordinates. The bundled UI (built with D3.js) renders:

  • Graph view — nodes as tests, edges as similarity links; click a node to see nearest neighbours and duplicate flags
  • Clusters view — grouped list with colour-coded legend
  • Folder tree — scope the graph to a directory or single file

Zoom into tests/checkout/ before a refactor. Scan the whole suite before a release. Hand the URL to an agent and ask it to propose merges.


Why this matters for agentic QA workflows​

Semantic Graph is not a replacement for TrueCoverage—production-informed prioritization—or requirement traceability. It solves a orthogonal problem: intra-suite redundancy.

Here is where it fits in a modern agent loop:

Before the agent writes​

Run Semantic Graph and attach the cluster summary to the agent's context. Instructions become concrete:

"We already have four tests in the checkout cluster covering coupon validation. Do not add another unless you are testing a different failure mode."

This is cheaper and more reliable than asking the agent to grep test titles.

After the agent writes​

Re-run the graph on the PR branch. New nodes that snap onto existing clusters—or spike duplicate scores above 0.92—are review flags. Pair with CI the same way you gate on lint or coverage deltas.

During suite health reviews​

Quarterly "suite diet" sessions used to mean spreadsheets and gut feel. Now: filter to clusters with high internal similarity, merge or delete, and measure CI time recovered.

Complement to production signals​

TrueCoverage tells you what behaviours users need tested. Semantic Graph tells you whether your existing tests are saying the same thing twice. Both are necessary for a suite that is broad and lean.


What you see in the UI​

The demo above shows the full workflow:

  1. Left panel — folder tree mirroring your repo layout; click a folder or file to scope the view
  2. Graph mode — force-directed layout; proximate nodes are semantically alike
  3. Clusters mode — tests bucketed with named themes
  4. Popover — click any test to see top similar neighbours, similarity scores, and potential duplicate badges

The UI ships inside the npm package—no separate install. It is the same "freebie" static app published as @testchimp/semantic-graph-viz in the monorepo for anyone who wants to embed or fork it.


Try it yourself​

Prerequisites​

  • Node.js 18+
  • An API key for embeddings (and cluster naming):
    • OpenAI — one key covers embeddings + LLM, or
    • Anthropic + Voyage — Claude for cluster labels, Voyage for embeddings (Anthropic does not ship an embedding API)

Quick start (OpenAI)​

export PROVIDER=openai
export API_KEY=sk-...

npx @testchimp/semantic-graph visualize --tests-dir ./tests

Open the printed URL (default port 3859). Add --verbose for embedding progress and diagnostics.

Claude + Voyage​

export PROVIDER=anthropic
export API_KEY=sk-ant-...
export VOYAGE_API_KEY=pa-...

npx @testchimp/semantic-graph visualize --tests-dir ./tests

All options​

FlagDescription
--tests-dir <path>Root folder to scan (required)
--port <n>Listen port (default 3859)
--verbose / -vDiagnostics to stderr

See the README for environment variables, monorepo build instructions, and npm publish details.


Continuous governance with TestChimp​

Semantic Graph is deliberately local and standalone—a flashlight you can shine on any Playwright repo, TestChimp customer or not.

For continuous duplicate detection, requirement traceability, release confidence, and keeping suites healthy as agents keep authoring, see TestChimp—the git-native QA governance platform built for agentic teams. Install the TestChimp Agent Skill and run /testchimp test after each PR to orchestrate coverage, exploration, and plan alignment in one loop.


FAQ​

What test file types are supported?​

The scanner picks up *.spec.ts, *.spec.js, *.test.ts, *.test.js, and .mjs / .cjs variants under your chosen root—standard Playwright test layouts.

Does it require a TestChimp account?​

No. Semantic Graph runs entirely locally. You only need embedding (and optionally LLM) API keys.

How is this different from code coverage?​

Code coverage measures which lines executed. Semantic Graph measures whether test intentions overlap. A suite can have high line coverage and still be full of redundant scenarios.

How is this different from duplicate detection by test name?​

Titles lie. Agents especially love paraphrasing: "should reject invalid coupon" vs "guest user sees error for expired promo code." Embeddings capture the full body and intent, not the string on line one.

Can I use it in CI?​

Today the primary interface is the local visualize command and JSON APIs (/api/graph, /api/similar). For CI gates, parse the API responses or run before review and archive the graph output. Continuous server-side governance is on the TestChimp platform roadmap.

What embedding models are supported?​

Defaults: text-embedding-3-small (OpenAI) and voyage-4 (Voyage). Override with EMBEDDING_MODEL. LLM cluster naming defaults to gpt-5-nano or claude-3-5-haiku-latest.

Is the source code open?​

Yes. MIT-licensed monorepo: github.com/TestChimp/semantic-graph. Packages: @testchimp/semantic-graph-core, @testchimp/semantic-graph, @testchimp/semantic-graph-viz.


Summary​

Agentic QA solved test authoring at scale. The next discipline is test distinctness at scale—ensuring every new spec adds behavioural breadth, not noise.

Semantic Graph gives you a semantic map of your Playwright suite: embeddings for meaning, DBSCAN for clusters, UMAP for intuition, and a local UI for humans and agents alike. Run it before you merge agent-authored tests. Run it when CI gets slow. Run it when you suspect the lake is boiling but not reducing risk.

Get started: github.com/TestChimp/semantic-graph · npx @testchimp/semantic-graph visualize


References and further reading​

SKILLs are becoming SaaS’s best distribution hack (here’s why)

· 3 min read
Nuwan Samarasekera
Founder & CEO, TestChimp

For years, the hardest part of selling a complex technical product was not the demo—it was the learning curve. Buyers had to internalize workflows, edge cases, and “the right way” to use each feature before they could reliably get value.

That is changing fast. Agent Skills—portable folders of instructions, checklists, and resources that teach an AI agent how to work with your product—are starting to look like one of the most attractive distribution mechanisms for technical SaaS. Instead of hoping every customer reads the docs in the right order, you ship a repeatable operating procedure the agent can follow on demand.

A skill turns every “new user” into a “power user”​

A well-designed Agent Skill effectively turns every user into a power user: one that knows which workflows to follow, how to use the product correctly, and how to extract maximum value from every feature.

That compresses time-to-value—the path to the “aha moment”—because the agent is not improvising from vague prompts; it is executing your intended playbook.

What we are seeing at TestChimp​

We have been seeing this firsthand since launching the TestChimp Agent Skill.

For teams, the workflow is intentionally simple:

  1. Author a few user stories (or import from Jira).
  2. Install the TestChimp skill on your coding agent.
  3. After each PR, simply say /testchimp test.

The skill teaches Claude how to coordinate with TestChimp to:

  • instrument the app for TrueCoverage,
  • fetch and interpret coverage gaps,
  • write tests that addresses the gaps and link them to scenarios correctly,
  • run targeted exploratory testing to catch UX issues,
  • and use AI-native test steps in tests where they help.

The upgrade loop: your perfect user ships with your product​

The best part is what happens when you ship new features.

With a properly designed, self-updating TestChimp Agent Skill, your "user" continuously learns your latest workflows, capabilities, and best practices—and applies them the way you intended. Your agent-side “instruction manual” can move as fast as your product, without requiring every human user to re-read release notes and learn every new capability you ship.

If you are building technical SaaS in the agent era, the product surface area is no longer only your UI and APIs. It is also the skill: the packaged expertise that turns your users in to power users.


References and further reading​

Authoritative guides and registries for Agent Skills (format, discovery, and ecosystem):

Boiling the lake - QA style

· 3 min read
Nuwan Samarasekera
Founder & CEO, TestChimp

Boil the lake - credits: https://garryslist.org/posts/boil-the-ocean

Garry Tan recently introduced a simple but powerful idea: The old adage “don’t boil the ocean” is bad advice in the AI agent era. Well - at the very least, “lakes” are now very much “boilable”.

The core insight is: AI compresses certain work by orders of magnitude. That doesn’t just make things faster - it fundamentally changes what’s feasible.

Most people ask the wrong question:

“What existing human workflows can we speed up with AI?”

That’s incremental thinking. The real leverage comes from asking:

“What powerful workflows did we avoid entirely because they were too expensive to do with humans?”

Those are your “lakes”. And with AI, many of them go from infeasible → trivial.


The QA lake​

In QA - making “test authoring faster” is akin to the former. The bigger ROI lies in the granular workflows that get unlocked now that agents can take autonomy in your test automation.

The Big Idea:

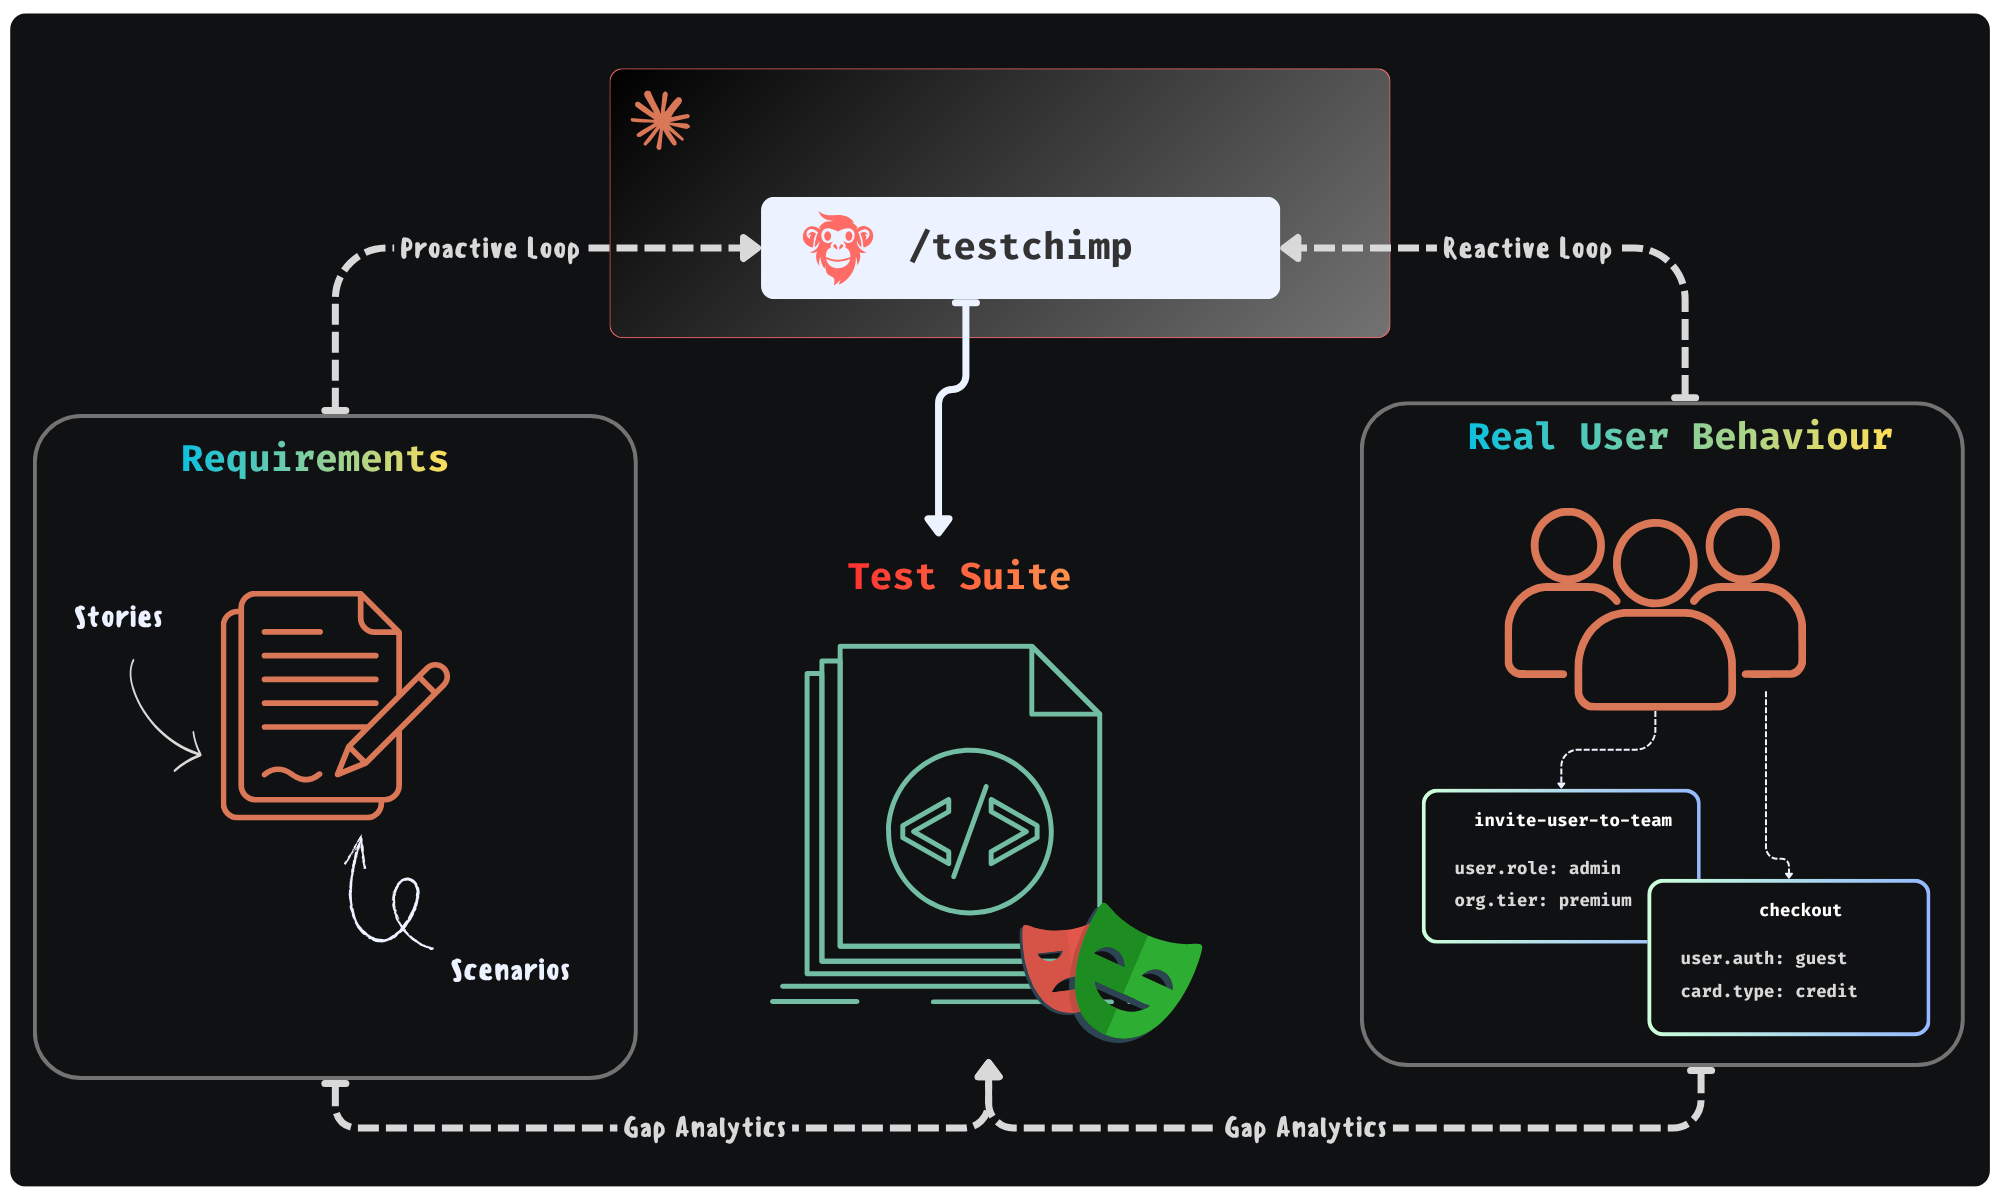
Could agents execute a workflow - where they continuously monitor “planned reality” (user stories / scenarios) and “production reality” (real user behaviour patterns) to improve the “tested reality” (test suite + test infra) - in a continuous feedback loop. All of it done in the background - looping you in for approval of plans it makes.

Feedback Loop enabled by TestChimp

This is exactly the future we were building TestChimp for - where agents participate in each phase of QA; where agents access real world insights / plan artifacts to self-direct its work strategically.


Claude + TestChimp​

Today, we are adding the final piece of the puzzle: A SKILL that you can install on Claude / Cursor that enables just that.

  • In TestChimp, test plans are already maintained as Markdowns in repo - directly accessible to agents.
  • Requirements are linked to tests via in-code comments - that Agents can author.
  • Test executions are auto-tracked by our Playwright plugin
  • Event ingests are tracked across prod and test - to generate TrueCoverage insights.

The Skill “upskills” Claude to read those insights via our CLI / MCP, to plan and execute the entire QA workflow:

  • Understand coverage gaps, prioritize (using signals exposed by TestChimp) and plan
  • Author fixtures that emulate real-world situations observed
  • Update test infrastructure (seed / probe endpoints) as needed
  • Author tests - (provisioning PR-local envs to test in and validating tests work)
  • Update instrumentations to learn about real user behaviour (for future cycles - covering new user journeys introduced)

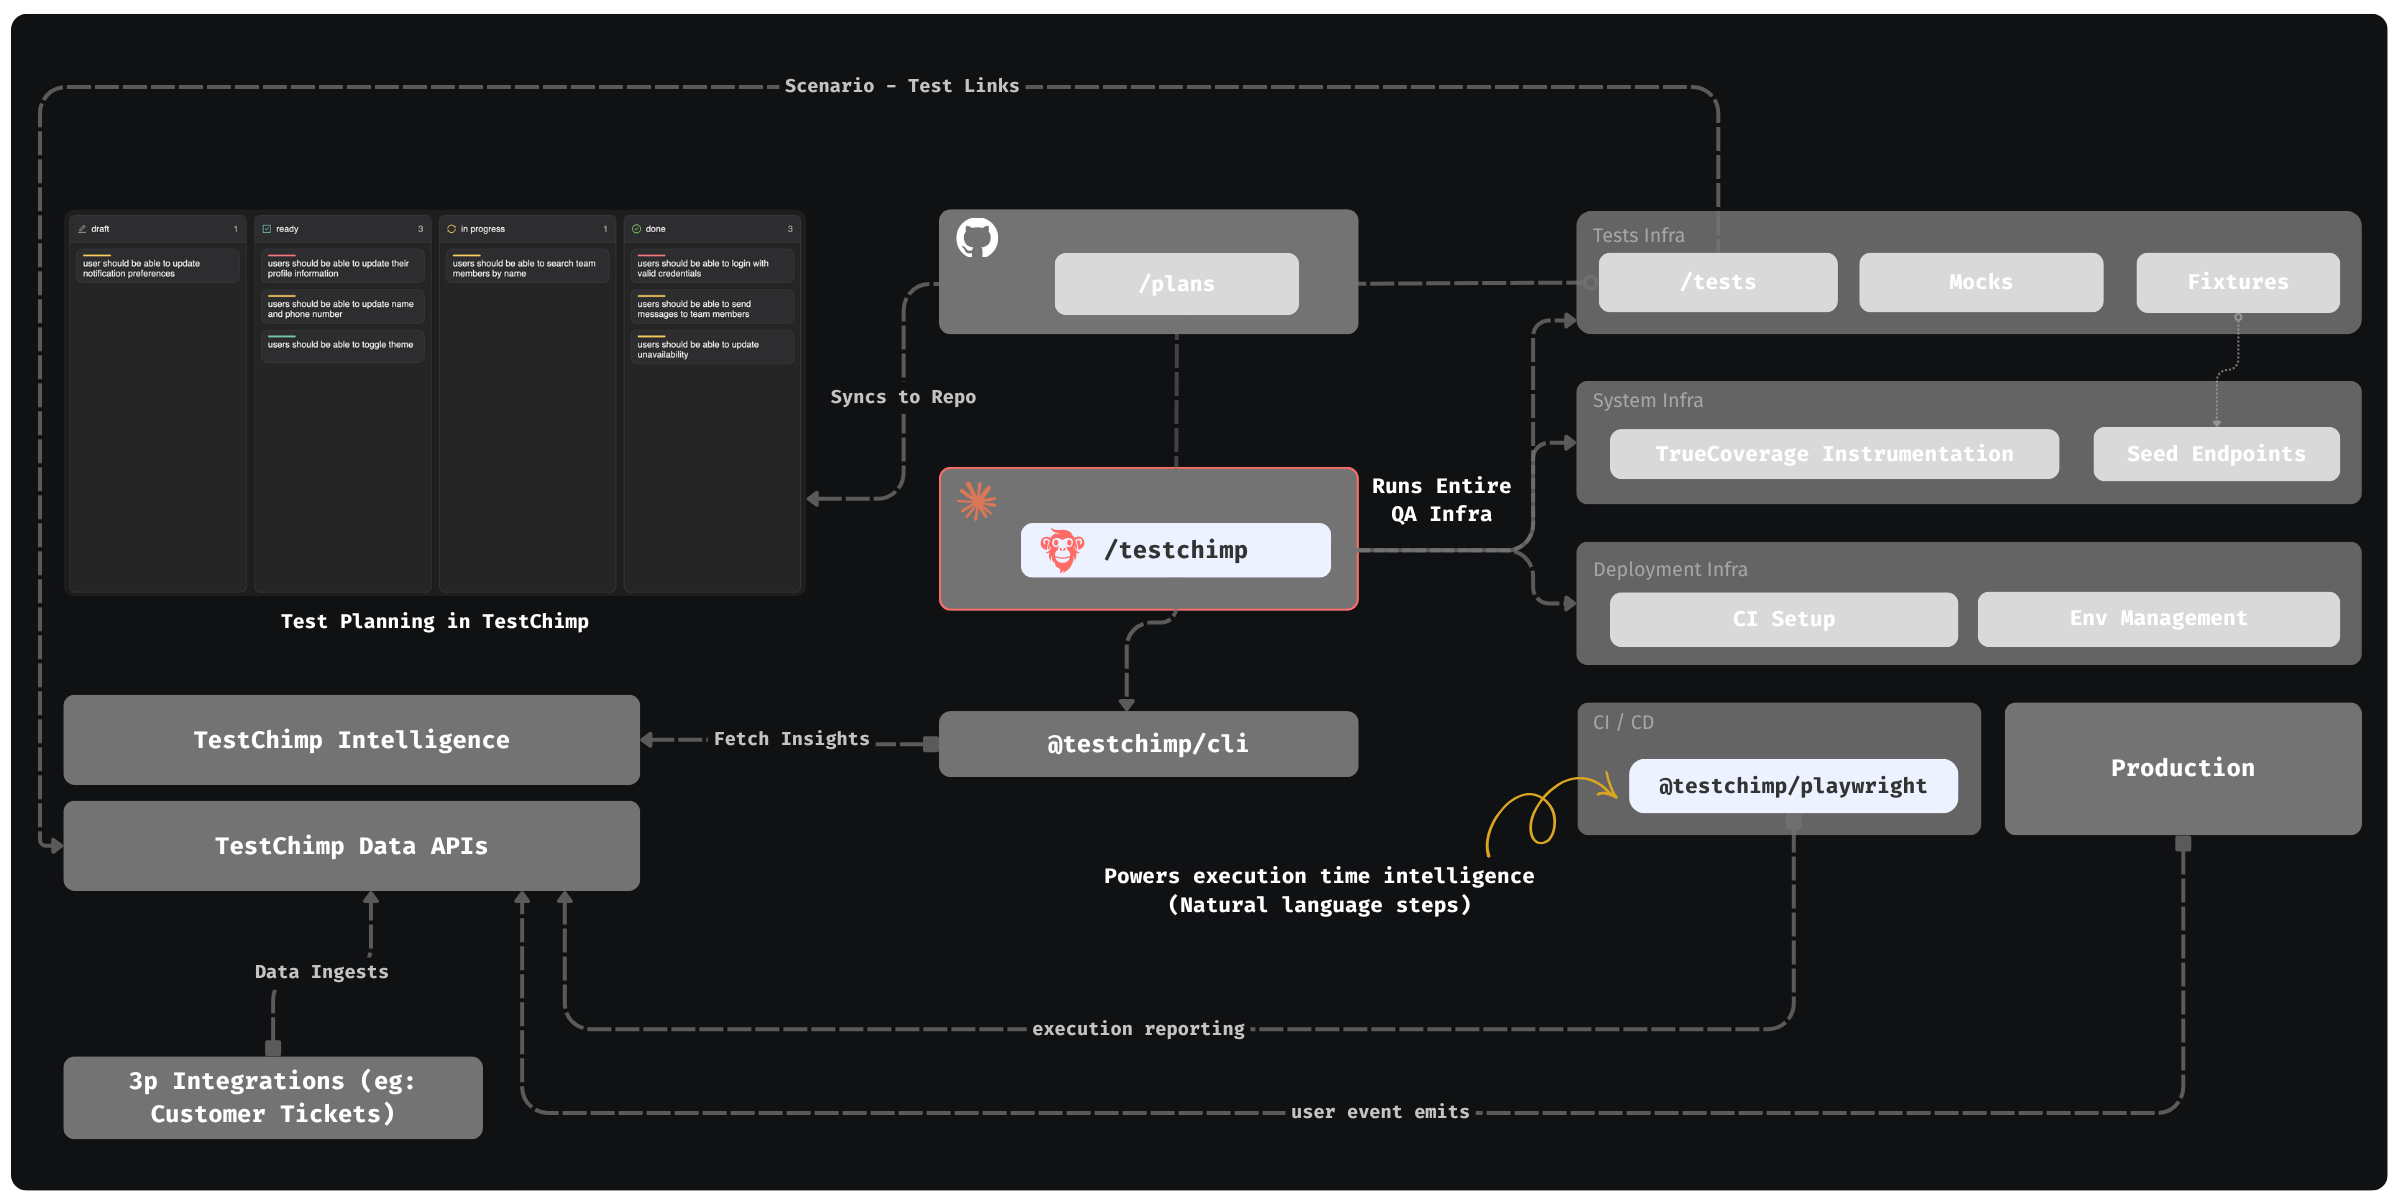
QA workflow orchestrated by TestChimp - Overview


The best part: All of this is condensed to just 2 commands - enabling a frictionless DevX:

  • /testchimp test -> (Run after each PR) Updates plans, authors seeds / fixtures, author tests, validate them in PR scoped isolated environments, instrument code for TrueCoverage

  • /testchimp evolve -> (Run periodically / on deploy) Audits test coverage aligned with requirements and real-user insights, to “evolve” your QA infra & test suite to cover critical under-tested areas and do corrective actions & run targeted exploratory runs.


Claude can write tests. With the right feedback loop, it can fully manage an effective, self-evolving QA posture that de-risks your product continuously. This is what TestChimp enables, by making each phase of QA agent-native, informed by requirements and real user behaviour insights, in a tight feedback loop.

ai-wright: AI Steps in Playwright Scripts

· 3 min read
Nuwan Samarasekera
Founder & CEO, TestChimp

Bring AI-native actions and verifications into your Playwright tests – open source, vision-enabled, and BYOL.

The Problem​

Most “AI testing” frameworks make you throw away what already works.

They replace your entire test suite with “agentic” systems — where an LLM drives every click, assertion, and navigation step.

Sounds cool… until you hit:

  • Slow, flaky, or non-deterministic runs
  • Proprietary test formats
  • Complete vendor lock-in

For most teams, that’s a non-starter.

What if you could keep your existing Playwright scripts, and just inject AI where it’s actually needed – the ambiguous, messy, or dynamic parts of your app?

The Idea​

ai-wright brings AI steps to Playwright.

You still write regular Playwright tests – deterministic, fast, inspectable – but when you hit a fuzzy point, you can drop in a step like:

await ai.act('Click on a top rated campaign', { page, test });

Or

await ai.verify('The campaign description should not contain offensive words"', { page, test });

That’s it. AI only handles that step.

Everything else stays Playwright-native.

Why It’s Different​

  1. Vision-Enabled Existing libraries (like ZeroStep and auto-playwright) use sanitized HTML – which misses what’s actually on screen.

This causes many issues:

  1. HTML ≠ UI reality – static DOM can’t reveal if elements are disabled, visible, obscured, or off-screen – resulting in LLMs attempting interaction with non-interactive elements.
  2. Loss of semantics – sanitized HTML strips ARIA roles, computed text, layout cues, and shadow DOM content, which are critical for accurate reasoning.
  3. Unbounded prompt size – large DOMs can often get too verbose, requiring truncation (resulting in loss of context).
  4. Fragile selectors – HTML-based approaches force LLMs to guess selectors; ai-wright uses precise SoM IDs bound to live DOM nodes, enabling accurate one-shot execution.
  5. ai-wright is vision-enabled: it blends SOM (Set-Of-Marks) annotated screenshots + structured DOM context for grounded, visual reasoning.

The result: AI that operates just like a normal user would – based on what it sees on the screen.

  1. Better Reasoning

Instead of one-shot “guess the next click”, ai-wright uses a multi-step reasoning loop.

It plans ahead, performs coarse-grained objective handling (e.g., “fill out login form,” not just “click button”), and adapts to UI state changes – minimizing retries and random flailing.

It can identify blockers (such as Modals etc.), and execute pre-steps before actioning on the objective.

  1. BYOL (Bring Your Own License)

ai-wright is LLM-agnostic – unlike existing solutions which require either proprietary licenses or supports specific providers only.

You can use your own OpenAI, Claude, Gemini key, or your self-hosted model – avoiding vendor lock-in.

You can choose to use your TestChimp license as well – which will proxy the LLM calls, removing separate token costs for you.

  1. Fully Open Source

Unlike agentic SaaS offerings which are closed source, proprietary solutions, ai-wright is fully open source, giving you complete transparency and community support.

ai-wright lets you inject AI where it matters — the tricky, ambiguous, or dynamic parts of your app — without giving up the speed, determinism, and maintainability of Playwright.

With vision-enabled reasoning, resilient multi-step planning, LLM flexibility, and a fully open source foundation, ai-wright bridges the best of both worlds: reliable, scriptable tests and AI-powered intelligence where you need it most – without any vendor lock-in.

AI where it helps, plain Playwright everywhere else.