25 posts tagged with "Testing"

Modern testing strategies and tooling

View All Tags

API Contract Governance: Cover What Your Spec Promises

· 6 min read
Nuwan Samarasekera
Founder & CEO, TestChimp

TL;DR: We’ve shipped API contract governance in TestChimp. Point us at your OpenAPI roots, opt in to API payload capture on SmartTest runs, and the APIs surface shows which operations—and which request/response fields and status codes—your automation actually exercised. Uncovered holes become Create issue, Create test, or Ignore gap—accountable work, not a spreadsheet of “we should cover that someday.”


The contract nobody audits​

Your OpenAPI (or Swagger) file is not documentation fluff. It is the business contract of the product: methods, paths, request shapes, response codes, and fields clients depend on.

UI E2E already touches that contract. Checkout hits POST /orders. Declined payment hits POST /payments. A rare enum or a 422 body? Often never.

Without a contract lens, teams hit the same failure modes:

Failure modeWhat goes wrong
Happy-path blind spotsGreen UI suites; error enums, optional filters, and rare response codes never run
Spec driftTraffic hits paths or fields the OpenAPI root never declared
Silent API debt“We have E2E”—whole services still have zero covering tests
Unowned gapsSomeone notices a hole; nothing is filed, authored, or consciously deferred

API contract governance is not a separate API-testing product. It is the audit and triage layer that turns traffic your SmartTests already generate into accountable coverage of the contract.

Full product guide: API Contract Governance.


How it works​

Three inputs. One surface.

  1. Discover the contract — Configure OpenAPI root path(s) from your connected repo (APIs → Configure). TestChimp parses them into services and operations.
  2. Observe traffic — Run SmartTests with TESTCHIMP_ENABLE_API_CAPTURE=1 (and @testchimp/playwright ≥ 0.2.17). Matching HTTP interactions upload with the batch; coverage denorm runs after—not on the hot ingest path.
  3. Govern gaps — List view for the portfolio; detail view for schema fields and response codes. From any hole: file an issue, copy an agent prompt to create/update tests, or ignore the gap when it is intentional.

Capture is off by default so ordinary runs stay light. Opt in when you want Operations coverage—same pattern as other optional runtime features. Setup detail: Set up API contract governance and the runtime plugin.


From endpoint scores to schema fields​

The APIs list is the portfolio view: service picker, coverage-band summary, method/path, spec-defined vs observed-only, coverage score, latency, covering-test chips.

Click a row and you get the interesting part—field-level truth:
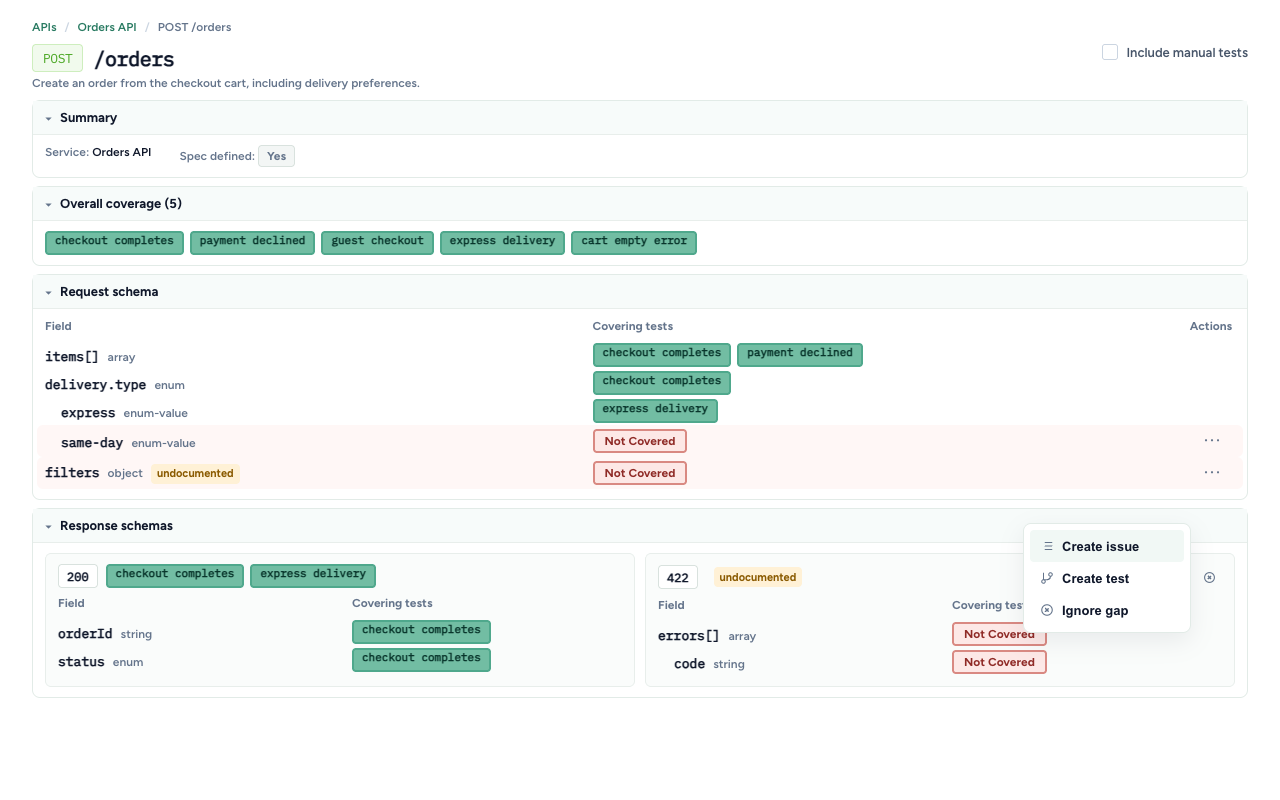
API operation detail with request schema tree, undocumented fields, and Create issue / Create test / Ignore gap

  • Request schema and query parameters with covering tests per field
  • Response schemas nested by status code
  • undocumented tags when traffic (or denorm) sees a field or code the OpenAPI root never declared
  • Empty covering tests when the contract exists but automation never exercised it

That is the difference between “we hit /orders” and “we never sent delivery.type = same-day, and nobody owns that hole.”

List and detail walkthroughs: Operations list · Operation detail.


Governance that sticks: issue, test, or ignore​

Coverage without triage is another dashboard nobody opens.

Wherever coverage is missing—operation, field, or response code—TestChimp offers the same decision set:

ActionWhen to use
Create issueTrack the gap as work—pre-filled title/description with method, path, operation id, and field or response code
Create testCopy an agent prompt scoped for /testchimp create tests—agents may update existing UI or API specs, not only invent a dedicated api/ folder
Ignore gapAcknowledge intentional out-of-scope or deprecated surface without filing or authoring

Agents already understand operation-id / field / response-code scopes. The UI just stops the gap from living only in someone’s head.


How this fits the rest of TestChimp​

If you’ve followed us:

  • Requirement quality governance hardens the plan contract before agents spend tokens
  • Release governance hardens the ship decision for a version
  • API contract governance hardens what your automation proved against the HTTP contract—the surface clients and integrations actually depend on

SmartTests remain the traffic source. Issues remain the backlog. Create-tests remains the authoring path. The APIs page is where contract debt becomes visible and governable—next to TrueCoverage for behaviour-aligned RUM, not instead of it.

Planned reality → tested reality → production reality. The API surface was the missing middle for teams whose “coverage” stopped at green UI journeys.


Frequently asked questions​

What is API contract governance in TestChimp?​

API contract governance maps OpenAPI operations to real and mocked SmartTest traffic so you can see endpoint and schema-field coverage, then triage gaps with create issue, create test, or ignore gap.

Do I need dedicated API tests?​

No. Coverage is inferred from HTTP traffic your SmartTests already generate when capture is enabled. You can still author dedicated API specs; the governance surface tracks both.

Why is my coverage empty after configuring OpenAPI?​

Parsing the spec discovers operations. Scores and covering tests need runs with TESTCHIMP_ENABLE_API_CAPTURE=1. Capture is off by default on purpose.

What does Ignore gap do?​

It marks an uncovered operation, field, or response code as intentionally ungoverned for now—without creating an issue or a test—so teams can acknowledge debt without false urgency.

Spec defined No vs undocumented—what’s the difference?​

Spec defined No on an operation means the whole method/path is missing from the OpenAPI root (observed in traffic only). An undocumented tag on a field or response code means that leaf was seen but not declared—classic contract drift.


Try it​

  1. Connect git and open APIs → Configure — select your OpenAPI root file(s)
  2. Wait for parse/sync; pick the service in the list
  3. Run SmartTests with TESTCHIMP_ENABLE_API_CAPTURE=1
  4. Refresh APIs — open a low-score or uncovered operation
  5. Create issue, Create test, or Ignore gap on the holes that matter

Start here:

Know the contract. Cover the edge cases—before unaudited branches ship.


Further reading​

TestChimp

Related posts

Put QA on Auto-Pilot with Workflow Automations

· 8 min read
Nuwan Samarasekera
Founder & CEO, TestChimp

TL;DR: We've shipped Automations in TestChimp—event-driven runs of the same catalog workflows you already invoke with /testchimp. When an issue is created, a story moves to ready, a CI batch fails, or a release lifecycle status changes, TestChimp can hand the work to a cloud agent—today via ChimpHands (recommended), a labelled GitHub Issue, or a webhook. Aggregation collapses noisy bursts; optional human gates keep high-blast-radius runs under review. Local agents stay for interactive work. Automations cover the complementary case: the platform watches, then starts the agent for you.

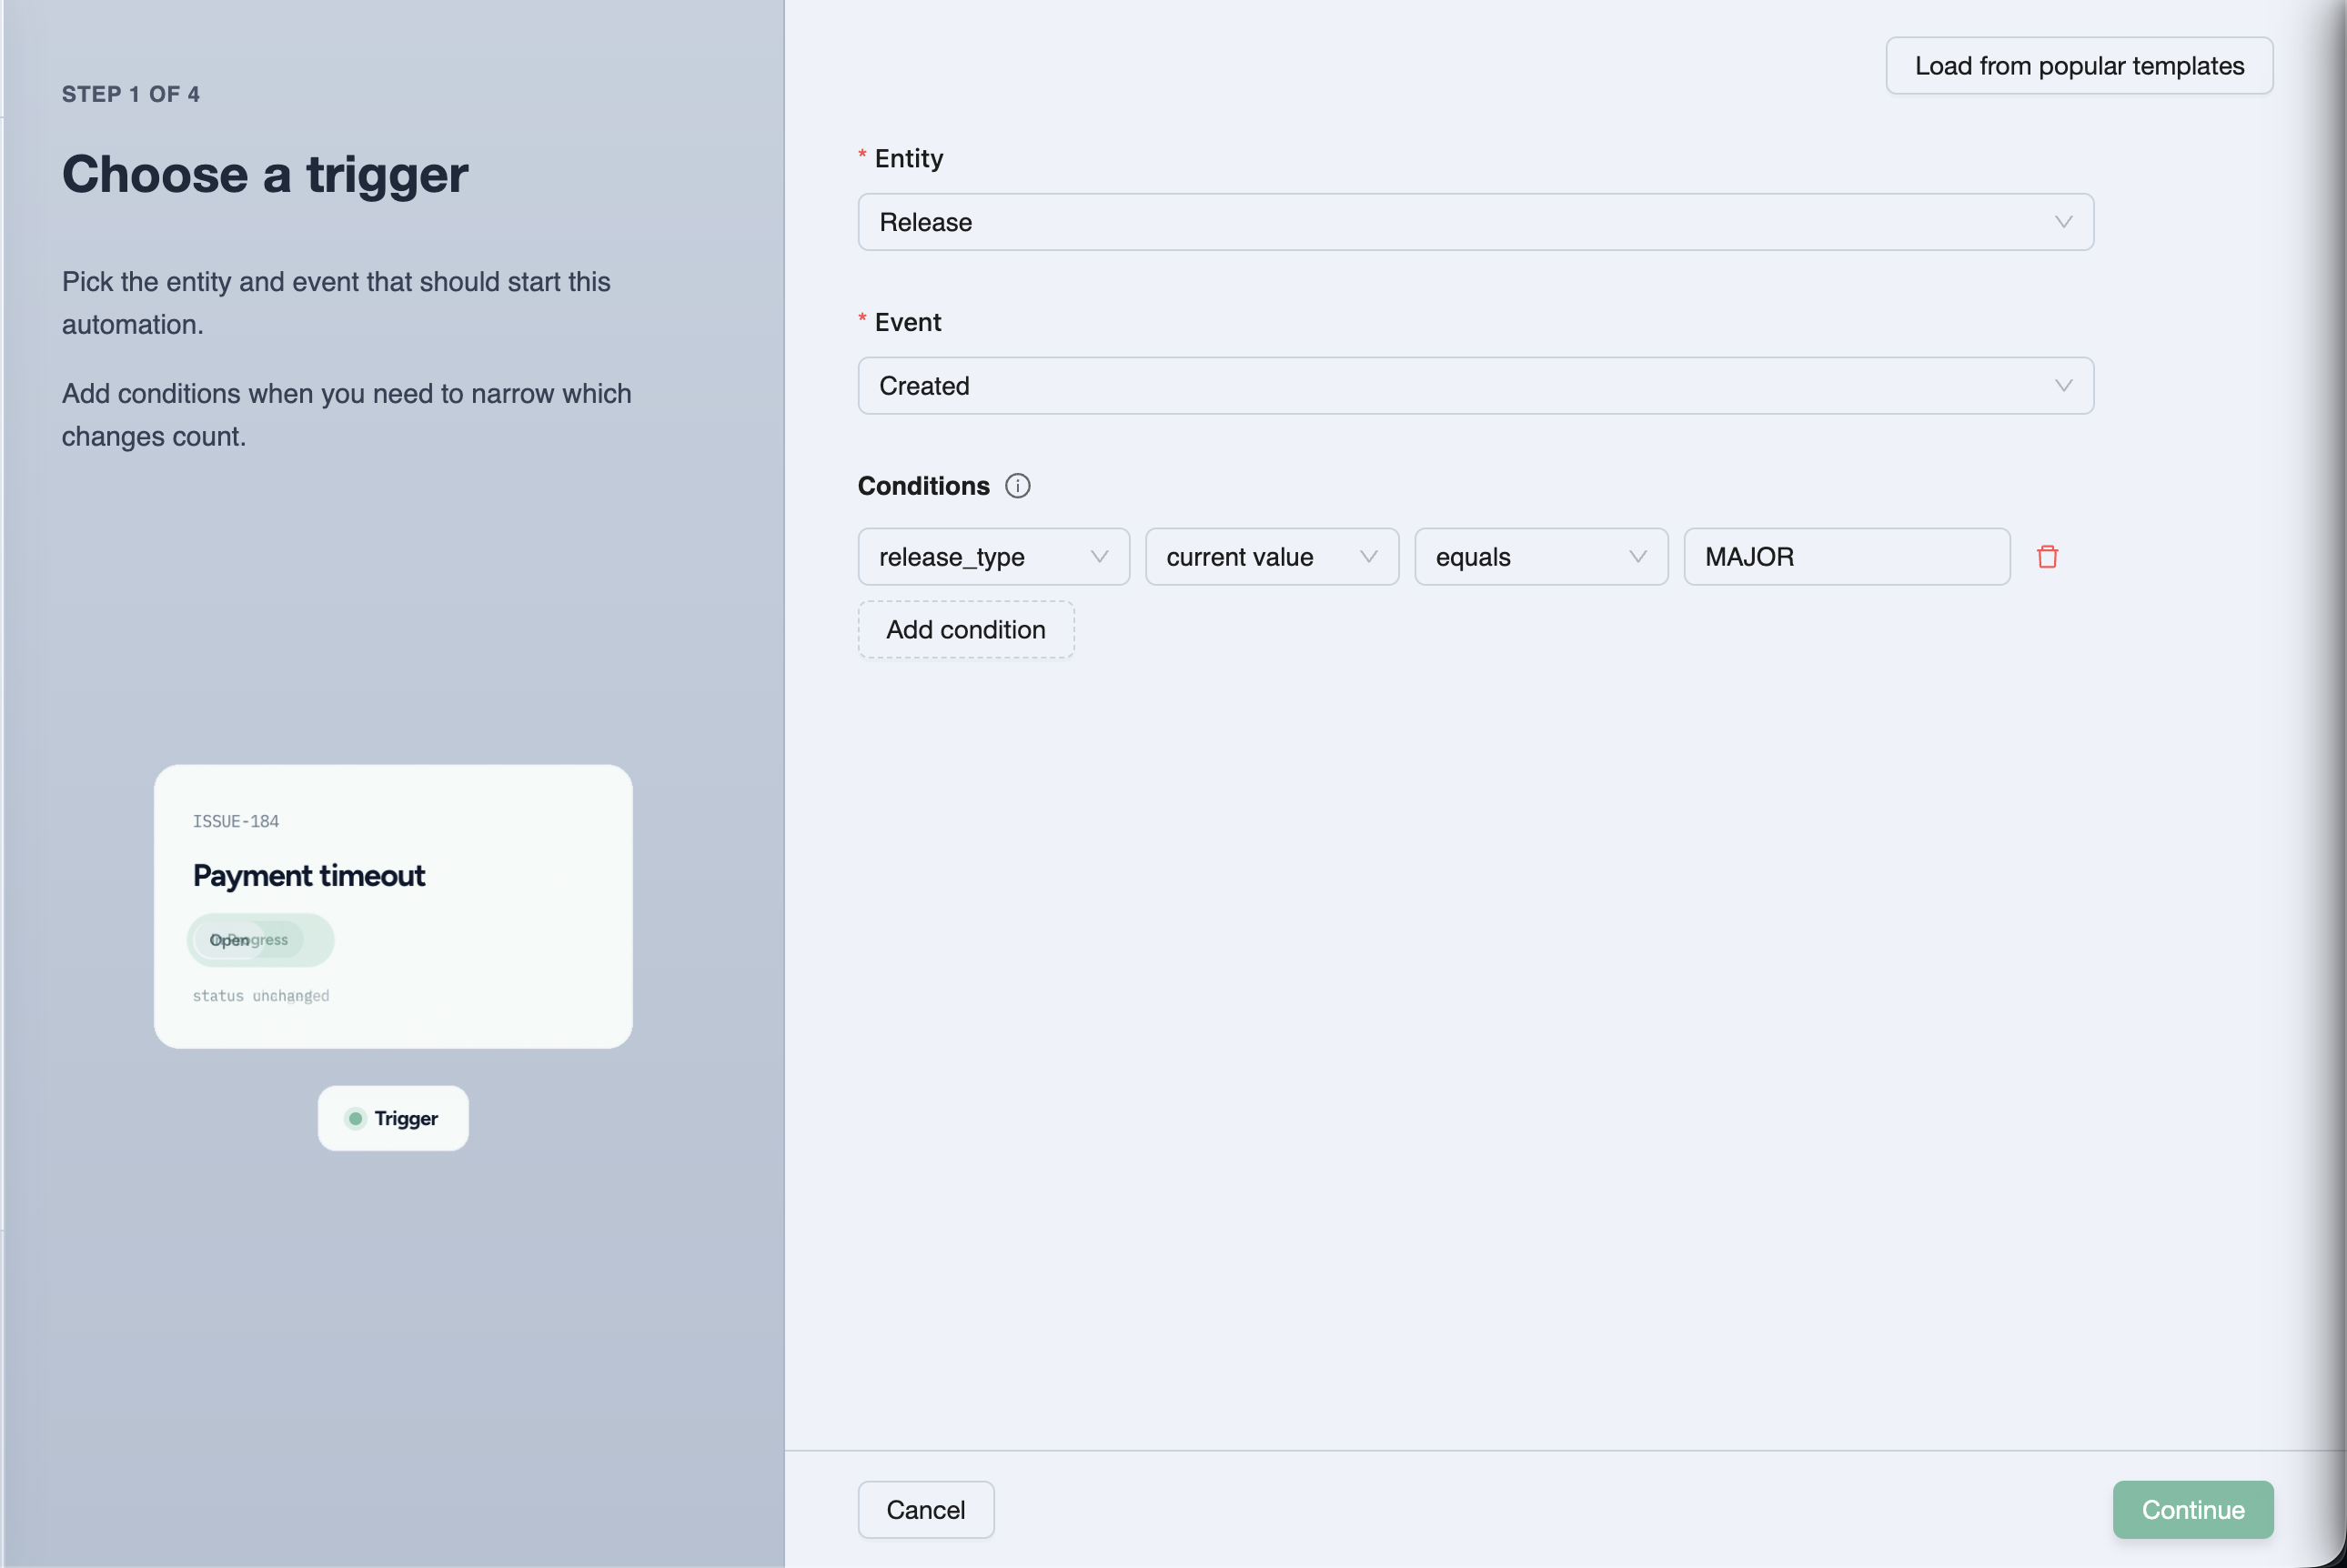
Configure an automation trigger — entity, event, and conditions


The prompt-pasting tax​

If you've been living in the agentic QA loop, you already know the playbooks:

/testchimp fix issue BUG-1042
/testchimp implement US-181
/testchimp fix test execution …
/testchimp run QA

That works. It also creates a new bottleneck: someone has to notice the event and paste the prompt.

Failure modeWhat actually happens
LatencyHigh-severity bug sits until a human opens the IDE
InconsistencyDifferent people phrase the same job differently
Missed signalsFailed CI batch, ready story, release → Ready—none of them auto-start work
No audit trailChat history ≠ a tracked workflow execution with status and policy version
Noisy burstsTen related failures → ten agent sessions unless someone batches by hand

Agents compressed execution. They did not invent routing. Automations are that routing layer—on the same workflows, policies, and workflow-execution-id traceability you already use.

Full product docs: Automations.


What is a TestChimp automation?​

An automation is three parts:

Trigger + Action + Config

PartAnswersExamples
TriggerWhen?Entity (issue, story, scenario, test execution, batch, release) + event + optional AND conditions
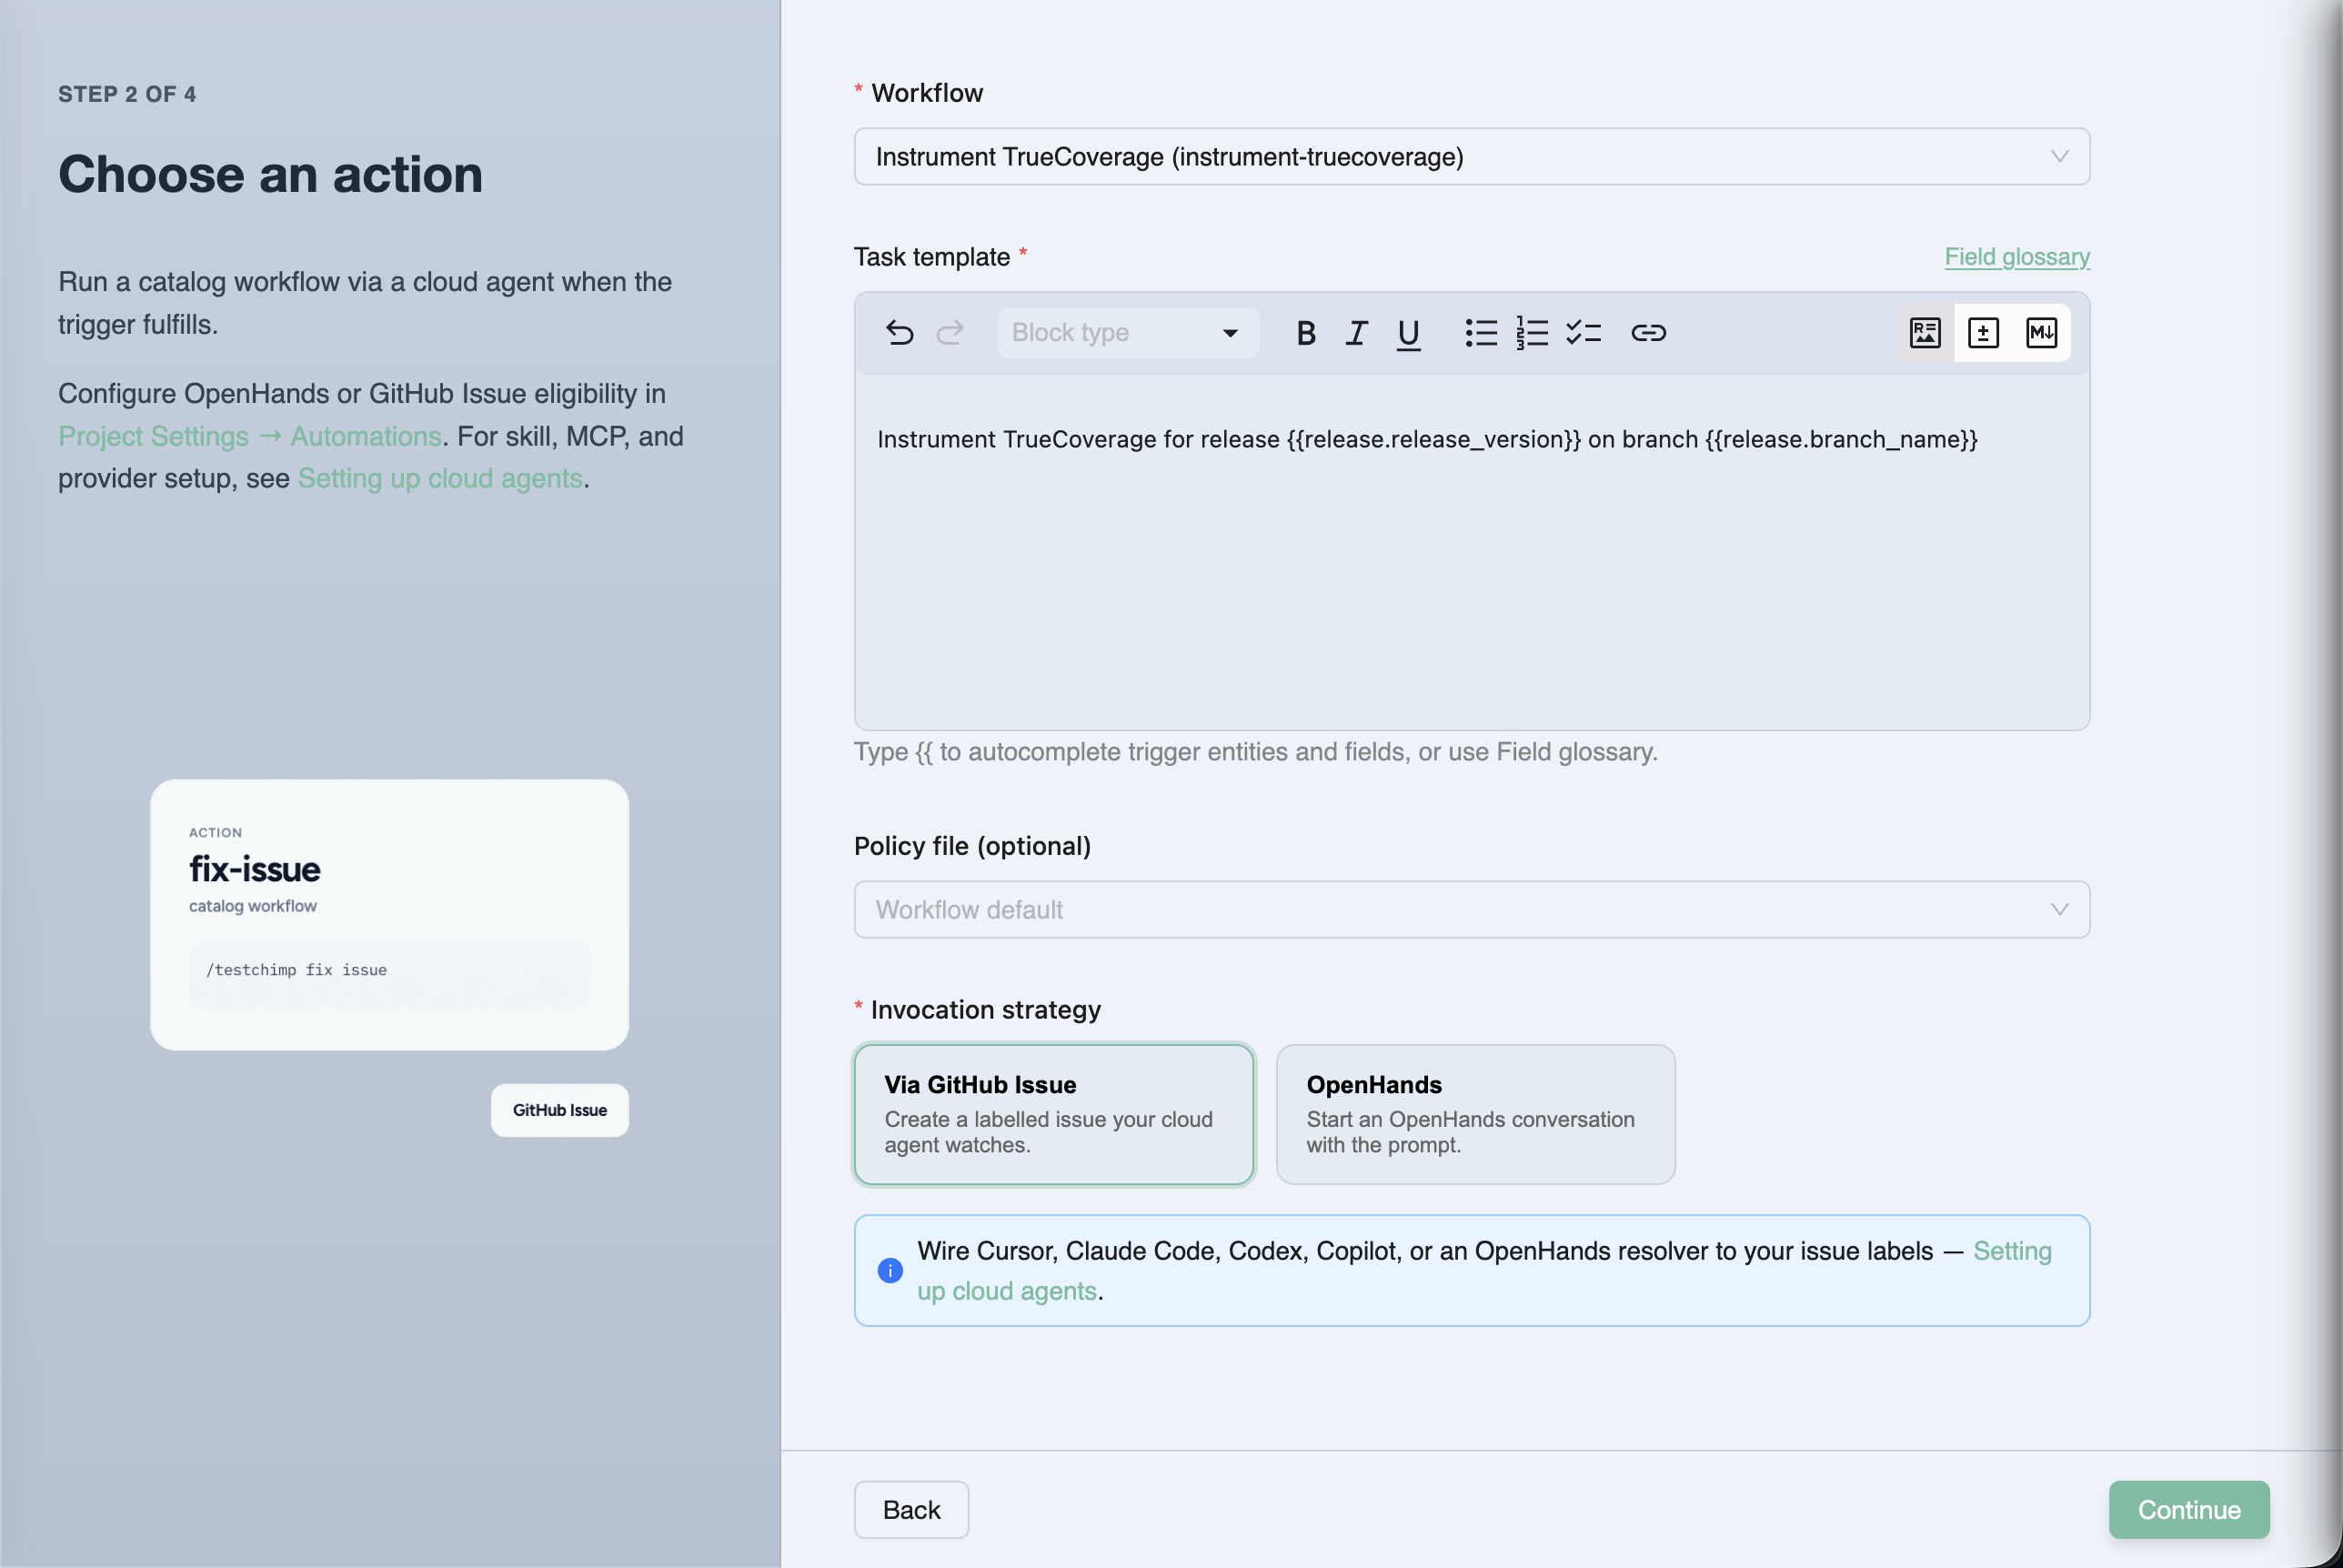
ActionWhat?Execute a catalog workflow with a task template, optional policy, and invocation strategy
ConfigHow loudly / how carefully?Aggregation (Immediate / Buffered / Windowed) + optional human approval before invoke and/or before plan execute

Policies stay *.policy.md in Git. Automations optionally attach them—the same files local /testchimp runs use. Workflows still define how the agent works. Automations define when that work starts and how the cloud agent is reached.

Project event → matching automation → aggregation window
↓
workflow execution queued
↓
(optional) human approve invoke / plan
↓
ChimpHands on CI or labelled GitHub Issue or webhook
↓
/testchimp <workflow> … --workflow-execution-id …

Ways to reach a cloud agent​

Configure once under Project Settings → Automations (and ChimpHands setup for the native path), then pick a strategy per automation.

TestChimp dispatches your repo's chimphands.yml GitHub Actions workflow with the rendered /testchimp … prompt. The agent runs on your CI with full checkout context, streams progress to the ChimpHands UI, and opens a PR when done.

One-click setup: GitHub App + workflow file + TESTCHIMP_API_KEY secret. See ChimpHands and Meet ChimpHands.

Via GitHub Issue (bring-your-own agent)​

TestChimp opens an issue on your mapped repo. Body = the full /testchimp … prompt (plus the workflow execution id). Labels always include testchimp, plus any extras you configure.

Point Copilot coding agent, Codex, Cursor Cloud, or your own runner at those labels. The agent checks out the repo, runs the prompt with the TestChimp skill + MCP, and reports back—so Executions → Workflow Executions stays current.

ChimpHandsVia GitHub Issue
Who starts the agentTestChimp (GitHub Actions dispatch)Your label-watching agent
NeedsGitHub App + ChimpHands workflow + API key secretTestChimp GitHub App + repo + BYO agent wiring
Continuation (plan → execute)Same session / re-dispatchComment on the same issue
FitDefault QA orchestration on your CICustom agent stacks you already operate

Deep dive: Cloud agents for automations.

Configure the automation action — workflow, task template, policy, invocation strategy


Aggregation and human gates (because autonomy without brakes is chaos)​

Matching events should not always mean "spawn an agent immediately."

PolicyBehaviour
ImmediateEvery match fulfills (still subject to the project hourly cap)
Buffered (default)Wait for a quiet period (≥ 5 minutes), bounded by max window / max event count
WindowedFulfill on fixed hour boundaries—digest style

Default rate limit: 5 cloud agent invocations per hour per project (shared). Over-cap runs stay Queued—not dropped.

Two independent human gates (off by default):

  1. Approve before invoke — review the rendered task before the cloud agent starts
  2. Approve before plan execute — agent plans first; you approve before execute

Pending work surfaces in Executions → Workflow Executions. You can also copy the prompt and run it locally—the workflow-execution-id keeps the timeline accurate either way.

Mechanics: How automations work.


Recipes teams actually want​

SignalWorkflowNotes
High-severity issue created (not ExploreChimp noise)fix-issueImmediate or short buffer; start with invoke approval
Story / scenario → readyimplementBuffered; prefer plan-execute approval
Automation batch status → failedfix-test-execution / upkeepBuffered so one CI push → one agent run
Release → Readyrun-qa / run-release-checkImmediate; gate the composite
Steady drip of ready workupkeepWindowed hourly/daily digest

Task templates use {{issue.id}}, {{story.title}}, {{batch.failed_count}}, {{project.repo_url}}, and friends—with autocomplete in the wizard.

More starters: Typical automation setups.


Why this matters in the agentic era​

We already argued that skills are SaaS distribution—the playbook travels with the agent. We argued that requirements must be governed before agents spend tokens. We argued that release governance is the ship decision, not a spreadsheet.

Automations close another gap: intent without attendance.

Without them, QA-on-autopilot still needs a human dispatcher. With them, the same /testchimp catalog becomes a control plane: events in → policy-backed workflow executions out → auditable status in the product. Local Claude / Cursor for interactive loops. ChimpHands and other cloud agents for the overnight and the "while you were in standup" cases.

That is how you boil the lake without standing next to the kettle (boiling the QA lake).


Frequently asked questions​

What are TestChimp Automations?​

Automations are event-driven rules that run TestChimp catalog workflows via a cloud agent when something changes in your project—issues, stories, scenarios, test executions, CI batches, or releases—optionally aggregated and gated by human approval.

How do Automations differ from Workflows?​

Workflows define how an agent should work (skill playbook + optional policy). Automations define when that work starts and which cloud invocation path to use. Both share the same execution timeline and workflow-execution-id reporting.

ChimpHands vs GitHub Issue—which should I pick?​

Use ChimpHands for the default path—native sessions on your GitHub Actions runner, platform chat, and QA-metered credits. Use GitHub Issue when you must keep an external label-watching agent (Copilot, Codex, custom bots) and already have the TestChimp GitHub App.

Will Automations spam my agents on every CI flake?​

Not if you configure them well. Prefer Buffered aggregation for batches, exclude ExploreChimp reporters on auto-fix rules, use conditions (status = BATCH_INVOCATION_FAILED, severity = HIGH), and keep the project hourly invocation cap. High-risk workflows should start with human gates on.

Can I still run workflows locally?​

Yes. Automations don't replace /testchimp in your IDE. From a pending execution you can also copy the prompt—including the workflow execution id—and run it with a local agent so status still updates in TestChimp.

Where do I create and monitor Automations?​

Create under Workflows → Automations (or contextual Automations CTAs on Issues, Plans, batches, releases, and workflow pages). Configure strategies and rate limits in Project Settings → Automations. Monitor and approve under Executions → Workflow Executions.


Try it​

  1. Connect GitHub and set up ChimpHands (or configure GitHub Issue / webhook under Project Settings → Automations)
  2. Open Workflows → Automations → Create Automation
  3. Pick a trigger (start from a popular condition template)
  4. Choose a workflow, task template, policy, and invocation strategy
  5. Leave Buffered aggregation on; add invoke or plan-execute approval for risky jobs
  6. Trigger a matching event—then watch Workflow Executions

Start here:

When something changes, the agent should already be working—not waiting for you to paste a prompt.


Further reading​

TestChimp

Related posts

Concepts

Release Governance: Ship When the Evidence Says So

· 10 min read
Nuwan Samarasekera
Founder & CEO, TestChimp

TL;DR: We’ve shipped release governance in TestChimp—the workflow that answers one question before you deploy: has this version been tested enough, in the right places, with evidence we can audit? A release rolls up test runs, manual session captures, CI automation batches, release checks (UX + security), and release intelligence—so product, QA, and engineering share one readiness picture. CI and agents can gate on the same data via API.

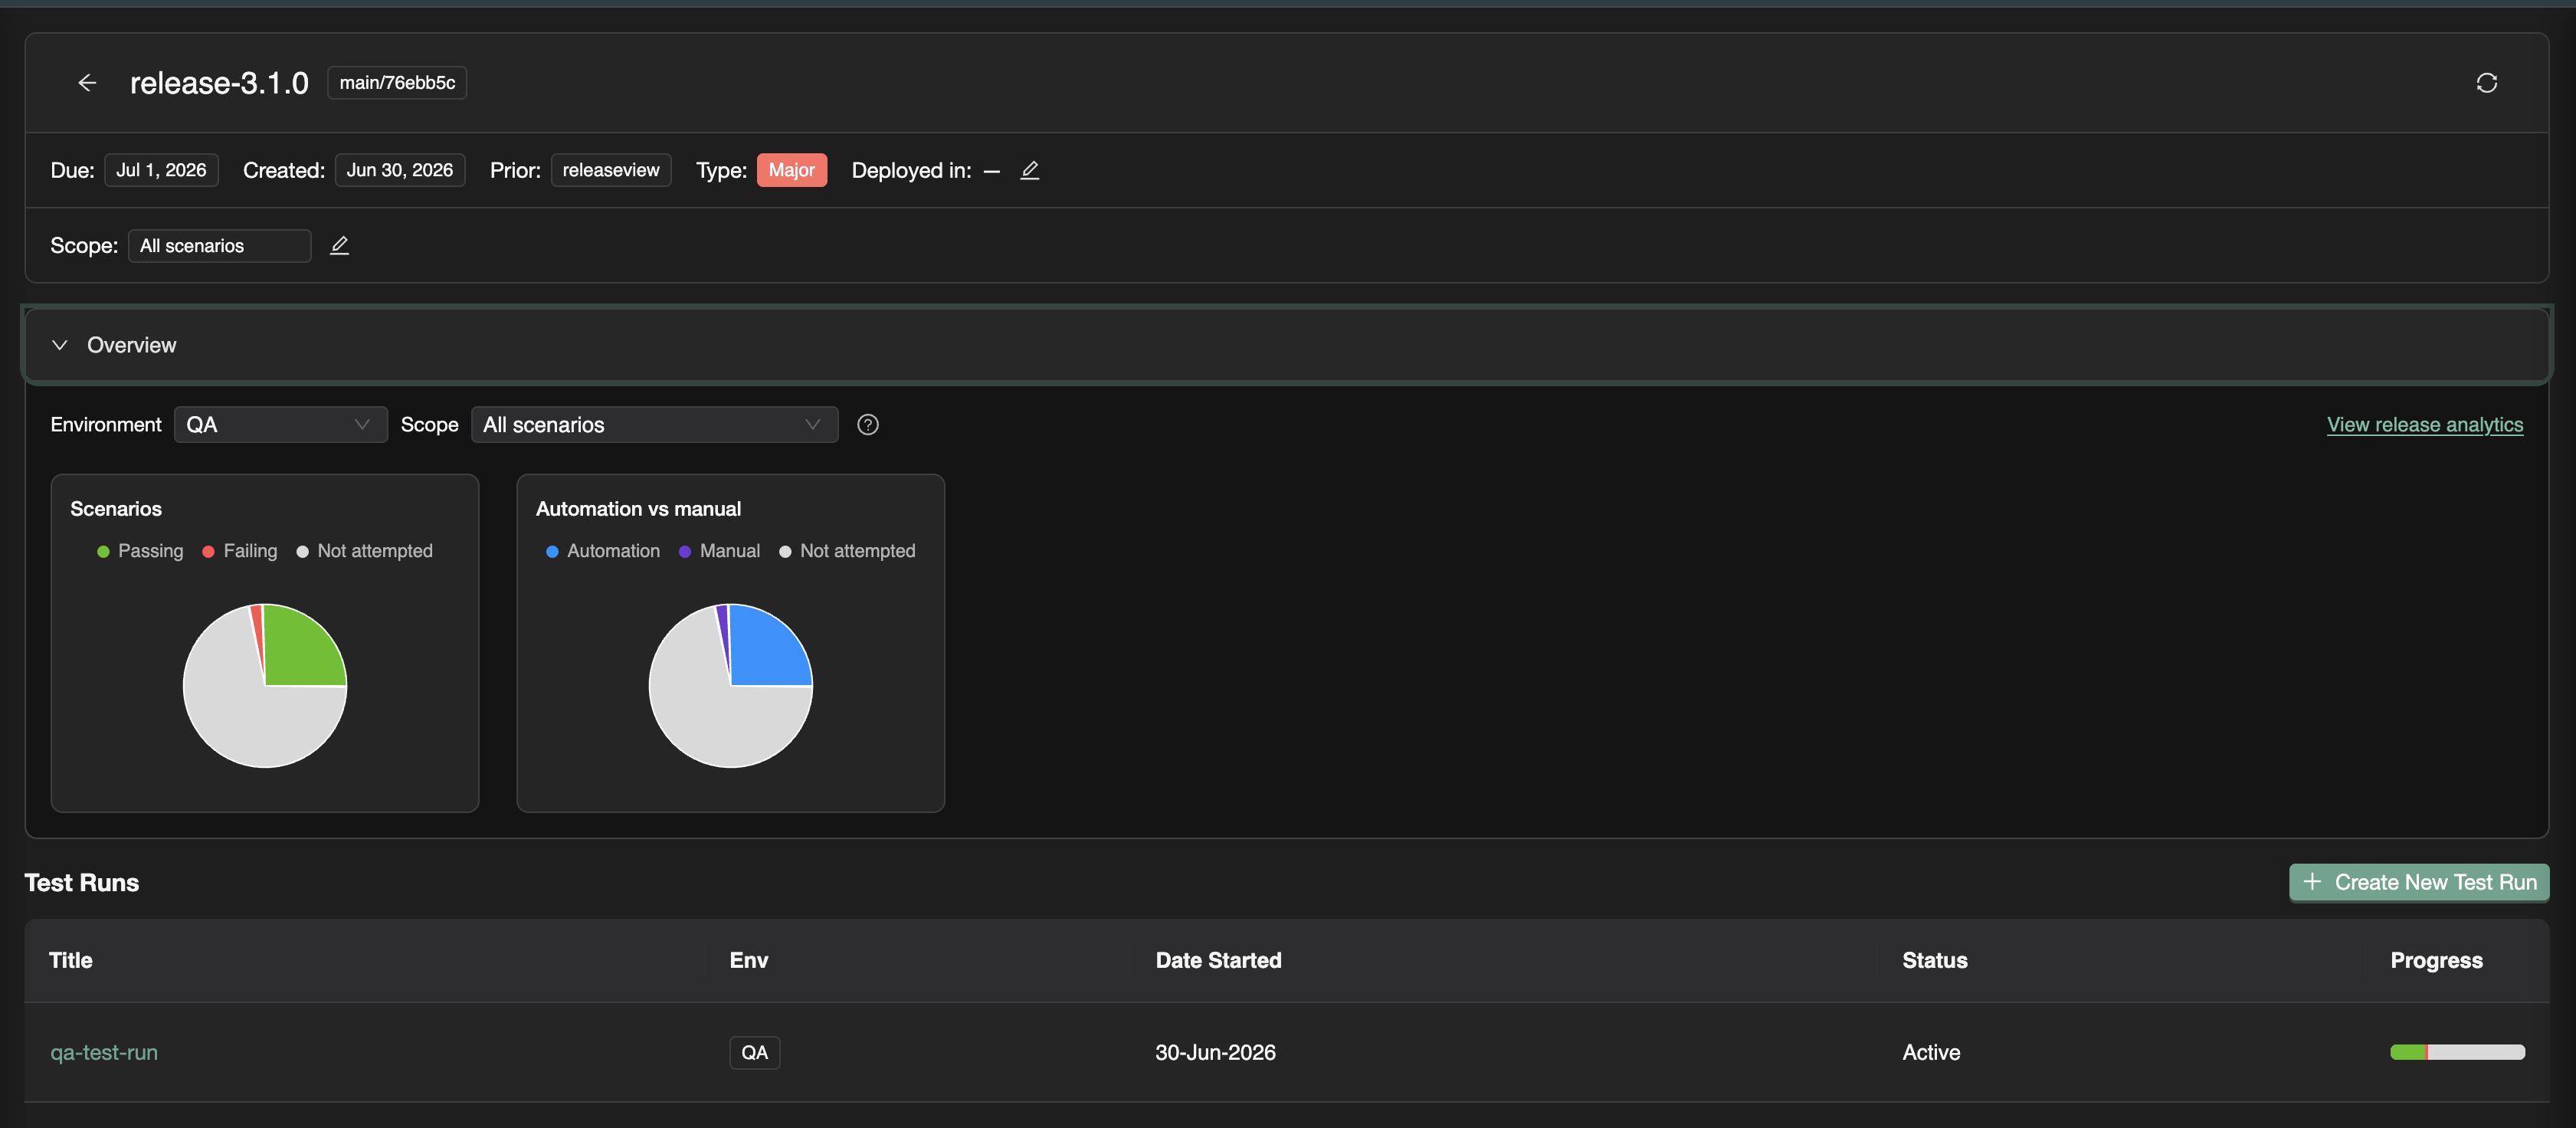
Release detail with overview charts and test runs


The release confidence problem​

Shipping fast only works when you can trust what was validated.

Most teams already run plenty of QA. What they lack is a version-level contract:

Failure modeWhat goes wrong
Scattered evidenceManual QA in Slack; CI green in another tab; no single view per version
Checkbox manual testing“Mark as passed” with no steps, screenshots, or tester identity
Automation silosPlaywright batches exist, but nobody ties them to the ship candidate
Unknown scope“We tested checkout”—but not which scenarios or requirements
Blind deploysCode merged without knowing what plans, tests, or RUM events changed

Release governance is not bureaucracy. It is the shortest path to deploy confidence when stakeholders need a shared, auditable answer—not a status emoji in #releases.


What is release governance?​

In software delivery, release governance is how a team decides a version is ready to ship: what was in scope, what was tested, what risk remains, and who can prove it.

Industry practice usually spans test planning, requirement traceability, regression campaigns (test runs), security review, and a release gate—a pass/fail policy before production. Traditional tools often split that across a TMS, CI dashboards, a security scanner tab, and a spreadsheet.

Release governance in TestChimp keeps that decision on one surface: the release—a versioned milestone (for example v2.4.0) with git commit context, focus areas from your plan, test runs, checks, and analytics.

Full walkthrough: Release Management.

Release Governance with TestChimp — video walkthrough


The TestChimp release model​

If you’ve followed us, the pieces already exist as Test Planning as Code, Test Runs, and requirement traceability. Release governance is the campaign layer that binds them to a ship candidate.

ElementPurpose
ReleaseVersion, due date, git commit SHA, prior release, deployments per environment
Focus areasOptional scope on your test plan—which story/scenario folders matter for this version
Test runsNamed validation campaigns (“Smoke on staging”, “Payment sign-off”) attached to the release
Execution evidenceManual sessions + automation batches linked to those runs
Release ChecksUX (ExploreChimp) and security scans scoped to the candidate
Release intelligenceDelta analytics, requirement coverage, ExploreChimp findings, TrueCoverage changes

Open Releases in the sidebar → create a version → create test runs from the release viewer. Progress, checks, and analytics stay anchored to that label and commit range.

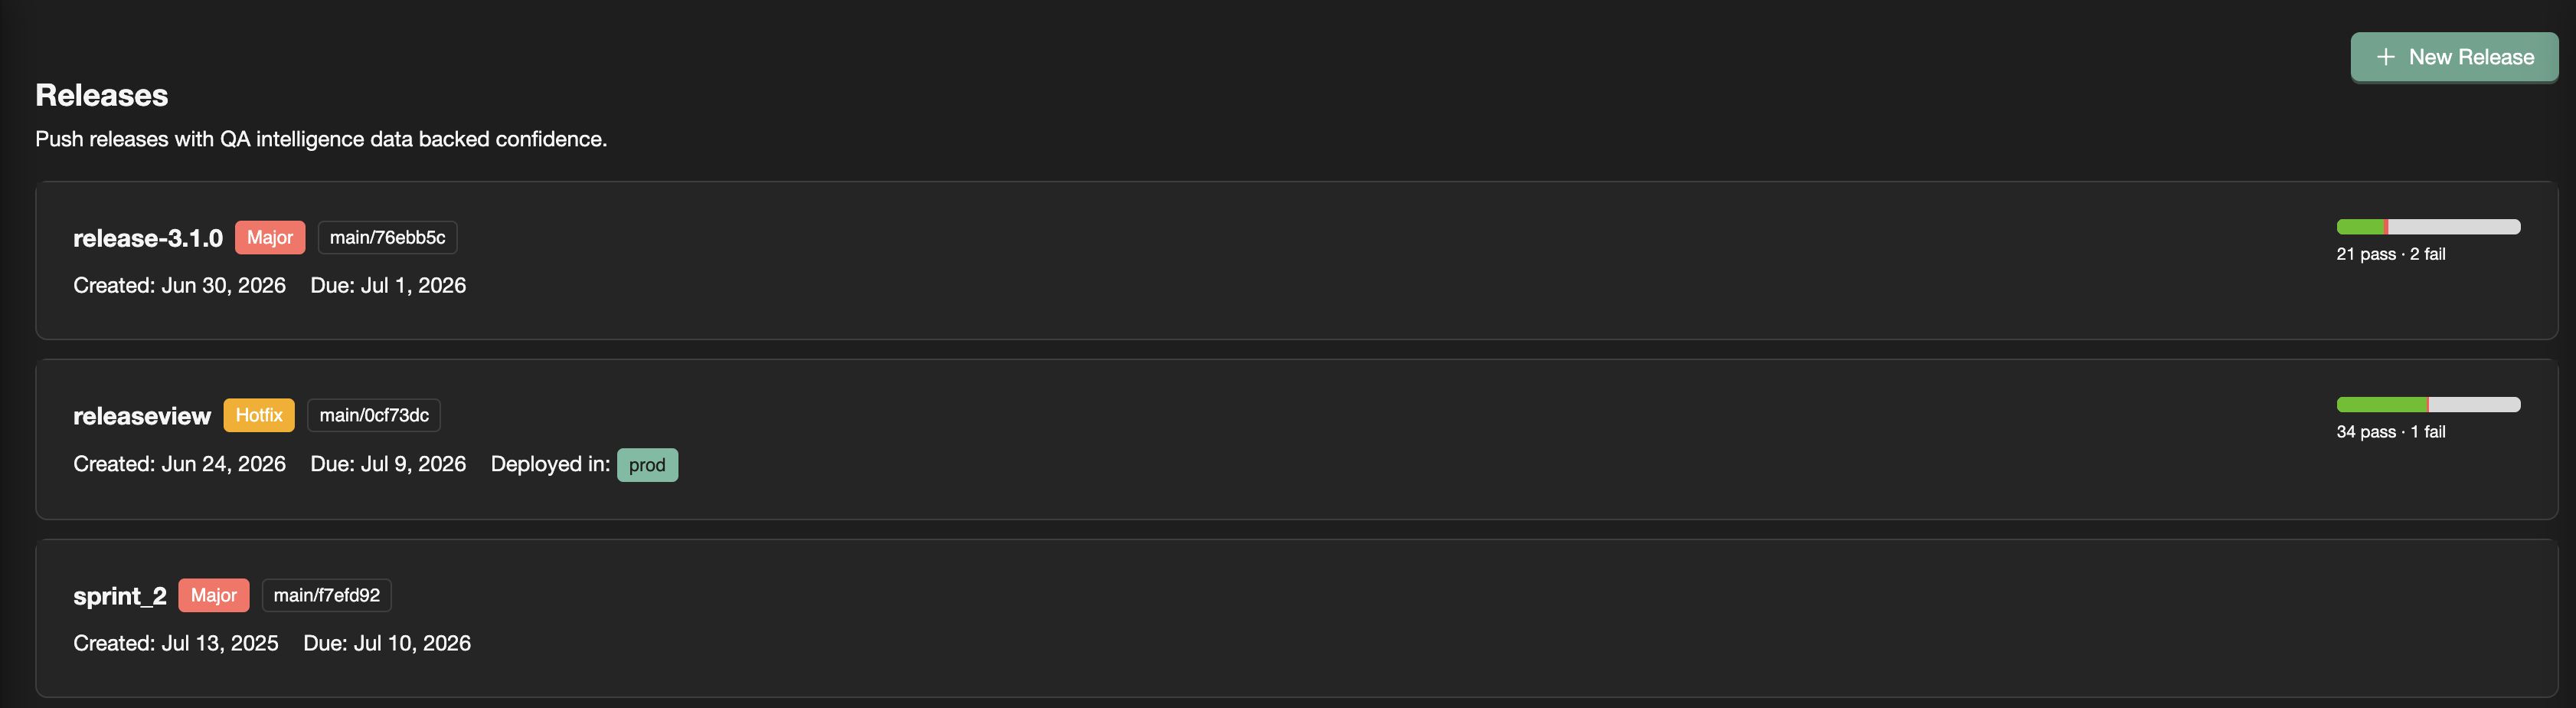
Releases list with progress bars


Evidence that rolls up: manual + automation​

Auditable manual testing​

Traditional TMS tools record an outcome. Release sign-off usually needs evidence.

With TestChimp, testers:

  1. Capture a session in the Chrome extension (or add a record in the test run viewer)
  2. Pick the active test run on the release
  3. Get steps, screenshots, notes, bugs, and tester identity rolled into release overview and requirement coverage

“QA said pass” becomes a reproducible session tied to the scenario and version. Details: Manual sessions to test runs.

CI that counts toward the release​

Automation batches from the Playwright reporter show up under Executions. For release work, link them to a test run—especially from the Candidate Automation Execution Batches panel (batches between prior and current release commits).

Linking answers: Does this CI run count toward our sign-off campaign? Scenario status updates in the same progress view as manual work. Guide: Linking automation batches.

One release. One progress bar. Both execution types.


Release Checks: UX and security on the ship candidate​

Test runs answer scenario pass/fail. Release Checks answer the adjacent ship questions—from the same release page:

QuestionCheckEngine
Did UX regress on paths this release touched?UX ChecksExploreChimp on SmartTests
Runtime web vulns on covered flows?DASTOWASP ZAP
Insecure code patterns in this range?SASTSemgrep
Secrets committed since baseline?Secrets scanGitleaks
New dependency CVEs?Dependency scanTrivy

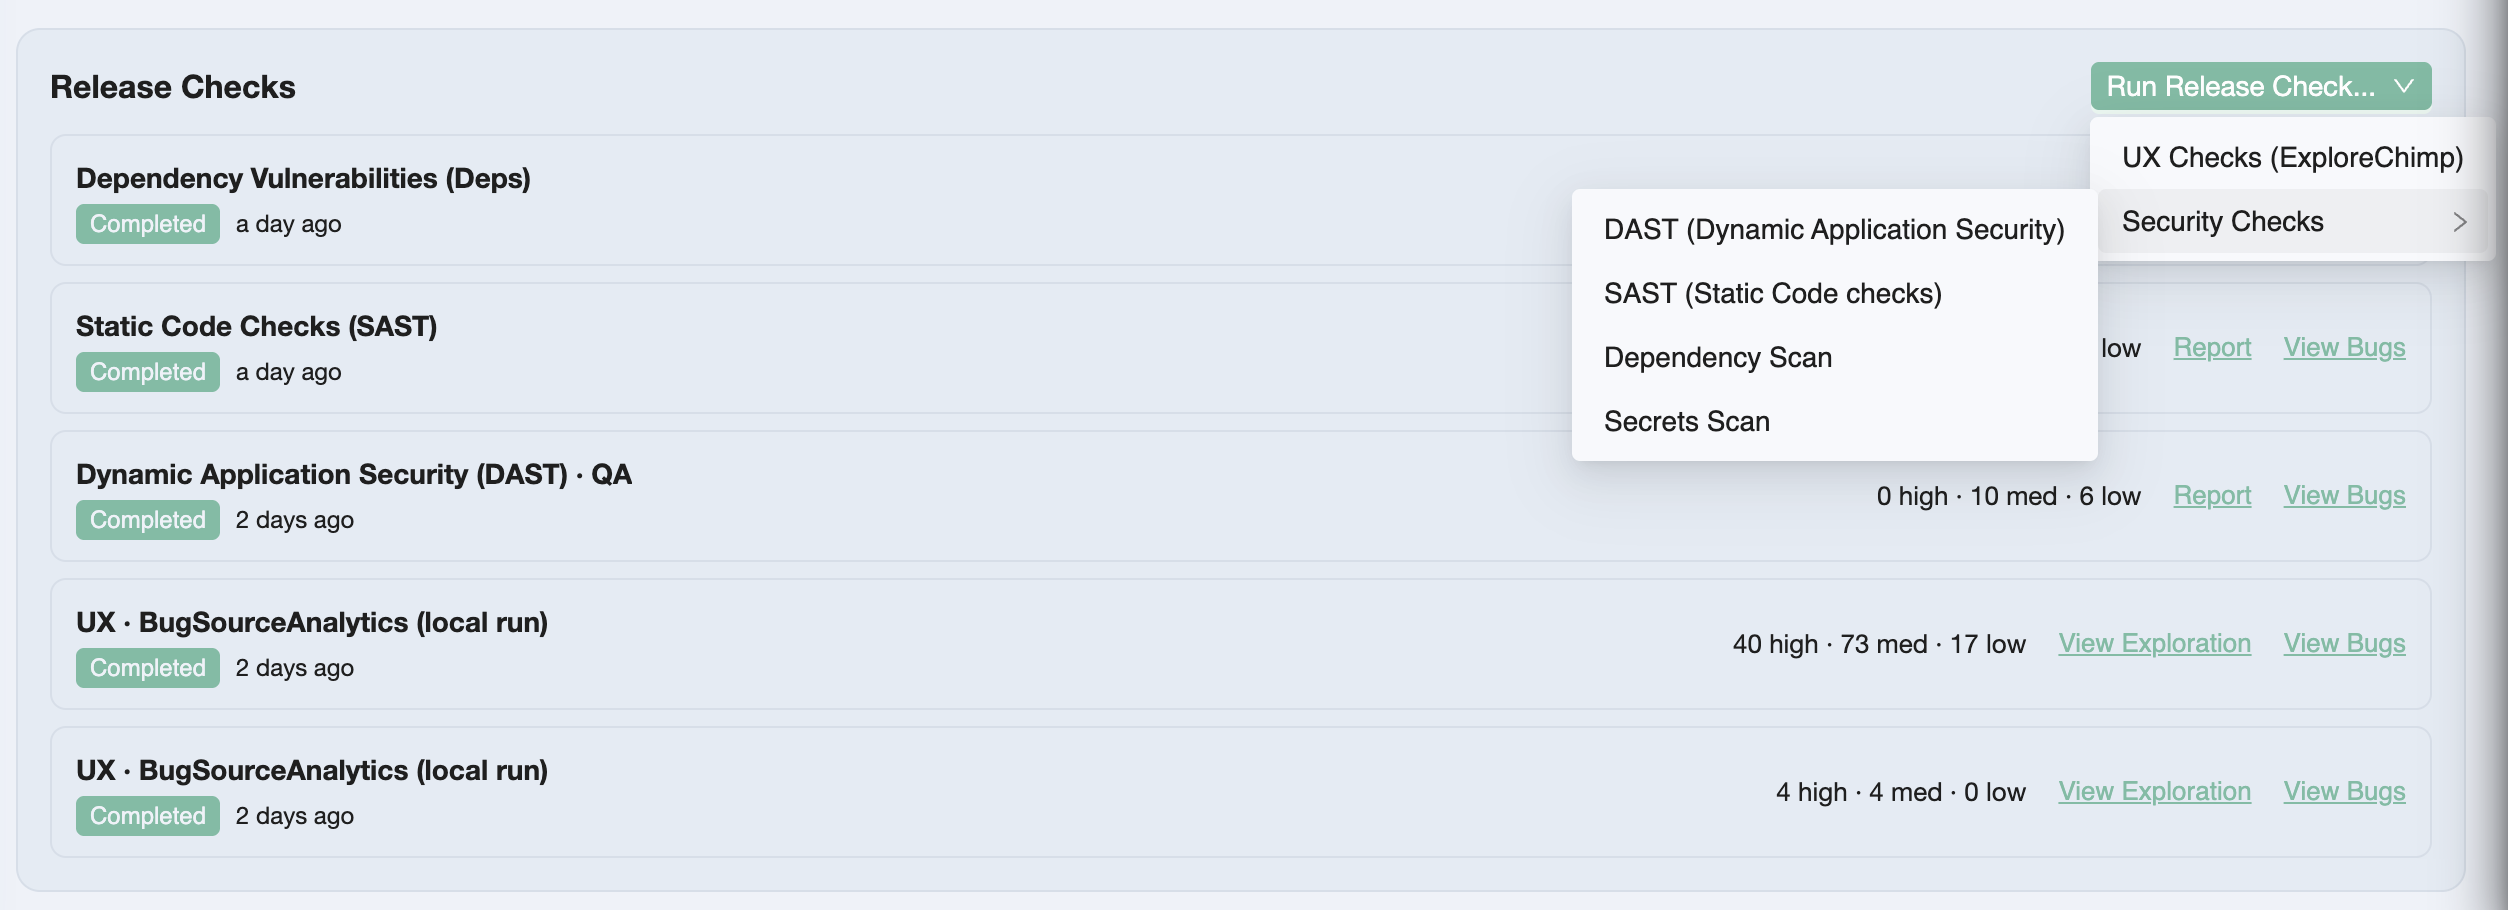
Release Checks list on the release detail page

You queue a check from Run Release Check…, paste the /testchimp run… prompt into a TestChimp-upskilled agent, and triage Report / View Bugs beside test runs—not in a separate security silo.

Overview: Release Checks.


Release intelligence: beyond pass/fail counts​

Release intelligence connects what changed since the prior release to what was tested and what exploratory work found.

InsightWhat it shows
OverviewScenario pass / fail / not attempted; automation vs manual mix
Requirement coverageStories and scenarios mapped to linked executions for this candidate
Release delta analyticsTests, stories, scenarios added/updated/deleted + commit graph
ExploreChimp findingsExplorations, new screens/states, bugs in the commit range
TrueCoverageRUM event definitions added/updated—instrumentation drift risk

Use Overview in standups. Drill into analytics when you need requirement-level proof or scope risk (“scenarios added in delta, still not attempted”). Refresh after new commits, linked batches, or manual sessions.

Full detail: Release intelligence.


Programmatic release gating​

Governance that only lives in a UI is incomplete for agentic and CI-first teams.

get_release_details returns gate-oriented JSON for a version label: in-scope test aggregations per environment, open-issue stats, release-check summaries, and per-scenario detail. Your pipeline applies your policy—we don’t hard-code “block if any P0 failed.”

testchimp get-release-details --version '1.2.0'

Same data the release page shows—consumable by GitHub Actions, agents, or a custom quality gate. Docs: Programmatic release gating.


How this differs from a classic TMS release​

DimensionTestRail-style TMSTestChimp release governance
Plan sourceCases in a TMS databaseMarkdown stories/scenarios in Git
Manual resultPass/fail checkboxCaptured session (or detailed record) with evidence
AutomationImport / plugin / re-entryscenario annotations + batch link to test run
Security / UXSeparate toolsRelease Checks on the version
Release viewMilestone + run summaryRelease viewer + intelligence (delta, ExploreChimp, TrueCoverage)
CI gateOften custom stitchingget_release_details

We are not asking you to maintain a parallel TestRail library forever—import scenarios if you need to migrate, then keep Git as source of truth. Honest comparison: TestChimp vs TestRail.


Why this matters in the agentic era​

Agents compress authoring and execution. They do not invent a shared definition of “ready to ship.”

Without release governance, you get faster green CI and louder Slack threads—still no auditable answer for this version. With it, the same agents that run /testchimp test and /testchimp run security scan feed a release surface humans and pipelines can gate on.

Requirements quality (DeFOSPAM governance) hardens the contract upstream. Release governance hardens the ship decision downstream. Together they close the loop we care about: planned reality → tested reality → production reality (boiling the QA lake).


Frequently asked questions​

What is release governance in TestChimp?​

Release governance is TestChimp’s workflow for validating a specific application version before deploy: create a release (version + git commit + optional plan scope), attach test runs, link manual sessions and CI batches, run release checks (UX and security), review release intelligence, and optionally gate CI with get_release_details.

What is the difference between a release and a test run?​

A release is the version milestone (v2.4.0) with metadata, focus areas, checks, and rolled-up intelligence. A test run is a scoped validation campaign inside that release—selected scenario folders, collaborators, due date, and linked executions. One release typically has multiple test runs.

What are release checks?​

Release Checks are QA activities launched from the release detail page: ExploreChimp UX Checks plus DAST (ZAP), SAST (Semgrep), secrets (Gitleaks), and dependency scans (Trivy). Reports and bugs stay scoped to the ship candidate next to test runs.

How do I know when a release is ready to ship?​

Review overview metrics for the target environment, requirement coverage for focus areas, delta analytics for untested plan changes, release-check reports and bugs, and ExploreChimp / TrueCoverage warnings. When in-scope scenarios meet your bar with evidence attached, complete the test runs and deploy—or enforce the same bar in CI via the gating API.

Does TestChimp enforce a fixed release gate policy?​

No. The UI and get_release_details expose the data. Your team (or pipeline) decides thresholds—for example zero failed P0 scenarios, no open critical security issues, or required completed scans.

Do manual results need to be linked to a test run?​

For results to count in release overview and requirement coverage, link manual sessions to an active test run on that release—easiest at capture time in the Chrome extension. Unlinked sessions stay in execution history but do not roll up to release progress.


Try it​

  1. Open Releases → New Release (set version, commit SHA, prior release, focus areas)
  2. Create New Test Run from the release viewer
  3. Capture a manual session or link a Playwright batch
  4. Queue a Release Check and run it with your agent
  5. Open View release analytics—then gate CI with get-release-details when you’re ready

Start here:

Ship when the evidence says so—not when the spreadsheet says “LGTM.”


Further reading​

TestChimp

Related posts

Concepts & standards

Your Agents Are Only as Good as Your Requirements

· 6 min read
Nuwan Samarasekera
Founder & CEO, TestChimp

We’ve spent a lot of energy making agents better at writing code and tests.

We’ve spent far less making the inputs to those agents less terrible.

Most modern teams don’t have an “AI coding” problem. They have a requirements problem—and agents make it louder. Give Claude a vague story with “fast,” “easy,” and a missing error path, and it will happily invent behaviour. Give Playwright-authoring agents an untestable scenario, and they will automate the guess. Garbage in doesn’t just produce garbage out anymore. It produces confident garbage—at merge velocity.

That isn’t a new insight in software engineering. It’s just newly expensive.


We’ve known what “good” looks like for decades​

Quality requirements aren’t a 2026 invention.

Agile teams have INVEST (Independent, Negotiable, Valuable, Estimable, Small, Testable)—Bill Wake’s checklist for backlog items that don’t sabotage the sprint. The “T” is the one that keeps biting agentic workflows: if you can’t write a test for it in principle, you don’t have a requirement—you have a vibe.

Formal requirements engineering went further. ISO/IEC/IEEE 29148 spells out characteristics like unambiguous, complete, singular, and verifiable—measurable properties of a requirement, not a gut feel in a grooming meeting. Industry write-ups of the standard make the same point in plain language: “user-friendly” isn’t a requirement; a verifiable threshold is (overview of ISO 29148 quality criteria).

And for scenario thinking, Specification by Example and Given-When-Then have been the antidote to “as a user I want stuff so that value” for years.

The gap was never knowing. The gap was doing it continuously, on every story, without a two-day workshop and a whiteboard full of sticky notes.


Enter DeFOSPAM​

DeFOSPAM is a seven-lens mnemonic from Paul Gerrard’s Business Story Method (with Jonathon Wright / OpenTest.AI)—popularized recently by OpenRequirements.AI as an agentic requirements-validation approach. The goal is blunt:

A perfect requirement lets the reader predict the behaviour of every feature in all circumstances.

Where that prediction fails, DeFOSPAM tells you why—systematically:

LensWhat it attacks
DefinitionsUndefined terms, synonym collisions, glossary gaps
FeaturesUnclear scope, mixed concerns, incomplete decomposition
OutcomesMissing or unmeasurable “so that…” value
ScenariosHappy-path-only coverage; missing edges and errors
PredictionSteps without verifiable expected results
AmbiguityWeasel words, open-ended “etc.”, unclear actors
MissingActors, data, NFRs, acceptance criteria, cross-cuts

Paul has talked about this as structured appraisal of requirements for years—including how AI can help walk the checklist without replacing human judgment (Analyzing and improving requirements — Richard Seidl podcast). OpenRequirements frames the same idea as specialist analyst agents over living documentation (OpenRequirements.AI; methodology notes on GitHub).

We didn’t invent DeFOSPAM. We operationalized it where our plans already live.


Requirement quality governance in TestChimp​

If you’ve been following us, you know the thesis: Test Planning as Code—stories and scenarios as markdown in Git, workflows layered on for humans, context for agents. Traceability without the spreadsheet circus (requirement traceability).

The next piece is governance: not just having plans, but knowing whether those plans are good enough for agents to build and test against.

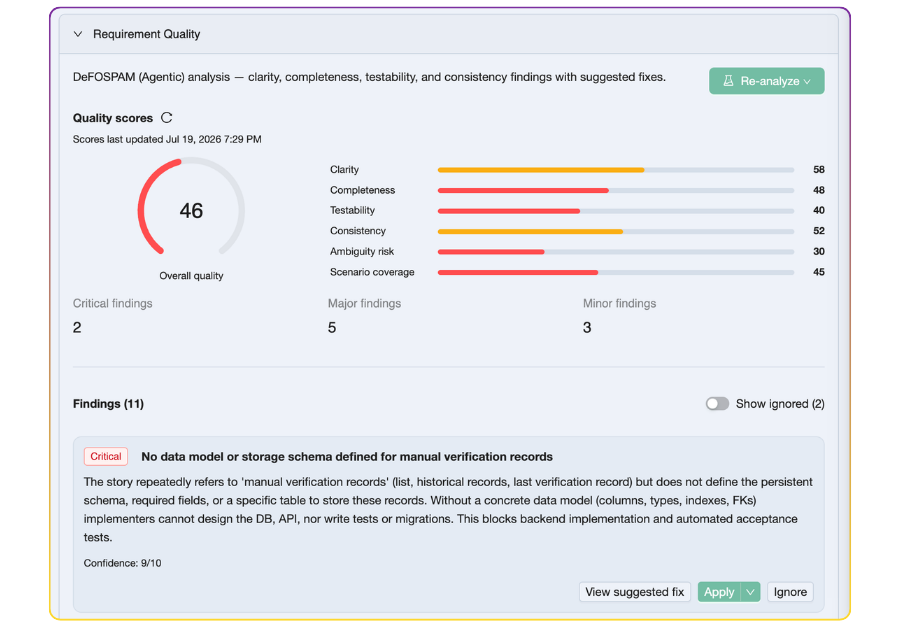
Requirement quality governance in TestChimp

In TestChimp you can run agentic DeFOSPAM-style checks on a story, a scenario, or a plans folder. What you get back isn’t a vague “needs more detail” comment:

  1. Scores across clarity, completeness, testability, consistency, ambiguity risk, and scenario coverage—plus an overall score
  2. Findings with severity (critical / major / minor)
  3. Suggested fixes you can apply or ignore
  4. Tracked state in Plans → Insights → Requirement quality, so quality is a backlog you can govern—not a chat transcript that evaporates

Applied and ignored findings stay out of the penalty box on re-score. The board shows remaining work.

Full walkthrough: Requirement Quality Governance. Agent playbook: /testchimp analyze requirement quality.


Cloud vs local agent: pick for context, not vibes​

There are two ways to run the checks.

TestChimp Cloud — one click from the story/scenario editor. Fast. No IDE setup. Costs an AI credit. Great when you want a quality pass without leaving the platform.

Local coding agent (recommended when you can) — install the TestChimp skill and run:

/testchimp analyze requirement quality of US-181
/testchimp analyze requirement quality of plans/stories/billing

Why we recommend local when it fits: the agent can ground findings in your code—fixtures, seed routes, existing scenarios, how “subscription” is actually modelled. Cloud is the simpler path; local is the richer one. Same governance surface either way—results land in Insights.

Authoring fits the same loop. Upskill the agent, then:

/testchimp author story for <objective>

Playbook: Author Plans. Docs: Authoring test scenarios.


Why this matters now​

In a human-only world, ambiguous requirements wasted meetings and produced “works as designed” arguments.

In an agentic world, they waste tokens, CI minutes, and PR cycles—and they poison the feedback loop we care about: planned reality → tested reality → production reality (boiling the QA lake).

Agents are extraordinary executors. They are mediocre mind-readers.

If you want high-quality dev output and high-quality test output, start earlier than /testchimp test. Harden the story. Score it. Fix the critical findings. Then let agents implement and automate.

Requirements stop being static tickets. They become governed assets—the same way we already treat code.


Wrapping up​

We believe the next leverage in agentic QA isn’t another “generate tests” button. It’s making the contract agents work from clear, detailed, and unambiguous—and keeping that quality visible over time.

DeFOSPAM gives the lenses. INVEST and ISO 29148 gave the vocabulary. TestChimp puts governance on the plans you already sync to Git.

If that resonates, start here:


References and further reading​

How to Find Duplicate Tests in a Playwright Suite (Semantic Graph for Agentic QA)

· 10 min read
Nuwan Samarasekera
Founder & CEO, TestChimp

TL;DR: When coding agents can write dozens of Playwright tests in a single session, the bottleneck shifts from authoring to governance: are the new tests distinct and useful, or just near-duplicates of what you already have? Semantic Graph is a free, open-source CLI that scans your suite, embeds each test semantically, clusters related tests, and renders an interactive graph so you—and your agent—can spot redundancy before it compounds.

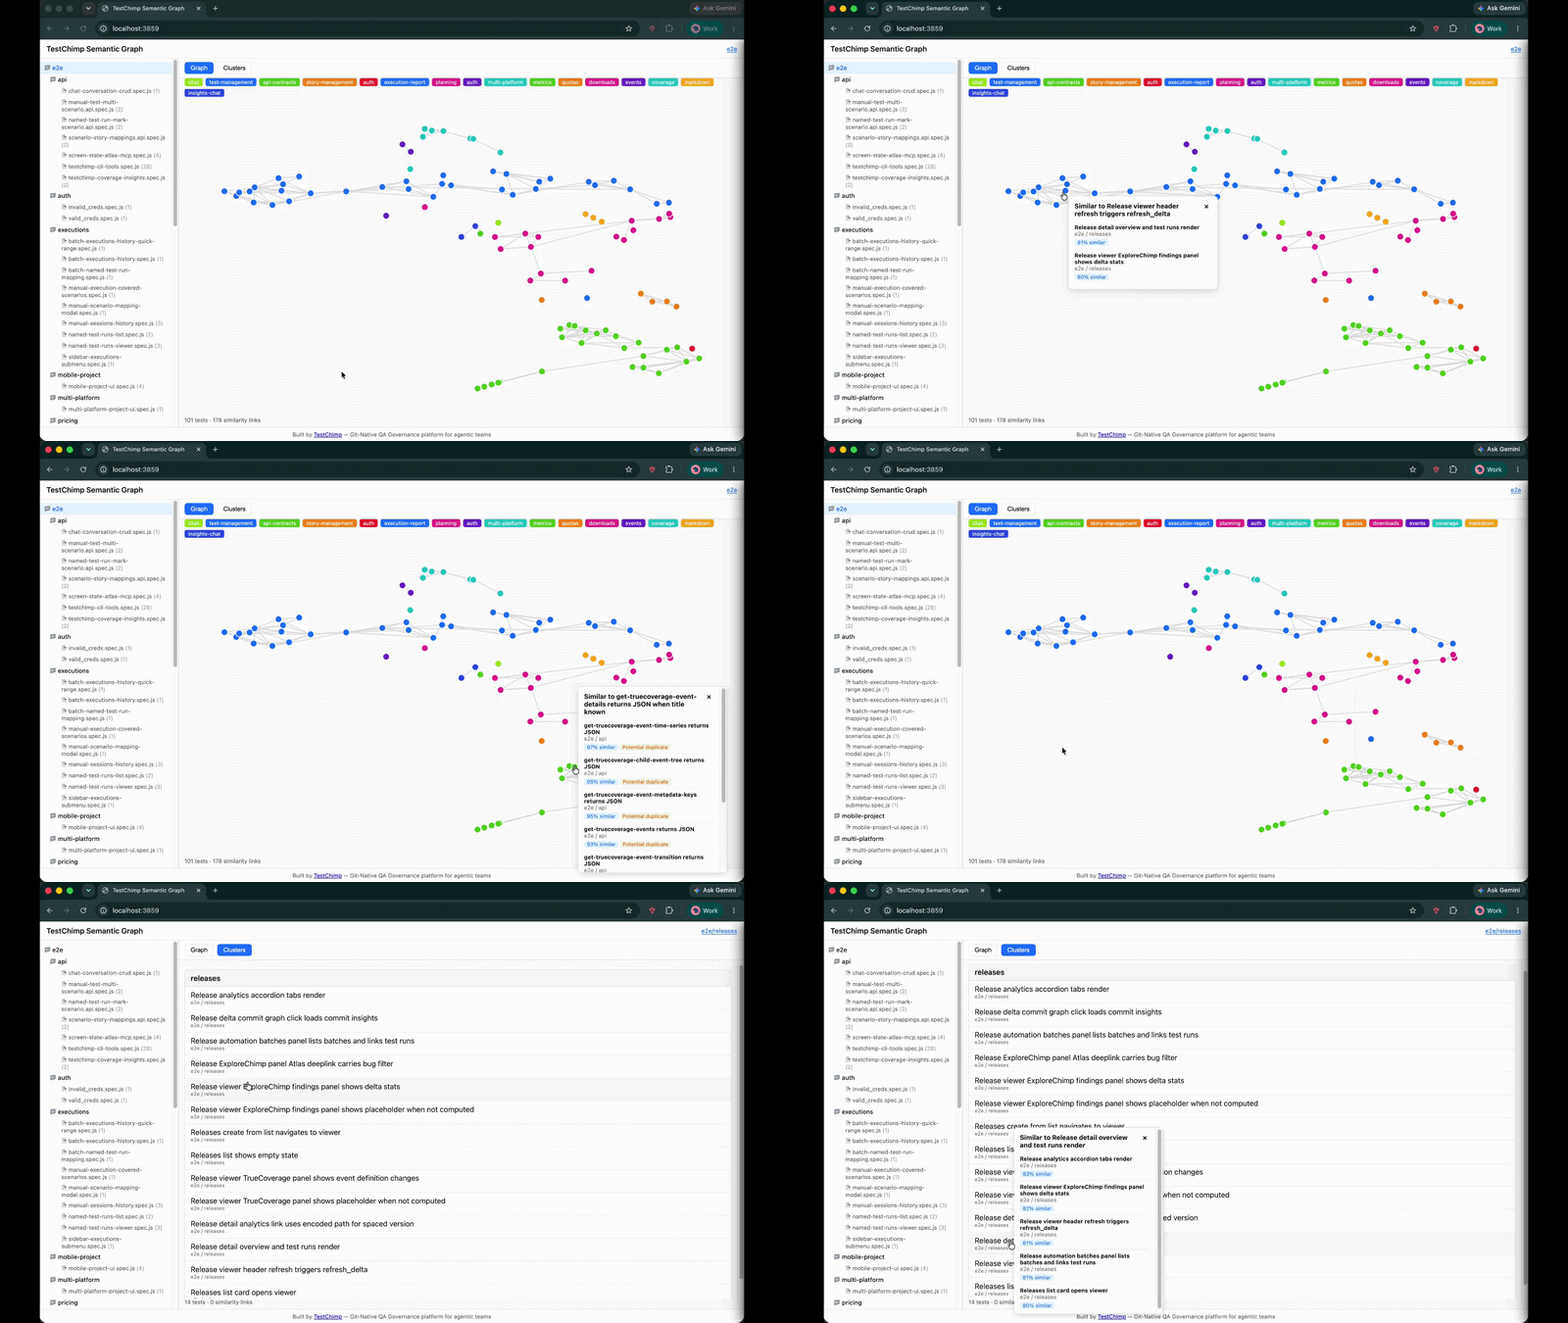
Semantic Graph visualization — folder tree, 2D similarity graph, and cluster list view


The new problem: agents author tests en masse​

For most of the last decade, the hard part of E2E testing was throughput: humans could not write and maintain enough tests to keep up with product velocity.

That constraint is collapsing. With Claude Code, Cursor, and agent skills like the TestChimp skill, a single prompt can produce a folder of well-formed Playwright specs in minutes. Coverage gaps that used to take a sprint to close can shrink to an afternoon.

The bottleneck has moved.

EraPrimary constraintWhat "good" looked like
Manual QAAuthoring speedEnough tests to cover the happy path
Human + low-code toolsUI-layer setup frictionStable POMs, fewer flakes
Agentic QASuite quality at scaleDistinct, high-signal tests—not copies

When an agent is rewarded for adding tests—closing coverage gaps, responding to PR feedback, or filling in scenarios from a test plan—it has no innate sense of "this already exists, slightly reworded." Left unchecked, suites balloon with:

  • Duplicate tests that assert the same behaviour under different titles
  • Near-duplicates that differ only in fixture data or selector phrasing
  • Clustered redundancy where five tests all exercise the same checkout edge case
  • Invisible overlap across folders, because no human (and no agent) holds the entire suite in working memory

This is the QA equivalent of boiling the lake in the wrong direction: lots of heat, little new coverage. Worse, duplicate tests inflate CI time, confuse failure triage, and give a false sense of depth—your line count grows while your behavioural breadth stalls.

The question is no longer "Can we write more tests?" It is:

"Are we writing useful, distinct tests—or just duplicative ones?"

That question needs a semantic answer, not a filename diff.


What is Semantic Graph?​

Semantic Graph is an open-source tool from TestChimp that maps your Playwright test suite by meaning, not syntax.

It is published as @testchimp/semantic-graph on npm and lives in the TestChimp/semantic-graph repository. Run one command against your tests directory; the CLI:

  1. Scans *.spec.ts, *.test.ts, and related Playwright files
  2. Parses each test's suite path, title, intent comments, scenario annotations, and body
  3. Embeds the canonical test text with an embedding model (OpenAI or Voyage AI)
  4. Clusters tests by semantic similarity using DBSCAN
  5. Lays out a 2D graph with UMAP so similar tests appear close together
  6. Names clusters with a lightweight LLM pass (e.g. "auth", "checkout", "api-contracts")
  7. Serves a local interactive UI at http://localhost:3859

No database. No TestChimp account required. Embeddings are computed in memory each run—ideal for local audits, pre-merge reviews, or giving an agent a structural view of the suite before it authors more tests.


How it works (the pipeline)​

Understanding the pipeline helps you interpret the graph—and tune how agents use it.

1. Parse tests into embedding-ready text​

The core library (@testchimp/semantic-graph-core) includes a vendored Playwright-aware parser. For each test it builds canonical text:

Suite: checkout > guest flow
Test: rejects expired coupon at payment step
Body:
Scenario: Guest checkout with invalid coupon
// intent: verify error copy and no charge created
await page.goto('/checkout');
...

Parsing captures intent comments and scenario annotations—the same metadata agents should be authoring anyway when following requirement traceability conventions. Two tests with different selectors but the same intent will land close together in embedding space.

2. Embed with cosine similarity​

Each test's text is sent to an embedding API in batches (default model: text-embedding-3-small for OpenAI, voyage-4 for Voyage). The tool computes cosine similarity between vectors and applies configurable thresholds:

SignalDefault thresholdMeaning
Graph edge≥ 0.75Tests are semantically related
Similar≥ 0.80Worth reviewing together
Potential duplicate≥ 0.92Strong dedup candidate

These thresholds mirror how humans judge redundancy: not byte-identical, but "would a failure in one make the other pointless?"

3. Cluster with DBSCAN​

Similar embeddings are grouped with DBSCAN density clustering—no need to pick k clusters upfront. Each cluster gets an LLM-generated label (e.g. "settings-page", "admin-tasks") so the legend is readable at a glance.

4. Visualize with UMAP + D3​

A seeded UMAP projection maps high-dimensional embeddings to 2D coordinates. The bundled UI (built with D3.js) renders:

  • Graph view — nodes as tests, edges as similarity links; click a node to see nearest neighbours and duplicate flags
  • Clusters view — grouped list with colour-coded legend
  • Folder tree — scope the graph to a directory or single file

Zoom into tests/checkout/ before a refactor. Scan the whole suite before a release. Hand the URL to an agent and ask it to propose merges.


Why this matters for agentic QA workflows​

Semantic Graph is not a replacement for TrueCoverage—production-informed prioritization—or requirement traceability. It solves a orthogonal problem: intra-suite redundancy.

Here is where it fits in a modern agent loop:

Before the agent writes​

Run Semantic Graph and attach the cluster summary to the agent's context. Instructions become concrete:

"We already have four tests in the checkout cluster covering coupon validation. Do not add another unless you are testing a different failure mode."

This is cheaper and more reliable than asking the agent to grep test titles.

After the agent writes​

Re-run the graph on the PR branch. New nodes that snap onto existing clusters—or spike duplicate scores above 0.92—are review flags. Pair with CI the same way you gate on lint or coverage deltas.

During suite health reviews​

Quarterly "suite diet" sessions used to mean spreadsheets and gut feel. Now: filter to clusters with high internal similarity, merge or delete, and measure CI time recovered.

Complement to production signals​

TrueCoverage tells you what behaviours users need tested. Semantic Graph tells you whether your existing tests are saying the same thing twice. Both are necessary for a suite that is broad and lean.


What you see in the UI​

The demo above shows the full workflow:

  1. Left panel — folder tree mirroring your repo layout; click a folder or file to scope the view
  2. Graph mode — force-directed layout; proximate nodes are semantically alike
  3. Clusters mode — tests bucketed with named themes
  4. Popover — click any test to see top similar neighbours, similarity scores, and potential duplicate badges

The UI ships inside the npm package—no separate install. It is the same "freebie" static app published as @testchimp/semantic-graph-viz in the monorepo for anyone who wants to embed or fork it.


Try it yourself​

Prerequisites​

  • Node.js 18+
  • An API key for embeddings (and cluster naming):
    • OpenAI — one key covers embeddings + LLM, or
    • Anthropic + Voyage — Claude for cluster labels, Voyage for embeddings (Anthropic does not ship an embedding API)

Quick start (OpenAI)​

export PROVIDER=openai
export API_KEY=sk-...

npx @testchimp/semantic-graph visualize --tests-dir ./tests

Open the printed URL (default port 3859). Add --verbose for embedding progress and diagnostics.

Claude + Voyage​

export PROVIDER=anthropic
export API_KEY=sk-ant-...
export VOYAGE_API_KEY=pa-...

npx @testchimp/semantic-graph visualize --tests-dir ./tests

All options​

FlagDescription
--tests-dir <path>Root folder to scan (required)
--port <n>Listen port (default 3859)
--verbose / -vDiagnostics to stderr

See the README for environment variables, monorepo build instructions, and npm publish details.


Continuous governance with TestChimp​

Semantic Graph is deliberately local and standalone—a flashlight you can shine on any Playwright repo, TestChimp customer or not.

For continuous duplicate detection, requirement traceability, release confidence, and keeping suites healthy as agents keep authoring, see TestChimp—the git-native QA governance platform built for agentic teams. Install the TestChimp Agent Skill and run /testchimp test after each PR to orchestrate coverage, exploration, and plan alignment in one loop.


FAQ​

What test file types are supported?​

The scanner picks up *.spec.ts, *.spec.js, *.test.ts, *.test.js, and .mjs / .cjs variants under your chosen root—standard Playwright test layouts.

Does it require a TestChimp account?​

No. Semantic Graph runs entirely locally. You only need embedding (and optionally LLM) API keys.

How is this different from code coverage?​

Code coverage measures which lines executed. Semantic Graph measures whether test intentions overlap. A suite can have high line coverage and still be full of redundant scenarios.

How is this different from duplicate detection by test name?​

Titles lie. Agents especially love paraphrasing: "should reject invalid coupon" vs "guest user sees error for expired promo code." Embeddings capture the full body and intent, not the string on line one.

Can I use it in CI?​

Today the primary interface is the local visualize command and JSON APIs (/api/graph, /api/similar). For CI gates, parse the API responses or run before review and archive the graph output. Continuous server-side governance is on the TestChimp platform roadmap.

What embedding models are supported?​

Defaults: text-embedding-3-small (OpenAI) and voyage-4 (Voyage). Override with EMBEDDING_MODEL. LLM cluster naming defaults to gpt-5-nano or claude-3-5-haiku-latest.

Is the source code open?​

Yes. MIT-licensed monorepo: github.com/TestChimp/semantic-graph. Packages: @testchimp/semantic-graph-core, @testchimp/semantic-graph, @testchimp/semantic-graph-viz.


Summary​

Agentic QA solved test authoring at scale. The next discipline is test distinctness at scale—ensuring every new spec adds behavioural breadth, not noise.

Semantic Graph gives you a semantic map of your Playwright suite: embeddings for meaning, DBSCAN for clusters, UMAP for intuition, and a local UI for humans and agents alike. Run it before you merge agent-authored tests. Run it when CI gets slow. Run it when you suspect the lake is boiling but not reducing risk.

Get started: github.com/TestChimp/semantic-graph · npx @testchimp/semantic-graph visualize


References and further reading​

Test Runs: Turn Testing Into Release Confidence

· 11 min read
Nuwan Samarasekera
Founder & CEO, TestChimp

TL;DR: TestChimp now has Test Runs—named validation campaigns that roll up scenario progress across manual sessions and automation batches. If you have used test runs in TestRail, Qase, or PractiTest, the concept will feel familiar. What is different is that scope, progress, and drill-down inherit the folder structure of your test plan—not a flat, manually curated case list copied into yet another container.

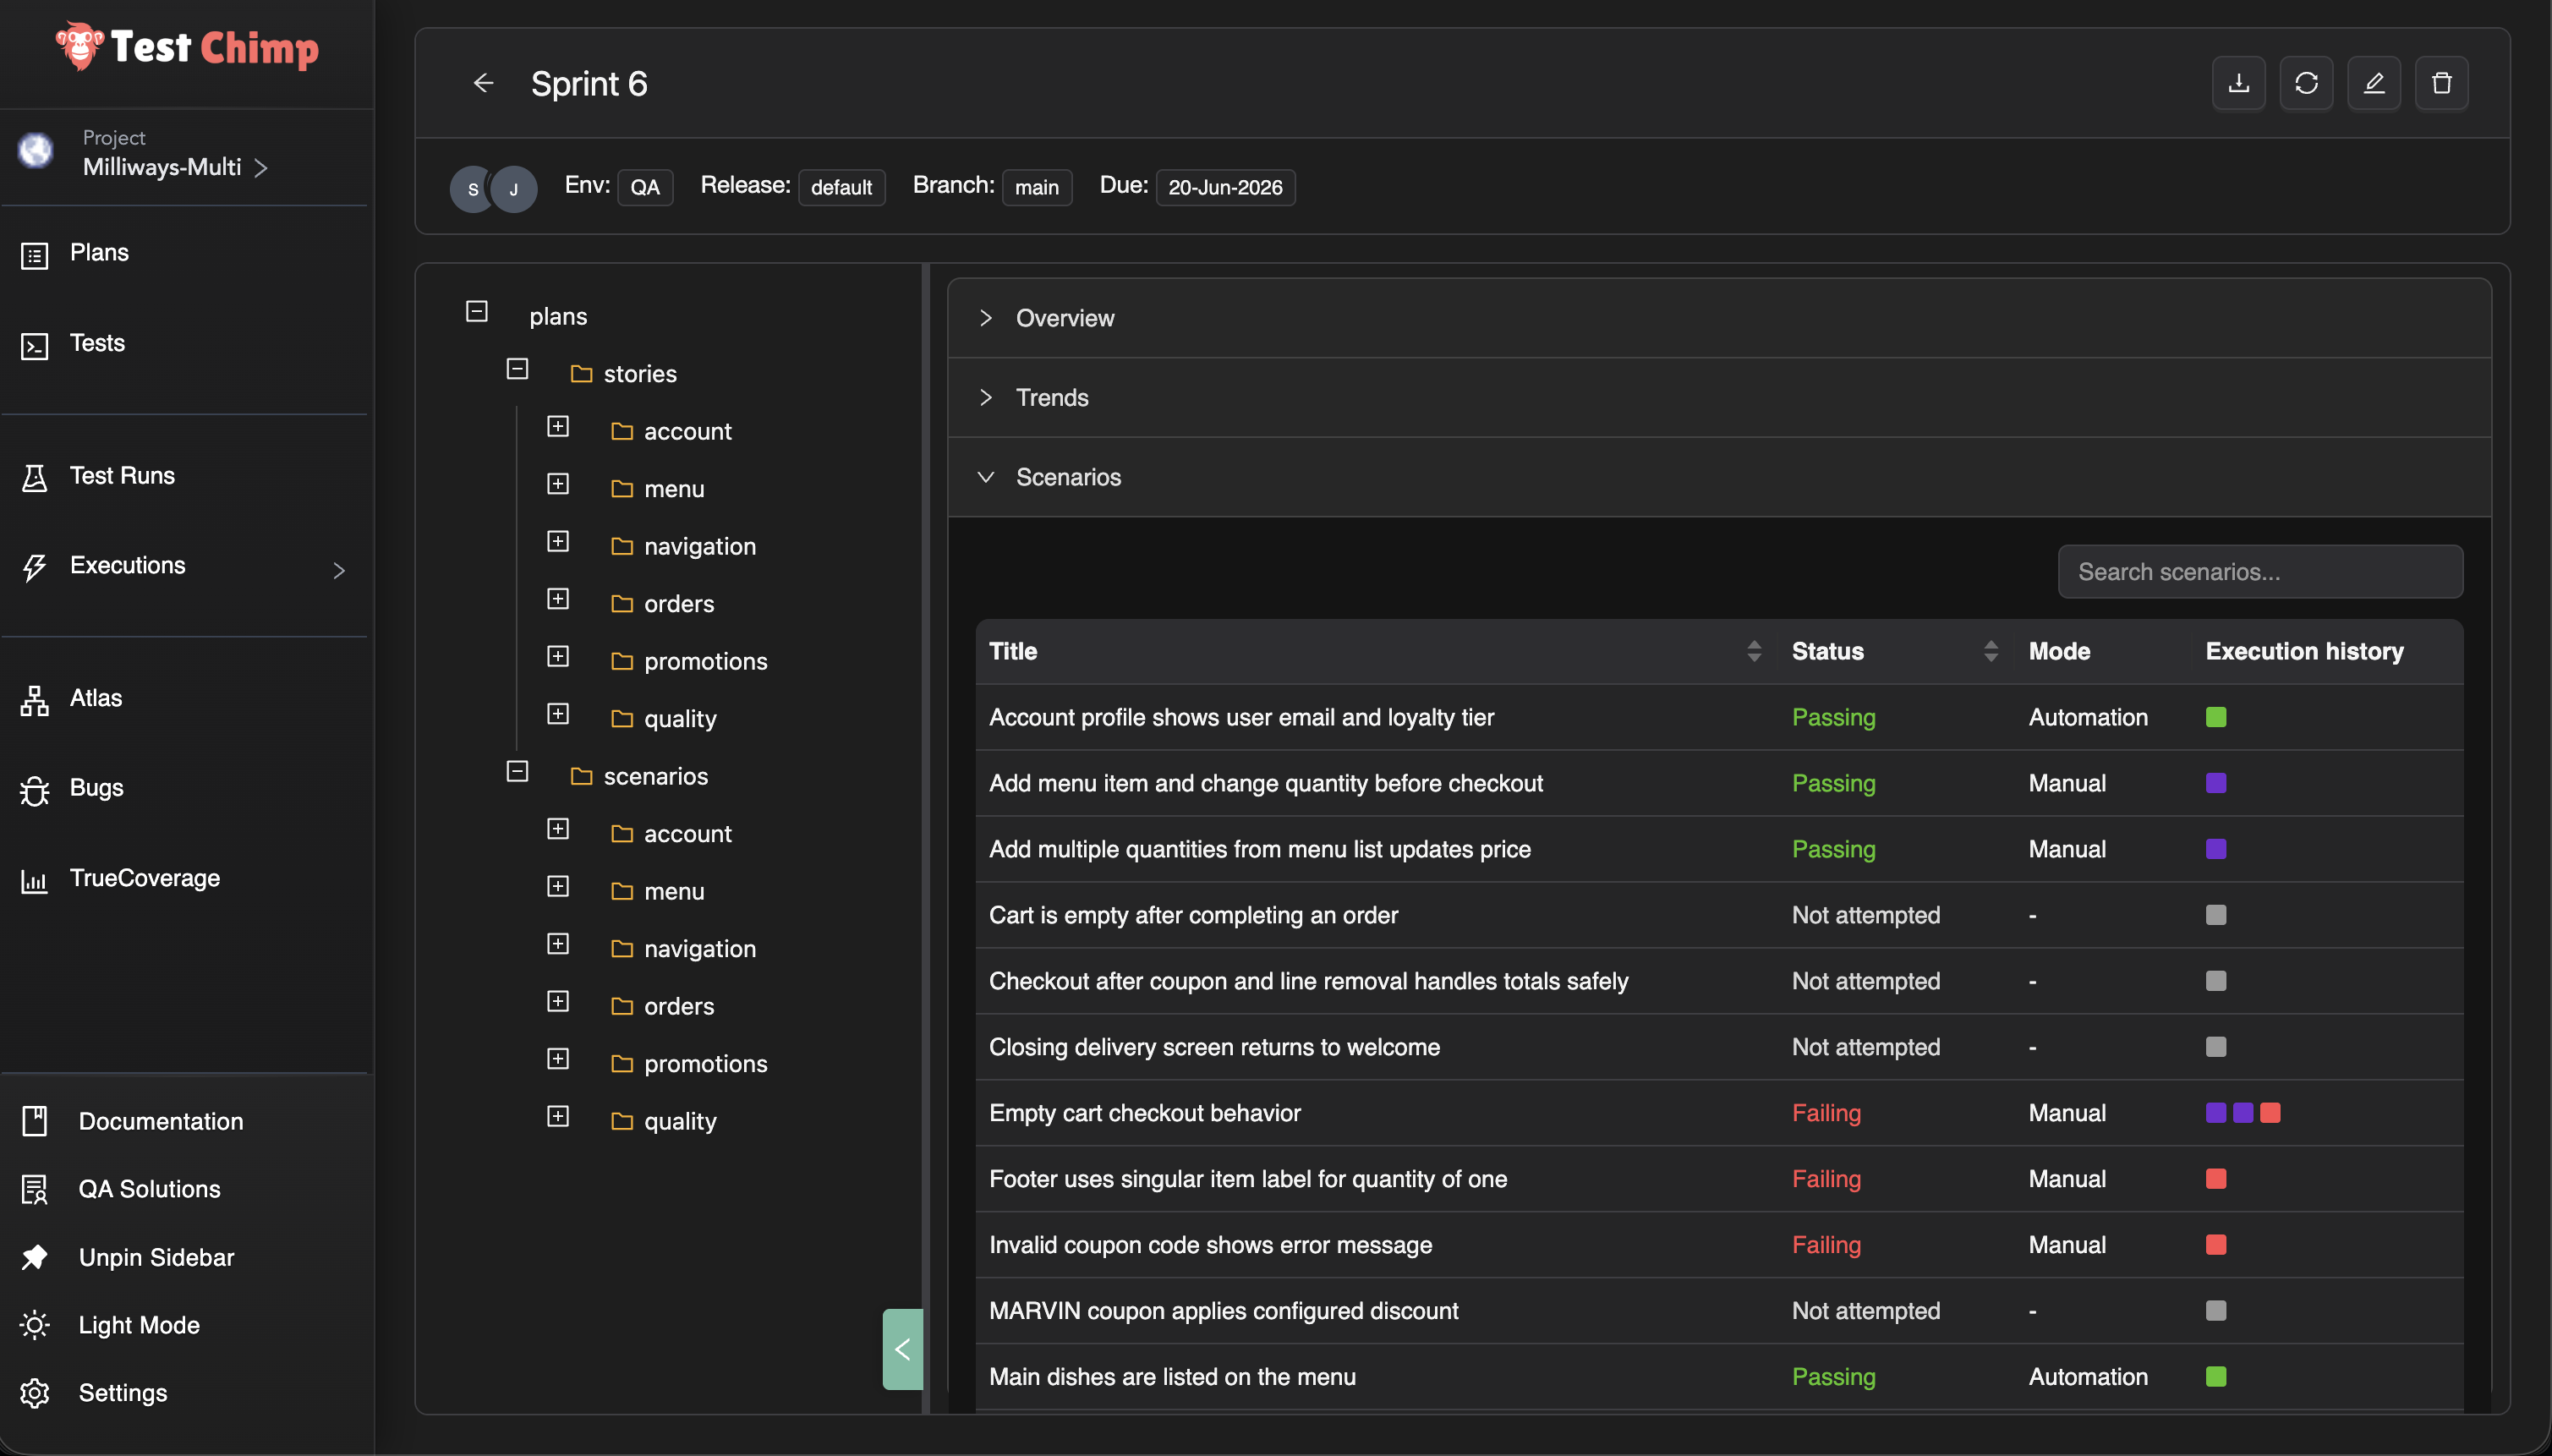
Test Run viewer — overview, trends, and folder-scoped scenario progress


What is a test run?​

In software testing, a test run is the execution of a defined set of tests against a specific version or build of the system under test. The ISTQB glossary defines it as “the execution of a test suite on a specific version of the test object.” Test execution—the process of running those tests and recording outcomes—is a core part of the fundamental test process described in ISO/IEC/IEEE 29119.

In practice, teams use test runs to answer a release question: Given the scenarios we committed to validate for this sprint or version, how far along are we—and what is still failing?

Traditional test management systems such as TestRail and Qase model a run as a container: selected test cases, assignees, pass/fail/blocked status, and often milestone or environment context. TestRail’s guidance notes that runs are typically created per sprint or release so managers can track progress in real time.

Test Runs in TestChimp preserve that coordination purpose while changing what sits underneath—the plan, the executions, and how progress rolls up.


The gap test runs are meant to close​

Most teams already know the shape of a release cycle:

  • a defined set of scenarios to validate
  • manual testers working through critical paths
  • automation running in CI on every build
  • a lead asking, “Are we done yet?”

Traditional tools answer the last question with a run—but the artifacts rarely stay connected.

User stories often live in Jira or similar issue trackers. Scenarios live in a TMS. Manual evidence sits in screenshots and Slack. Automation results sit in GitHub Actions, Jenkins, or a Playwright CI report. Requirement traceability—linking requirements to verifying tests, as described in ISO/IEC/IEEE 29148—is often maintained in spreadsheets or a test traceability matrix that goes stale.

The run becomes another manually curated list, disconnected from how the product is organized and how work actually happens.

We built Test Runs in TestChimp to close that loop without duplicating your plan in a flat case catalog.


Same concept, different foundation​

A Test Run in TestChimp is still a time-bound validation campaign: a title, optional environment and release context, collaborators, a due date, and a scope of scenarios to validate.

What changes is everything underneath.

Traditional TMS test runTestChimp Test Run
Flat list of test cases copied into the run (TestRail add_run)Scope selected from your plans folder tree (stories and scenarios)
Manual results entered in the TMS UIManual sessions linked from the Chrome extension or web UI—with step evidence
Automation results imported via API or re-entered (TestRail result import)Automation batches linked after CI Playwright runs; no duplicate result entry
Progress is case-by-case checkboxesProgress is scenario status (passing / failing / not attempted) from the latest linked execution
Roll-up is a fixed “suite” or “section”Roll-up follows any folder in your plan—checkout today, authentication tomorrow

You are not maintaining a parallel catalog. You are pointing a run at the test plan you already have.


One run, both execution types​

The most common fracture in enterprise QA is two parallel tracks:

  • manual validation tracked in a test management tool
  • automated validation tracked in CI or a vendor dashboard

Qase’s own documentation describes the tension: auto-generated CI run names pile up quickly, and teams need runs that “tell a story at a glance” when reviewing overnight failures before a release.

A Test Run in TestChimp is deliberately execution-type agnostic. Link a manual session from exploratory regression. Link tonight’s Playwright batch. Link both to the same run. Scenario status reflects the latest relevant execution—whether a human marked a session passed or CI reported a SmartTest failure.

That is the same unified coverage story we told with manual testing and traceability—now packaged for release-scale questions instead of only folder-level requirement traceability insights.


Folder-based progress, not flat lists​

Because TestChimp organizes stories and scenarios as markdown files in folders (Test Planning as Code), a test run inherits something traditional tools struggle to offer: scoped views at any granularity.

Select the root of the run and see overall progress for the whole release. Select checkout/ and see only checkout scenarios. Select a single story file and see exactly what is left on that requirement.

No re-tagging. No re-grouping cases into ad hoc suites every sprint. The folder structure you already use for planning becomes the structure you use for reporting—the same principle as coverage at any folder level in Test Planning.

That matters when:

  • feature teams own folders, not individual case IDs
  • a release spans several modules but not the entire backlog
  • you need a standup answer for one area without re-filtering a 2,000-row grid

Trend charts in the run viewer show how passing, failing, and not-attempted counts move over time—useful for daily readouts without exporting to a spreadsheet.


Why this fits the agentic era​

Test runs are not a throwback to heavyweight process. They are a lightweight coordination layer on top of artifacts agents can already read.

Your scenarios are files. Your tests link with scenario annotations (requirement traceability in code). Executions feed the same traceability graph whether they are manual or automated. A test run simply names the campaign—“Sprint 42 regression”, “v2.1 sign-off”—and gives humans a place to see progress while agents keep authoring against the same plan.

We are not replacing CI dashboards or extension manual capture. We are giving product and QA leads a single pane for this validation cycle, grounded in requirements rather than orphaned case records.


See it in action​

Using Test Runs in TestChimp — video walkthrough

For step-by-step setup—creating a run, defining scope, linking batches and sessions, reading the viewer—see Test Runs in the docs.


Frequently asked questions​

What is a test run in software testing?​

A test run is a structured execution of a selected set of tests against a specific build, release, or milestone. The ISTQB glossary defines it as running a test suite on a particular version of the system under test. Teams use runs to track who tested what, record pass/fail outcomes, and report release readiness.

How is a TestChimp Test Run different from a TestRail or Qase test run?​

The coordination goal is the same: scope a set of tests, track progress, report status. The foundation is different. Traditional tools copy flat test cases into a run container (TestRail runs, Qase test runs). TestChimp scopes runs from your existing plans folder tree and aggregates results from linked manual sessions and automation batches—without maintaining a duplicate case list.

Can one test run include both manual testing and test automation?​

Yes. TestChimp Test Runs are execution-type agnostic. Link manual sessions captured via the Chrome extension and automation batches from Playwright CI to the same run. Each scenario’s status reflects the latest linked execution, whether the outcome came from a human or from CI.

Do I need to duplicate test cases to create a test run?​

No. You select scope from folders and files already in Test Planning. Scenarios remain the same markdown artifacts your team authors and version-controls; the run is a pointer and progress lens, not a second catalog.

What is folder-based test run progress?​

Because stories and scenarios live in a nested folder structure (Test Planning as Code), the test run viewer lets you drill into any folder or file and see passing, failing, and not-attempted counts for just that subtree. Root shows the full run; authentication/ shows auth only—without re-tagging cases or rebuilding suites each sprint.

How do Test Runs relate to requirement traceability?​

Requirement traceability links requirements and scenarios to executions over time—supporting the verification relationships described in standards such as ISO/IEC/IEEE 29148. Test Runs add a named campaign layer: a due date, collaborators, explicit scope, and release-oriented progress for one validation cycle. Traceability is ongoing product health; test runs are this regression or this release sign-off.

When should we use test runs vs Test Planning insights alone?​

Use Test Planning insights when you want continuous coverage visibility for a folder, environment, and time range. Use Test Runs when you need a time-bound campaign with assigned collaborators, a due date, and a dedicated dashboard fed by executions you link during that cycle—similar to how teams use TestRail test runs per sprint, but unified across manual and automated work.

Yes. Automation batches can be linked from Executions → Automation Batches (list or batch viewer). Manual sessions can be linked at capture time in the extension or afterward from the manual session viewer. Many-to-many linking is supported—a batch or session can belong to multiple active runs.


Try it​

Open Test Runs from the TestChimp sidebar, create a run scoped to the folder your team owns, and link the next manual session or automation batch you execute.

If you are comparing approaches, our requirement traceability post explains the foundation; this feature adds the campaign layer on top when you need to track a specific release or regression cycle end to end.

We are iterating on collaborator workflows, PDF reporting, and deeper agent integration. Feedback welcome—especially from teams migrating off TestRail-style run models.


Further reading​

TestChimp

Test management & QA concepts

Automation & CI

Related posts

Multi-platform test automation: one test codebase for web and mobile

· 11 min read
Nuwan Samarasekera
Founder & CEO, TestChimp

TL;DR: If your product ships both a web app and native mobile apps, you are probably maintaining two automation codebases that repeat the same Arrange logic—users, listings, payments, feature flags—before any UI step runs. TestChimp Multi-Platform Projects put Playwright (web), Mobilewright (iOS/Android), and API tests in one Git-connected scaffold, with shared business logic for world-state setup and platform-specific UI tests, coverage, and UX analytics. UI interactions stay platform-specific; test infrastructure does not have to—and neither does your requirements, TrueCoverage, or Atlas view of quality.

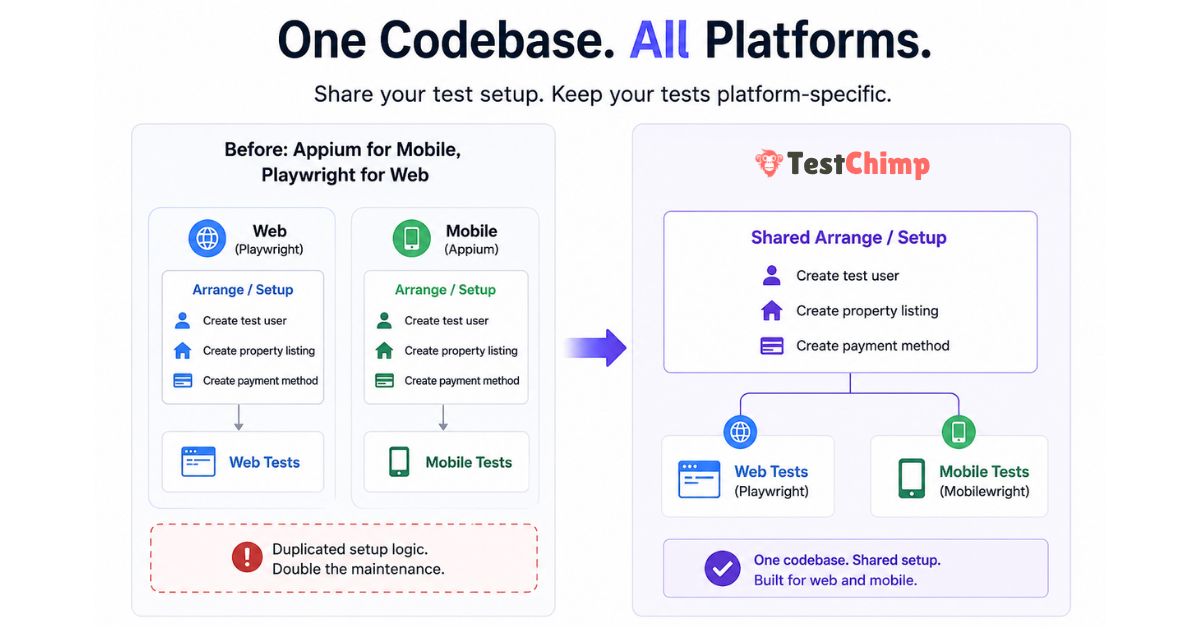
TestChimp Multi-Platform project: shared test codebase with Web, iOS, and Android coverage


The hidden cost of “Appium for mobile, Playwright for web”​

Cross-platform products rarely differ at the data layer. A booking marketplace needs the same primitives whether the customer taps Book in Safari or in your iOS app:

  • A test user with a known identity
  • Inventory (for example, a few property listings)
  • A valid payment method linked to that user
  • Whatever else your domain requires before the flow under test is meaningful

None of that is inherently web or mobile. It is application state—the Arrange phase in the classic Arrange → Act → Assert model (Martin Fowler on Given-When-Then).

Yet the dominant split for years has been:

LayerTypical tooling
Web UIPlaywright
Native mobile UIAppium (often with WebDriver-style clients)
Shared setupDuplicated across two repos or two top-level trees

Teams end up with parallel helper libraries, duplicate seed scripts, and drift—web tests create users one way, mobile tests another, and failures become “which stack is wrong?” instead of “did we break the product?”

The Act and Assert steps should differ by surface: selectors, gestures, and viewport behaviour are platform-specific. The Arrange layer often should not.


Why Mobilewright changes the consolidation story​

Mobilewright brings native iOS and Android automation closer to the Playwright mental model: async tests, auto-waiting, project matrices in config, and fixtures that feel familiar if you already run npx playwright test.

That alignment matters for multi-platform engineering, not only for “mobile testing” as an isolated workstream:

  • Same language and patterns (commonly TypeScript/JavaScript in one repo)
  • Same CI habits (config projects, parallel workers, artifact uploads)
  • Same opportunity to share code for factories, API clients, and database seeding

TestChimp already extended the plan → repo → agent → CI loop to native mobile (native mobile testing announcement). Multi-Platform Projects are the next step: one TestChimp project type and one tests tree for teams that ship web and mobile together.


What TestChimp Multi-Platform Projects provide​

When you create a TestChimp project with type Multi-Platform, the platform scaffolds a single tests/ directory that includes:

  • web/ — browser SmartTests via Playwright (playwright.config.js, web/e2e/, web/pages/, web/fixtures/)
  • mobile/ — native UI tests via Mobilewright (mobilewright.config.ts, mobile/e2e/common|ios|android/, mobile/pages/, mobile/fixtures/)
  • api/ — platform-agnostic HTTP specs (often the fastest way to Arrange and to assert backend state)
  • shared/ — cross-suite helpers and fixture factories (seed users, auth builders)—excluded from test discovery, intended for reuse
  • setup/ — global setup run once before suites in both configs

Platform-specific UI code lives in platform-specific folders. Business logic that creates entities and prepares situations can live in shared/, api/fixtures/, or factories imported by both web and mobile specs.

tests/
setup/
shared/ ← shared Arrange logic (users, listings, payments, flags)
api/
fixtures/
mobile/
fixtures/
pages/
e2e/
common/
ios/
android/
web/
fixtures/
pages/
e2e/
playwright.config.js
mobilewright.config.ts

Result for QA and platform teams:

  • Less duplicated infrastructure — one place to update “premium user with saved card”
  • Less maintenance — fix seeding once; web and mobile suites consume the same factories
  • More consistency — the same world-state definitions drive cross-platform regression

Smart Steps (ai.act, ai.verify) remain web-only today; native mobile continues to use standard Mobilewright APIs for UI Act steps. For platform capabilities and CI notes, see Mobile testing.


One project, platform-specific coverage and UX intelligence​

Consolidating tests in one repo does not mean blending web and mobile into one misleading coverage number. Multi-Platform Projects keep one TestChimp project and one plans/tests Git mapping, while treating Web, iOS, and Android as first-class execution platforms everywhere insights matter.

Think of it as: shared requirements and shared Arrange code, sliced execution and analytics per surface.

AreaWhat stays unifiedWhat is platform-specific
Test plansMarkdown scenarios and user stories in plans/Coverage and execution history per platform
TrueCoverageSame project, env/release/branch scopeProduction RUM + test attribution per platform
AtlasSame product vocabulary (screens/states)SiteMap tree, bugs, and baselines per platform

Requirement traceability (Test Planning)​

Requirement traceability links scenarios in Git to SmartTest runs. On a Multi-Platform project, the Insights tab and scenario execution history respect an execution scope that includes platform alongside environment, release, branch, and time range.

  • Choose Web, iOS, or Android to see which scenarios passed or failed on that surface.
  • Drill into a user story to view execution history filtered to the platform you care about—useful when mobile lags web or when a shared scenario is covered by both web/e2e/ and mobile/e2e/ specs.
  • Folder roll-ups in Test Planning still work; the platform dimension answers questions like “Is checkout covered on iOS in QA this week?” without spinning up a second project.

Agents and CI should report runs with the correct platform identity (via @testchimp/playwright / Mobilewright reporter wiring) so linked scenario-annotated tests attribute to the right slice. Your plans can describe behaviour once; coverage status reflects where that behaviour is actually exercised.

TrueCoverage (production-informed gaps)​

TrueCoverage compares real user journeys (RUM) with automation coverage (test-tagged events). Each surface has its own instrumentation path—@testchimp/rum-js on web, testchimp-rum-ios and testchimp-rum-android on native—with TESTCHIMP_PROJECT_TYPE set to web, ios, or android as described in Instrumenting your app.

On Multi-Platform projects, the TrueCoverage execution scope offers the same Web / iOS / Android selector. That keeps comparisons honest:

  • Production events from the iOS app are not mixed with web test runs when you evaluate gaps.
  • Agents prioritizing fixtures and tests can target the platform where users actually hit the gap—for example high drop-off on Android checkout vs healthy web funnel.

Instrument every surface you ship; scope analytics one platform at a time when deciding what to automate next.

Atlas (UX bugs on the right surface)​

Atlas is TestChimp’s app-structure map: screens and states, with UX and non-functional bugs tagged where ExploreChimp or SmartTests observed them. For multi-platform products, the SiteMap is not a single blurred tree—you browse and triage per platform.

  • A platform selector (Web, iOS, Android) loads the screen-state tree for that execution platform.
  • Bugs discovered during exploration or annotated runs are associated with screen-state context on that platform, so a layout regression on mobile does not drown in unrelated web noise.
  • markScreenState checkpoints in web Playwright tests and mobile Mobilewright tests feed the vocabulary ExploreChimp and Atlas use; platform-specific folders keep Act steps separate while structure stays comparable across surfaces.

That matters for engineering leads reviewing quality: you open Atlas, pick iOS, and see UX issues on the iOS SiteMap—assign owners per screen, run targeted ExploreChimp from a node, and track fix status without conflating desktop-only flows.


Arrange vs Act: what to share (and what not to)​

PhaseWebMobileShare?
ArrangeAPI/fixtures/DB seedSame backendsYes — prefer api/, shared/, or backend fixtures
ActPlaywright locators & navigationMobilewright gestures & native selectorsNo — keep under web/ and mobile/
AssertDOM + optional API probesNative UI + optional API probesOften partial — API assertions can be shared; UI assertions stay local

This is the same insight as fixtures and Object Mother patterns in xUnit-style testing (xUnit Test Patterns — test fixture, Object Mother): push incidental complexity of setup out of the test body and into reusable, composable building blocks. Agents authoring tests benefit even more when Arrange is API-backed rather than repeated through slow UI clicks (fixtures in agentic automation).


How to get started​

  1. Sign in to TestChimp and open Add project.
  2. Choose project type Multi-Platform (web + native mobile in one codebase).
  3. Connect Git and map your plans/ and tests/ folders (same workflow as web-only projects).
  4. Run your usual agent workflow—for example /testchimp test after a PR—using the TestChimp skill on Claude or Cursor.

Docs to read next:

If your team already runs separate web and mobile automation repos, migrating Arrange into shared/ and api/ first—before moving UI specs—is usually the lowest-risk path. You keep platform runners; you stop duplicating the world behind them.


Frequently asked questions​

Is Multi-Platform the same as creating separate web and mobile TestChimp projects?​

No. Multi-Platform is one project and one scaffold where both Playwright and Mobilewright configs and folder layouts coexist. Separate Web and Mobile project types still exist when you only need one surface.

Do I have to abandon Appium to use this?​

TestChimp’s native path is Mobilewright, not Appium. Teams often adopt it when they want Playwright-like authoring and shared TypeScript with web suites. If you are standardized on Appium, compare effort to maintain duplicate Arrange code versus migrating Act layers over time while centralizing setup in API tests first.

Can API tests really replace UI for Arrange?​

For many domains, yes—and Playwright’s request context (and direct HTTP clients in api/*.spec.js) are the fastest, least flaky way to reach a given situation. UI Act remains necessary to validate what users see and tap; UI Arrange is usually optional once APIs or admin seeds exist (QA in production).

What’s the biggest win if we already have Playwright on web?​

The win is often consolidation of test infrastructure, not “another mobile runner.” Mobilewright lets mobile join the same repo conventions as web so agents and engineers maintain one mental model for fixtures, plans, and CI.

If plans and tests are in one repo, is coverage merged across web and mobile?​

No—not by default. Requirement coverage, TrueCoverage comparisons, and Atlas navigation use an explicit platform dimension on Multi-Platform projects (Web, iOS, Android). Shared scenarios in plans/ can be linked from both web/ and mobile/ tests; the platform scope shows where those links actually ran and passed.


Further reading​

TestChimp

Playwright & Mobilewright

Patterns & quality engineering

Try it

  • TestChimp — create a Multi-Platform project and connect your repository. Feedback welcome via your usual support channel or community touchpoints linked from the product.

Shipping both web and mobile? The duplication you feel in test automation is often in the Arrange layer—not in the product. Multi-Platform Projects let you maintain that layer once, run Playwright and Mobilewright where users actually interact, and still read requirements, TrueCoverage, and Atlas with clear per-platform signal.

TestChimp now supports native mobile testing

· 4 min read
Nuwan Samarasekera
Founder & CEO, TestChimp

TL;DR: TestChimp now supports native mobile app testing on both iOS and Android. This brings the same seamless workflow we unlock for your web testing - just say "/testchimp test".

TestChimp native mobile testing support


What shipped​

Mobile is not a separate product bolted on the side. It is the same plan → repo → agent → CI loop you use for web SmartTests, extended to native apps via Mobilewright—a Playwright-style API and toolchain for iOS and Android.

Create a TestChimp project with project type iOS or Android, connect Git for your plans and tests folders, install the TestChimp skill on Claude or Cursor, and after each PR say /testchimp test. The platform keeps doing what you expect: wiring RUM, reading scenarios, closing coverage gaps, and surfacing analytics—now on screens that live inside your app, not only in the browser.

For setup details and parity tables, see Mobile testing (iOS and Android).


Five value props for Claude-based test authoring—four are live on mobile​

TestChimp’s agentic QA model rests on five pillars. On native mobile, four are fully supported today:

Value propWhat it gives youMobile status
Requirement traceabilityPlans ↔ tests feedback loop; scenarios stay linked to coverageSupported
TrueCoverageReal user behaviour ↔ tests feedback loop; production informs what to automateSupported
QA workflow executionSeed/probe endpoints, fixtures for reusable world-states, test authoring, scenario linkingSupported
ExploreChimpAnalytics on screenshots, logs, and network from exploratory runsSupported
Smart StepsIntent-based steps in test scripts (ai.act, ai.verify, …)Not yet

Smart Steps remain web-only for now. Native mobile tests use standard Mobilewright APIs for UI interaction—the same deterministic, async execution model you know from Playwright, without the intent-comment layer on top.

Everything else—the closed loops between requirements, production behaviour, fixtures, and tests—carries over.


The same seamless workflow as web​

You do not need a new playbook. The habit stays the same:

  1. Install the TestChimp skill on Claude or Cursor.
  2. After each PR, run /testchimp test (or your team’s equivalent in the agent host).

TestChimp then orchestrates the work you would otherwise stitch together manually:

  • RUM libraries — Wire up testchimp-rum-ios and testchimp-rum-android so production and test runs speak the same event vocabulary.
  • Instrumentation — Understand real user behaviour: segments, interaction flows, and scenarios—not just “the app launched.”
  • Plans and stories — Read markdown scenarios, pull requirement traceability insights, and see what is still untested.
  • Test authoring — Author Mobilewright tests to cover gaps, with traceability annotations where your plan expects them.
  • Spot analytics — Run ExploreChimp-style analysis on new screens: visuals, logs, network.

You still get continuous transparency of QA posture in one platform—requirements, coverage, failures, and exploration—whether the surface is a browser tab or a native view controller.


Familiar tests, less flakiness​

Mobile tests are authored in a Playwright-familiar style via Mobilewright: auto-waits, async execution, and fixtures that behave like the ecosystem you already trust on web. That consistency matters when agents (and humans) move between repos that ship both web and mobile.

Fair credit where it is due: the reliability characteristics of that execution model come from Mobilewright—and we are grateful they exist. Mobilewright moved our timeline for serious native support forward by at least a year. If you need cloud-hosted real devices in CI, Mobile Use integrates with the same stack.


What to do next​

If you are already on TestChimp for web, create an iOS or Android project, point Git at your plans and tests folders, and run /testchimp test on your next mobile PR. Smart Steps will follow; the feedback loops you care about for shipping quality are already there.

Fixtures - the 'unsung hero' in agentic test automation

· 4 min read
Nuwan Samarasekera
Founder & CEO, TestChimp

In E2E tests, Page Object Models (POMs) were the “popular kids”. Everyone knew them, everyone praised them. Yet not many knew of (or extensively used) "fixtures".

While there are many use cases of fixtures, a prominent one is - they let you pipe pre-created entities to tests that represent specific situations (a user with a valid subscription, a premium tier org etc.).

Ok - before we go into why it matters, let's back off a bit.

Arranging the world-state for the test​

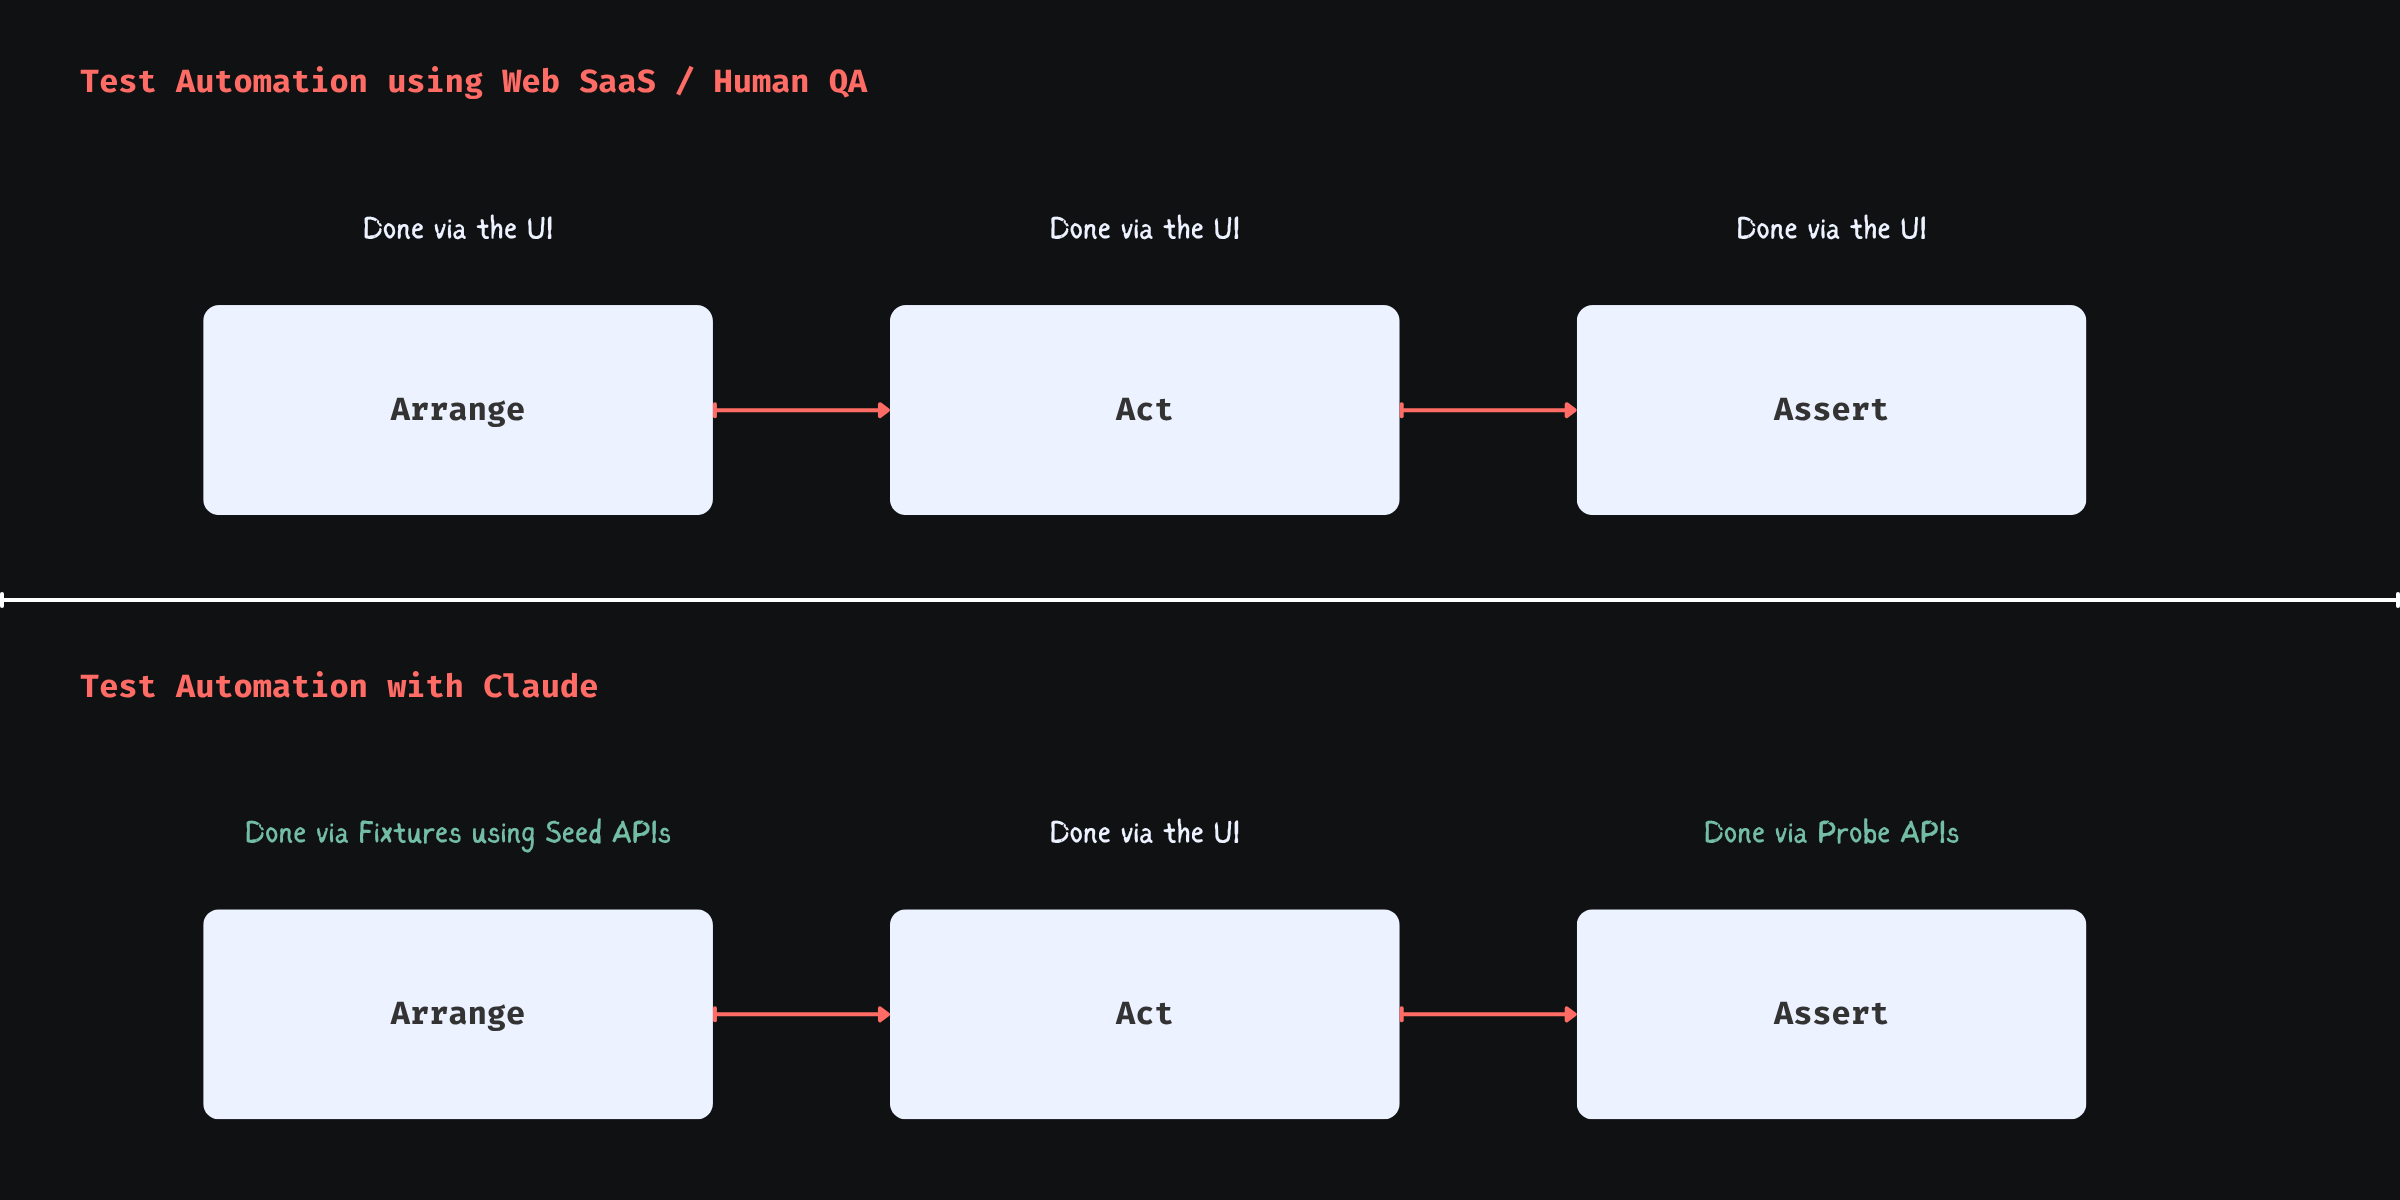
Every functional test boils down to 3 steps (the 3A's):

Arrange -> Act -> Assert

In plain terms:

Given a situation (e.g. a user with an expired credit card),
When a set of actions are done (attempting checkout),
Expect a defined outcome (error message, no order created).

Here’s where things went sideways for a long time.

Phase change with CC test authoring

When humans were authoring tests - especially using web-based SaaS / No-code tools - they were constrained to the UI layer, due to a couple of reasons:

  1. Tools operated outside of the system
  2. QA lacked coding skills / were not allowed to work with system code due to organizational frictions

So everything had to be set up through the UI (or live system APIs), which made POMs the “sexy abstraction”: they made UI-driven setup bearable.

But that setup was never the ideal. It was the workaround.

Arriving at the situation is not the test. It is incidental complexity introduced by tooling and human limitations.

The Shape Shift in Test Automation with Claude​

When Claude is authoring, it is not bound by that restriction. It has the full context of your codebase and can operate across layers. It can author seed / probe endpoints, generate data, and construct precise system states directly.

This is where fixtures shine.

Fixtures expose these pre-built states as reusable, composable building blocks:

  • “User with expired card”
  • “Account with failed payment retries”
  • “Cart with out-of-stock item”

More importantly, fixtures provision those entities with full data-isolation per test run (so that parallel workers running tests, retries etc. don’t interfere with each other). This removes many anti-patterns common in pure UI-layer test authoring - such as depending on order of tests (one to create the entities, one to update, another to delete - each depending on prior).

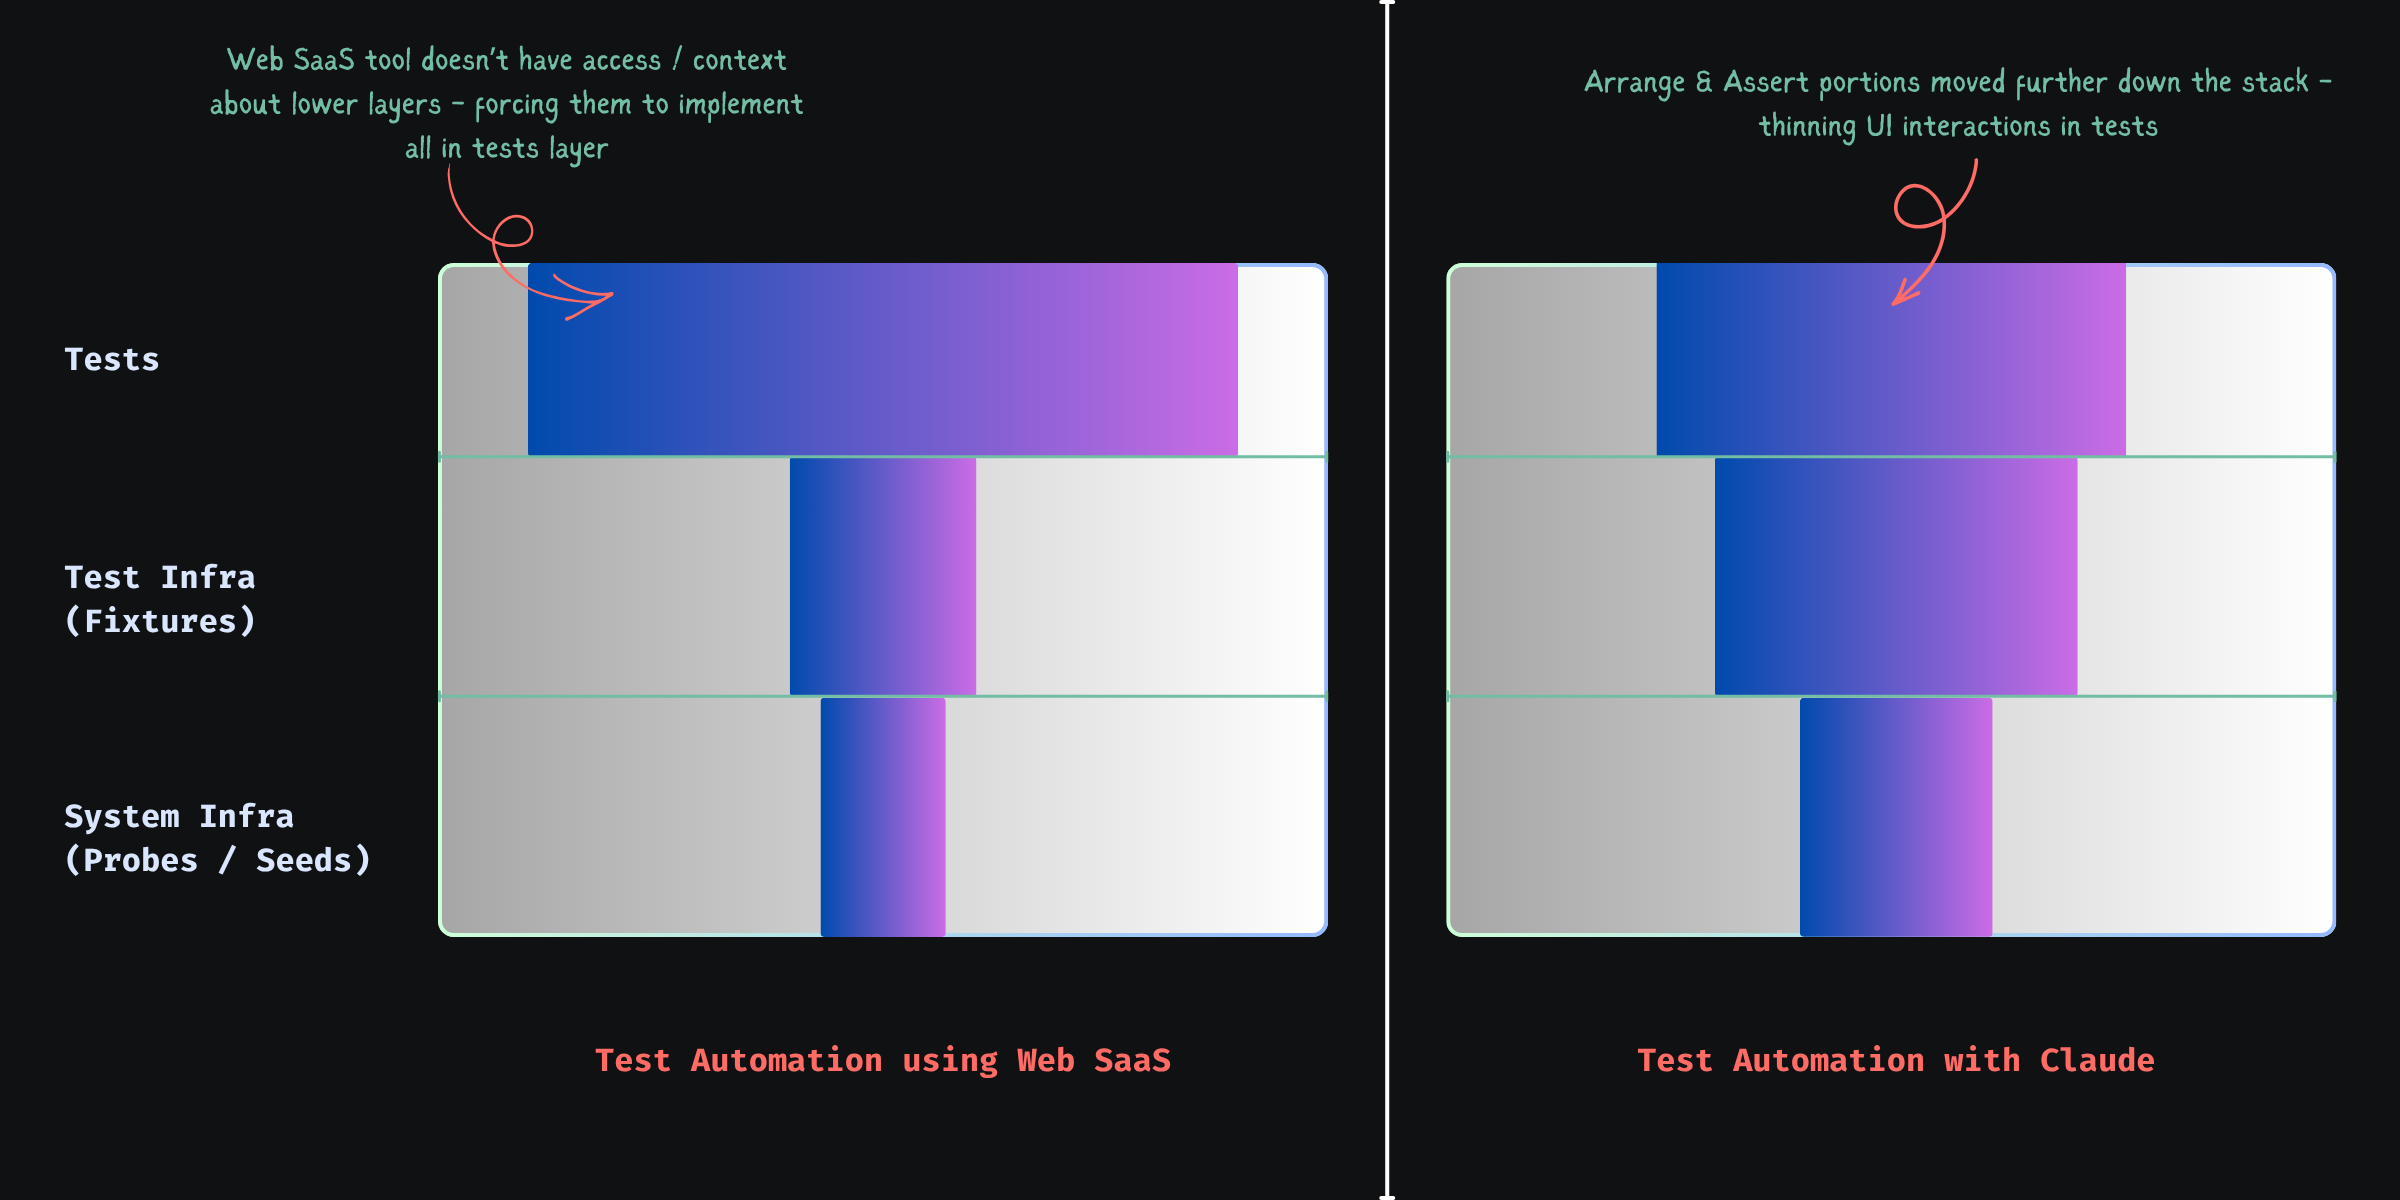
Shape Shifting of Test Automation Work with CC

Now your tests change shape:

  • Arrange → mostly handled via reusable, API-backed fixtures
  • Act → only the actions that actually matter
  • Assert → UI checks plus direct state validation via probe endpoints

The result: faster tests, more reliable tests, and far less noise.

TrueCoverage - Write fixtures that mirror real-world​

Here’s where things get even more interesting:

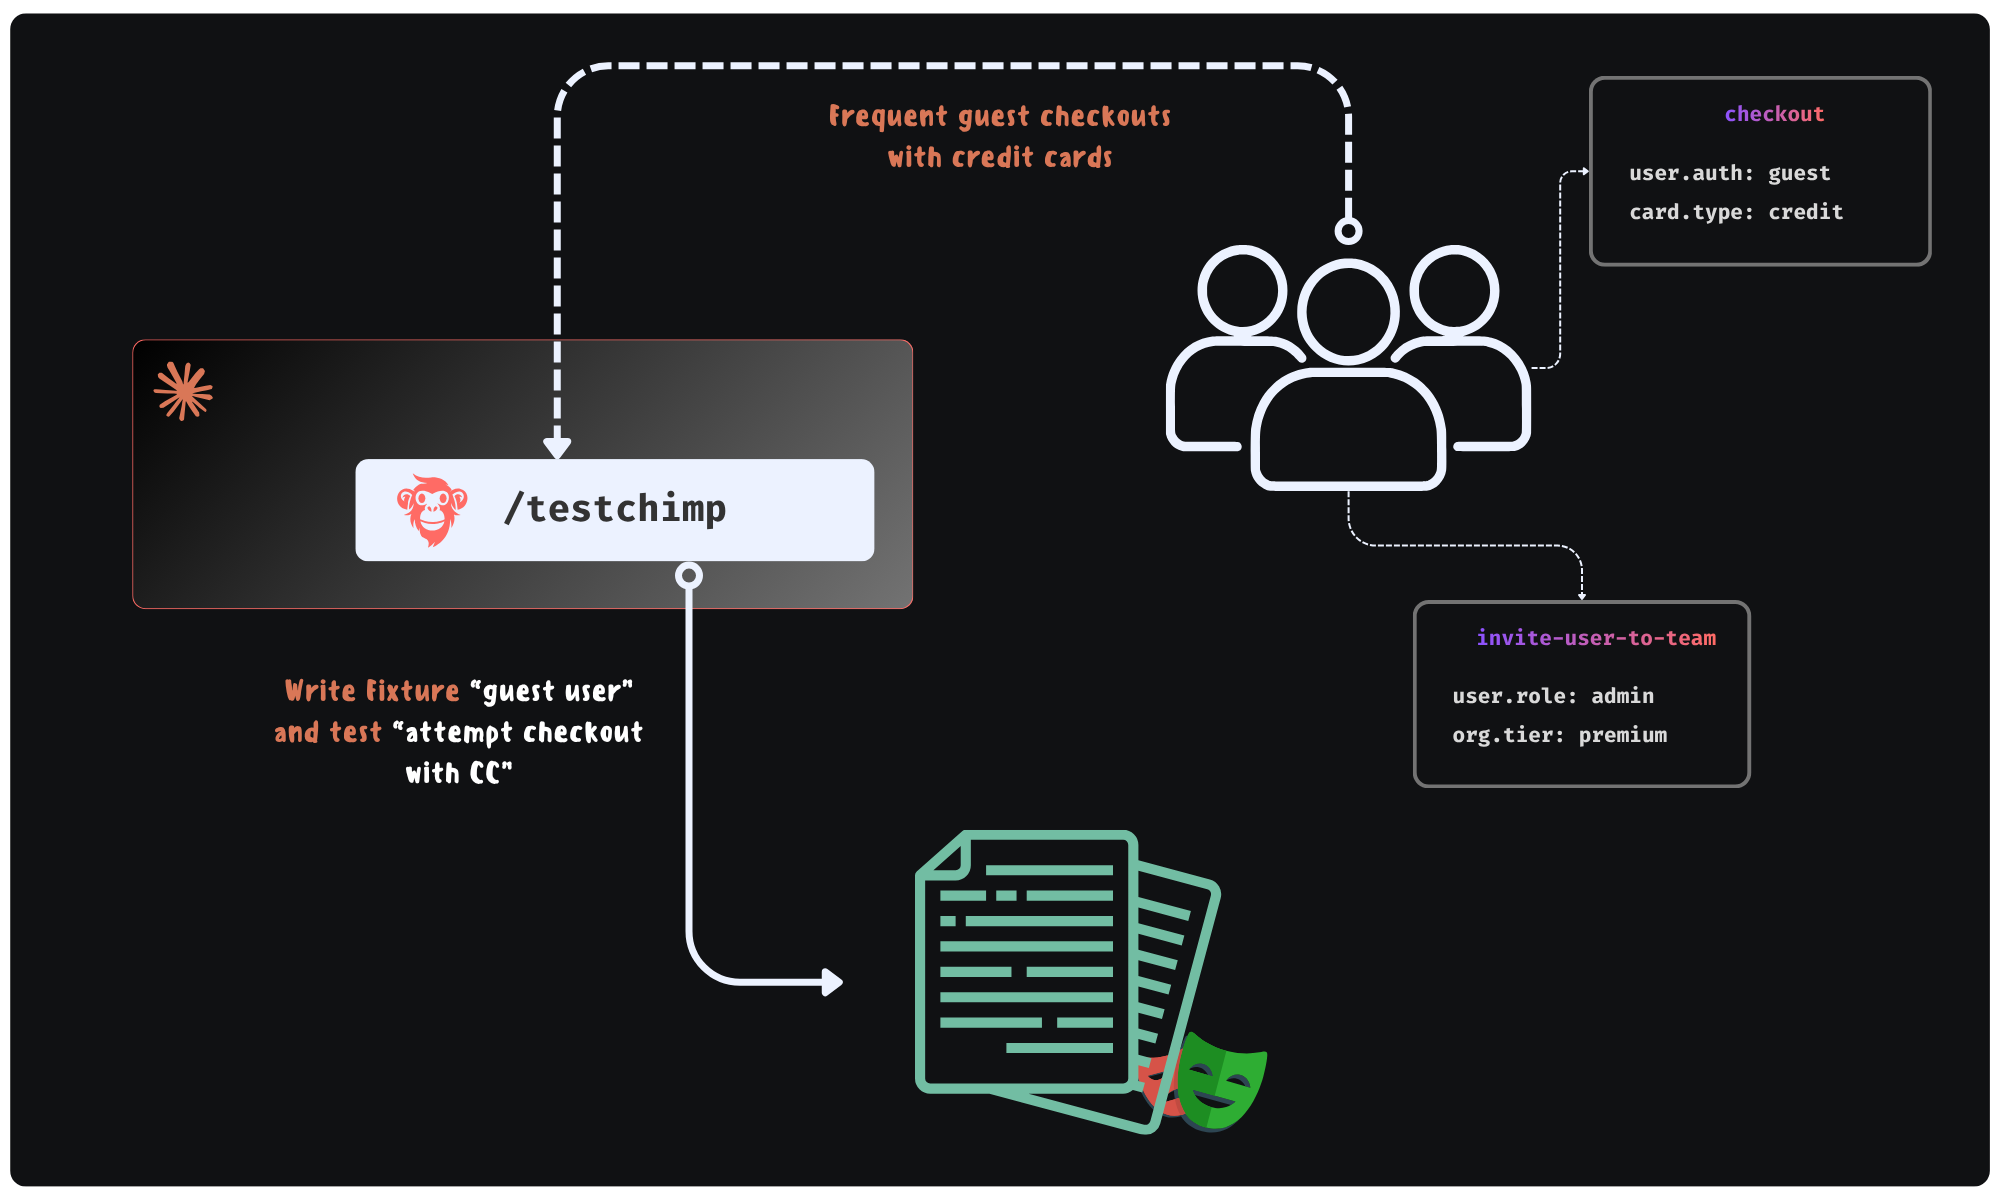
What if Claude could learn what situations occur in the real world? Then, it can author fixtures that emulate them - prioritized by impact - resulting in coverage that actually de-risks your product against real user behaviour.

Production informed feedback loop for fixtures + tests

This is exactly what TestChimps’ TrueCoverage unlocks: a feedback loop - where agents can continuously learn from production insights and generate fixtures that mirror real-world situations.

  • Not guessed. Not happy-path-heavy assumptions.
  • Actual situations your users experience.

That’s when your test suite stops being synthetic - and starts becoming representative of “what your users experience”.

POMs helped us survive UI-driven testing.

Fixtures unlock systemic scenario coverage in the agentic automation era.

Further reading​

TrueCoverage for agentic QA: learn how users really behave, then evolve tests on purpose

· 11 min read
Nuwan Samarasekera
Founder & CEO, TestChimp

If you are an autonomous QA agent, your hardest problem is not syntax. It is prioritization under uncertainty: which journeys matter, which world-states recur in the wild, and which gaps actually de-risk the product. If you are a human delegating QA to an agent, your hardest problem is trust: how do you know the agent is not optimizing for easy coverage while the business burns on paths real users depend on?

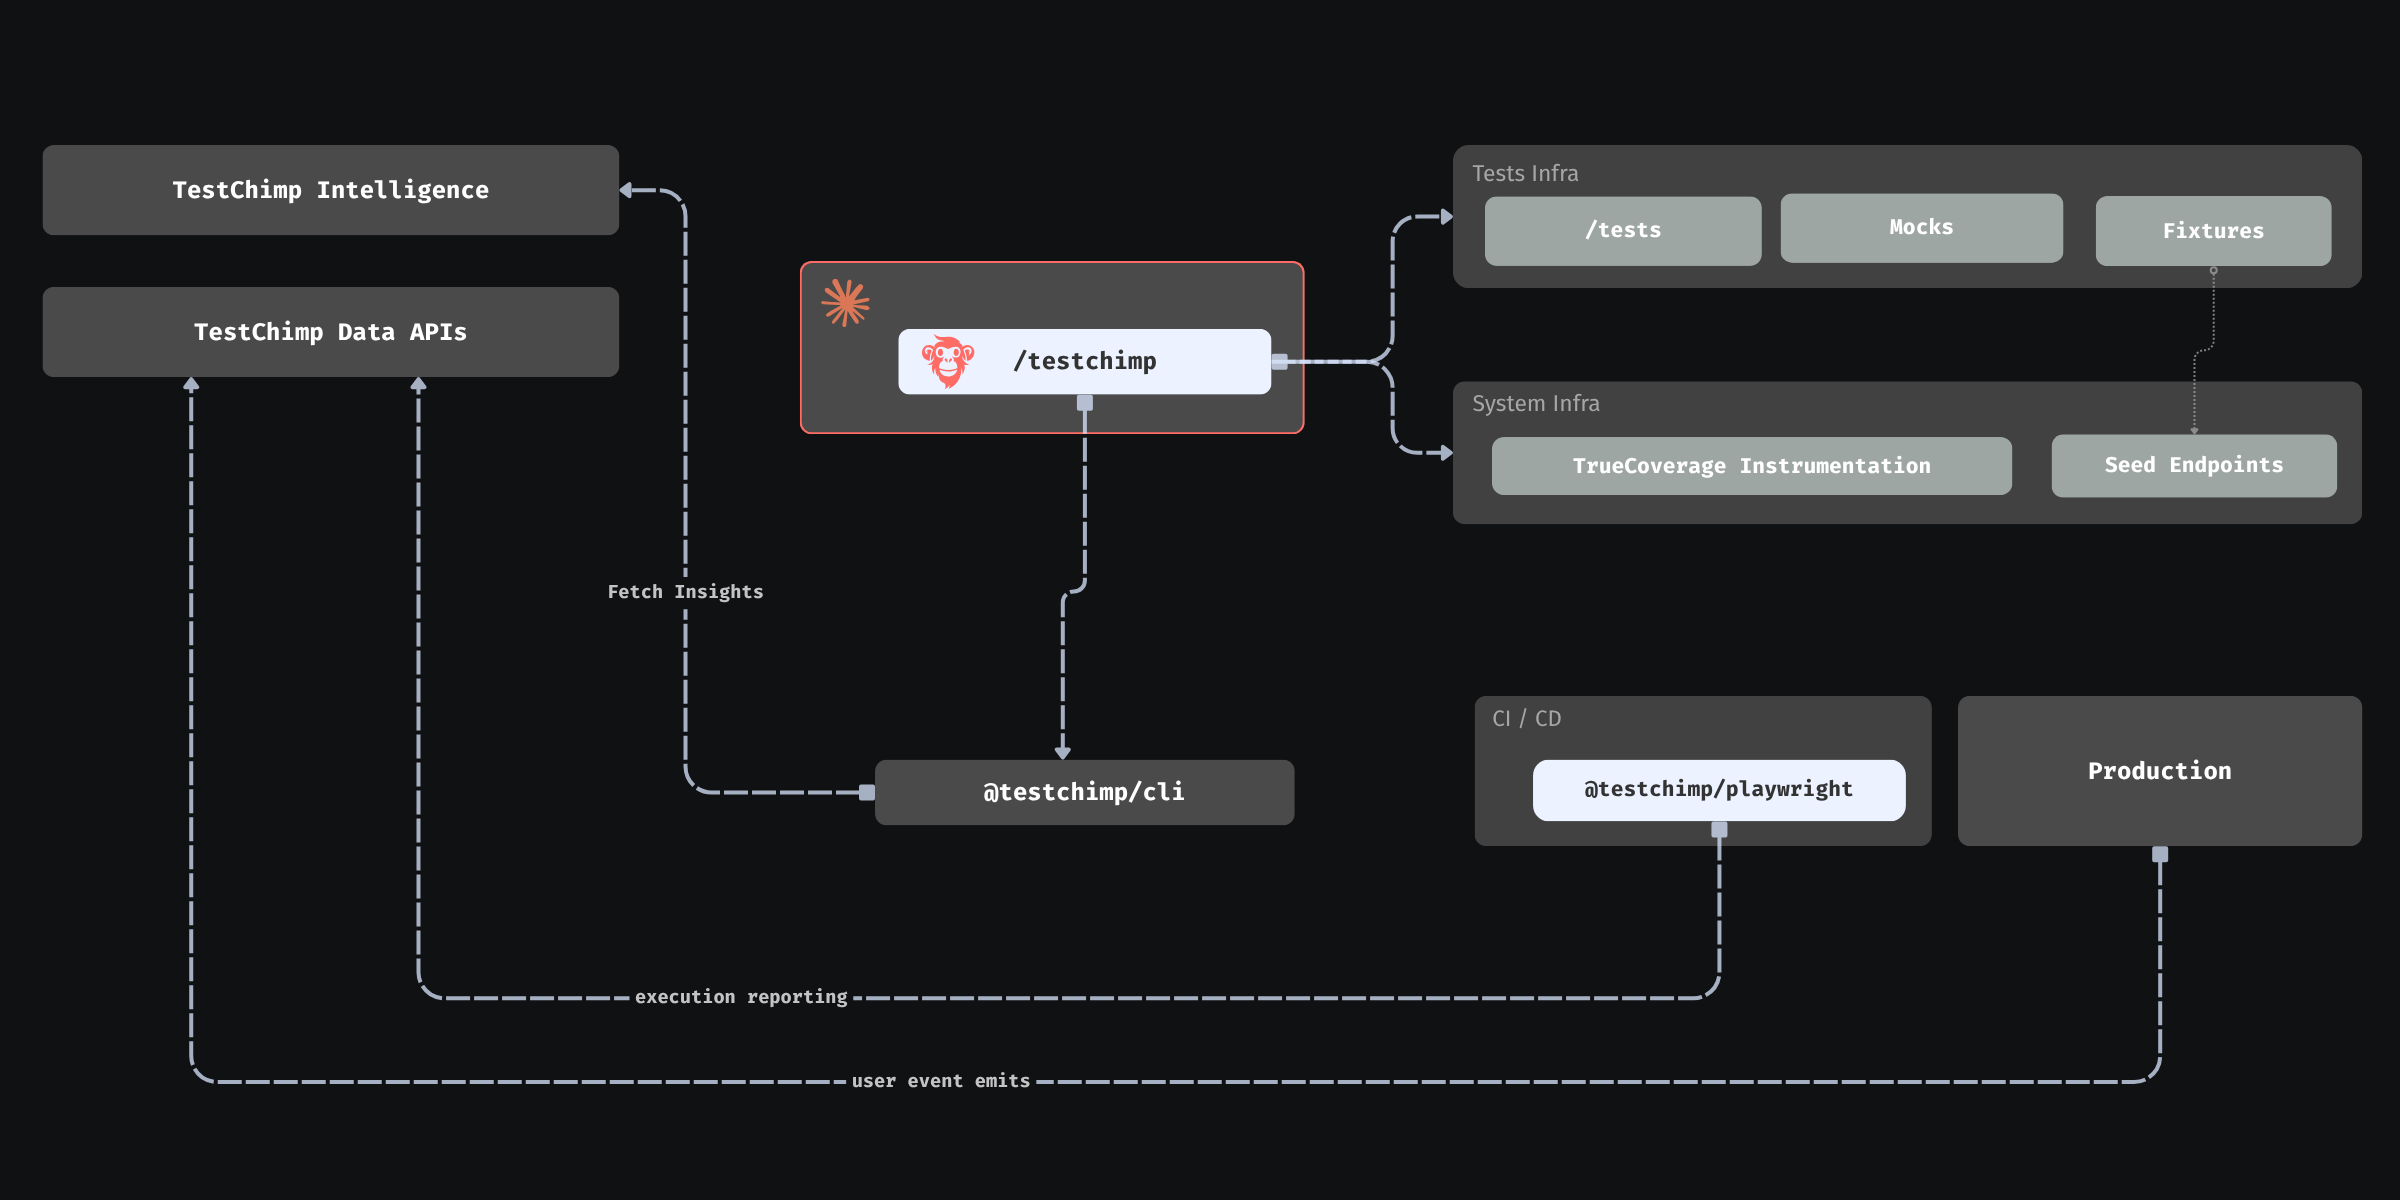
Production Feedback Loop enabled by TestChimp

TrueCoverage is a way to ground both sides in the same signal: what production traffic is trying to tell you, expressed in a form tests can participate in. This post is framed in two layers:

  1. Concept and utility — what TrueCoverage means independent of any vendor, why it fits the agentic era, and what becomes feasible once you have it.
  2. How TestChimp implements it — how @testchimp/rum-js, and @testchimp/playwright plugin, and summarized analytics APIs close the loop so agents (and humans supervising them) can learn, decide, and evolve QA continuously.

Part I — The idea: production as the curriculum for QA​

What “TrueCoverage” means as a concept​

Classical coverage answers: did my code execute? That is necessary and insufficient. It does not tell you whether the behaviors users rely on are the behaviors your suite exercises under conditions that resemble reality.

TrueCoverage, means:

  • You observe meaningful user-journey steps in production (not every click—semantic steps that map to product risk: checkout started, export completed, permission denied, and so on).
  • You observe the same vocabulary during automated test runs, with a way to know which tests produced which events.
  • You compare the two streams so you can see demand, sequencing, friction, and slices of the real world (roles, entitlements, cart shape) where real usage and automated coverage diverge.

The outcome is not a bigger dashboard. It is a closed feedback loop: production teaches you what “normal” and “important” mean for this product; tests and fixtures prove you still protect those paths after every change.

Why this approach matches how good agents already work​

Agents that ship useful QA behave like scientists with a budget: they form hypotheses (“checkout without a saved payment method might be undertested”), gather evidence, run a targeted experiment (a test + fixture), and update the model. The weak link is almost always evidence. Product specs are incomplete. Ticket backlogs are biased. Code coverage is blind to which user stories matter.

Production behavior is imperfect—sampling, seasonality, and product experiments all apply—but it is ground truth for impact ordering. When an agent can query “how often does this situation occur?” and “what usually happens next?”, it stops guessing which regressions would hurt the most.

The elephant in the room: instrumentation used to be expensive​

For years, the honest reason teams did not do this everywhere was operational cost:

  • Designing event names and metadata so they are stable, low-cardinality, and privacy-safe is skilled work.
  • Plumbing init, helpers, env-specific keys, and batching behavior across a large frontend is tedious.
  • Maintaining that layer across refactors—without breaking analytics or leaking identifiers—is ongoing tax.
  • Interpreting raw event lakes often required a data partner, not a QA engineer.

So the idea of aligning tests with real journeys was always sensible; the implementation and upkeep were the barrier. Teams defaulted to intuition, bug history, and line coverage because those scaled with human attention spans.

Why that burden collapses in the agentic era​

Agentic coding changes the economics:

  • Boilerplate (init wrappers, typed emit helpers, progress trackers, event documentation) is exactly the sort of work models do quickly and consistently.
  • Refactor propagation—rename a flow, split a route, move state—becomes a task you can assign: “keep emitCheckoutProgress aligned with the new module boundaries.”
  • Governance at scale—dot-scoped metadata keys, cardinality rules, “no raw IDs in metadata”—can be enforced as repeatable policies in code review and in agent instructions, not as tribal memory.

What becomes feasible once agents can “see” real usage​

Below are some capabilities that gets unlocked when an agent can pull summarized production-test deltas on demand.

1. Fixtures that mimic real-world situations—not demo data​

Suppose checkout emits a semantic event checkout_attempted with bounded metadata such as user.has_fop (form of payment on file: true / false). Production aggregates might show that a large share of attempts happen with user.has_fop=false, while your automated runs almost always hit true because the seed user is “too perfect.”

An agent can:

  • Treat that skew as a coverage gap on a risk-bearing slice, not a vanity metric.
  • Author or extend a Playwright fixture (or API seed flow) that creates a user without FOP, then add a test that asserts the expected behavior (validation, alternate payment path, error copy, telemetry).
  • Document the event slice in repo-local knowledge (plans/events/*.event.md style) so the next agent does not reinvent the schema.

The point is not “more metadata.” The point is metadata that matches how the product branches in reality, so fixture work is evidence-backed.

2. Journey prioritization from sequences, not screenshots​

Agents excel at graph-like reasoning when you give them a graph. TrueCoverage-style child event trees and transition summaries answer questions humans ask in war rooms—“after someone opens the importer, what do they actually do next?”—without watching session replays for hours.

Example: production might show that after import_started, the modal next step is usually mapping_confirmed, but a non-trivial fraction goes to import_cancelled within seconds. If tests always march the happy path to mapping_confirmed, you may be blind to early abandonment bugs (performance, confusing copy, default file type issues).

An agent can prioritize a short journey test for the high-drop branch, or an instrumentation pass if the “cancel” events are too coarse to explain why.

3. Using Demand, Duration, Drop-off, and Depth as a shared prioritization language​

TrueCoverage analytics align well with a compact strategy: the 4Ds (how TrueCoverage metrics work)—Demand (how often something shows up), Duration (dwell and pacing), Drop-off (abandonment and terminal sessions), Depth (where a step sits in the funnel). Depth is especially important for prioritization because top-of-funnel steps guard everything downstream: if sign-up, workspace creation, or the first checkout screen is flaky, slow, or wrong, users and sessions never reach the deeper flows your suite might obsess over—so automation that skips straight to “step seven” can look green while production is bleeding at the door.

Together the 4Ds steer agents away from covering easy code and toward protecting painful journeys.

Concrete prioritization examples:

  • High demand + absent in test-tagged traffic → add or extend regression coverage soon.
  • Early funnel (shallow depth) + high demand or high drop-off → harden entry paths first: stronger tests, fixtures, and instrumentation for the gate events; defer deep-journey expansion until those steps are reliably exercised—otherwise you optimize coverage for journeys most real sessions never complete.
  • High drop-off + shallow tests → add negative paths, resilience, and performance-aware checks.
  • High duration → broaden scenarios (large payloads, slow networks) rather than a single happy-path click-through.

This is the difference between an agent that writes “a test” and an agent that writes the test the business would have asked for if it had perfect memory of last month’s traffic.

4. Continuous “evolve QA” instead of annual suite audits​

When digestible analytics are API-accessible, QA improvement becomes a loop aligned with shipping:

Analyze aggregated production vs automated scopes → Plan instrumentation/tests/fixtures → Execute in the repo → Verify in CI → repeat on the next meaningful traffic shift.

Humans stay in control of goals and risk appetite; agents handle volume, consistency, and follow-through.


Part II — How TestChimp turns the concept into an agent-ready system​

The conceptual loop needs three mechanical pieces: emit in the app, tag during automation, compare in a platform. TestChimp wires all three and exposes the result as summaries agents can consume without becoming data engineers.

TrueCoverage powered agentic QA loop in TestChimp

1. @testchimp/rum-js: production speaks the same language as tests​

The application under test integrates @testchimp/rum-js (see the library README for init, emit, flush, configuration, and event constraints). Typical practice:

  • Call testchimp.init() once at bootstrap with projectId, apiKey, and an environment tag (for example production vs staging).
  • Prefer a single helper (for example emitProductEvent) wrapping testchimp.emit({ title, metadata }) so event names and metadata stay consistent.
  • Control volume through config (caps per session, repeats per title, batching intervals, kill switches)—agents can tune this deliberately instead of flooding pipelines.

Agent-relevant discipline: keep titles semantic (subscription_renewed) rather than noisy (blue_button_clicked). Keep metadata low-cardinality and non-identifying—think user.role, org.plan_tier, cart.is_empty—not raw IDs or free text. That is how the platform can return per-value coverage without privacy explosions. Dot-scoped keys like user.has_fop help agents map analytics slices directly to fixture dimensions.

Product overview: TrueCoverage intro.

2. Playwright reporter: the same events, tagged with test identity​

Automated runs are only comparable to production if tests emit the same event titles (or a deliberate, documented mapping) and the platform can tell automation apart from anonymous traffic. TestChimp’s Playwright integration—@testchimp/playwright—tags RUM events with test identity during runs so coverage comparisons can answer: “Did this suite actually exercise checkout_attempted in the last seven days of CI?”

That is what makes “coverage” mean behavioral coverage of real journeys, not merely “we ran N tests.”

3. Execution scopes: compare apples to apples, on purpose​

Agents should treat scopes as first-class inputs (see TrueCoverage workflow docs in your agent instructions). In practice:

  • A base scope anchored on the environment that best reflects real users (often production) drives funnel-relative metrics: frequency, transitions, terminal behavior, session counts.
  • A comparison scope (often QA or staging) answers what automation (or a specific branch/release) is doing in the same vocabulary.
  • automationEmitsOnly on comparison or child-tree scopes is how you ensure “covered” means test-tagged emits, not a manual tester clicking around on the same environment.

Getting this wrong is how teams accidentally overstate coverage. Getting it right is how agents earn trust from humans who offload QA.

4. Data APIs and MCP tools: digested signal for decisioning​

TestChimp exposes TrueCoverage through APIs mirrored in MCP tools (for example list-rum-environments, get-truecoverage-events, get-truecoverage-event-details, get-truecoverage-child-event-tree, transition and time-series endpoints, metadata key discovery). The agent workflow is intentionally summary-first:

  1. List environments → pick stable tags for base vs comparison.
  2. Fetch event summaries → find high-impact titles with weak or absent coverage status vs the comparison scope.
  3. Drill into details → metadata distributions, example sessions, next-event trees.
  4. Translate gaps → SmartTests, fixtures, seed endpoints, or new emits if the product changed but telemetry did not.

Because payloads are aggregated—frequencies, histograms, coverage badges—agents can make informed plans without pulling raw session oceans into the context window.

5. Closing the loop: from insight to repo changes to measurable improvement​

The full agentic story looks like this in practice:

  1. Instrument with rum-js using repo conventions (shared helper, env-based keys, documented events).
  2. Run Playwright suites with the reporter so emits carry test identity.
  3. Query TrueCoverage summaries after meaningful windows (release, marketing push, seasonal spike).
  4. Decide using 4Ds + transitions + metadata slices what to add or fix.
  5. Implement tests and fixtures; optionally evolve instrumentation when new risk-bearing branches appear in the UI.
  6. Re-query to confirm the comparison scope now hits the slices that production demanded.

That is autonomous QA with a compass: still bounded by human policy (privacy, release priorities, acceptable sampling), but no longer guessing whether the suite matches reality.


Who this is for​

  • Agents: treat TrueCoverage as your grounding layer—the bridge from “what humans wrote in tickets” to “what the world actually does.” Use it to prioritize fixtures, journeys, and instrumentation before you spend budget on breadth nobody needs.
  • Humans offloading QA: ask for scopes, metadata discipline, and before/after dashboards—simple checks that the agent is optimizing production-aligned risk, not arbitrary line counts.

Accountable product and compliance choices still sit with people; TrueCoverage cheapens the cost of being well-informed—for agents reasoning over code and humans steering risk—which, in the agentic era, is the difference between automation that merely runs and automation that continuously earns the right to ship.


Further reading​