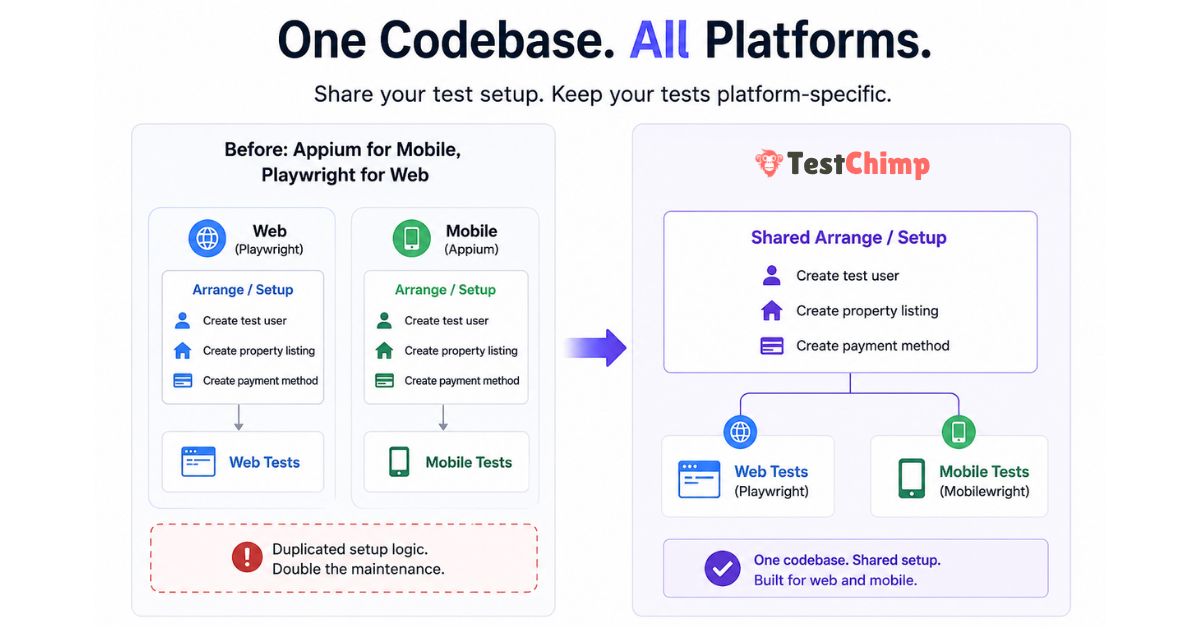
TL;DR: If your product ships both a web app and native mobile apps, you are probably maintaining two automation codebases that repeat the same Arrange logic—users, listings, payments, feature flags—before any UI step runs. TestChimp Multi-Platform Projects put Playwright (web), Mobilewright (iOS/Android), and API tests in one Git-connected scaffold, with shared business logic for world-state setup and platform-specific UI tests, coverage, and UX analytics. UI interactions stay platform-specific; test infrastructure does not have to—and neither does your requirements, TrueCoverage, or Atlas view of quality.
The hidden cost of “Appium for mobile, Playwright for web”
Cross-platform products rarely differ at the data layer. A booking marketplace needs the same primitives whether the customer taps Book in Safari or in your iOS app:
- A test user with a known identity
- Inventory (for example, a few property listings)
- A valid payment method linked to that user
- Whatever else your domain requires before the flow under test is meaningful
None of that is inherently web or mobile. It is application state—the Arrange phase in the classic Arrange → Act → Assert model (Martin Fowler on Given-When-Then).
Yet the dominant split for years has been:
| Layer | Typical tooling |
|---|
| Web UI | Playwright |
| Native mobile UI | Appium (often with WebDriver-style clients) |
| Shared setup | Duplicated across two repos or two top-level trees |
Teams end up with parallel helper libraries, duplicate seed scripts, and drift—web tests create users one way, mobile tests another, and failures become “which stack is wrong?” instead of “did we break the product?”
The Act and Assert steps should differ by surface: selectors, gestures, and viewport behaviour are platform-specific. The Arrange layer often should not.
Why Mobilewright changes the consolidation story
Mobilewright brings native iOS and Android automation closer to the Playwright mental model: async tests, auto-waiting, project matrices in config, and fixtures that feel familiar if you already run npx playwright test.
That alignment matters for multi-platform engineering, not only for “mobile testing” as an isolated workstream:
- Same language and patterns (commonly TypeScript/JavaScript in one repo)
- Same CI habits (config projects, parallel workers, artifact uploads)
- Same opportunity to share code for factories, API clients, and database seeding
TestChimp already extended the plan → repo → agent → CI loop to native mobile (native mobile testing announcement). Multi-Platform Projects are the next step: one TestChimp project type and one tests tree for teams that ship web and mobile together.
When you create a TestChimp project with type Multi-Platform, the platform scaffolds a single tests/ directory that includes:
web/ — browser SmartTests via Playwright (playwright.config.js, web/e2e/, web/pages/, web/fixtures/)mobile/ — native UI tests via Mobilewright (mobilewright.config.ts, mobile/e2e/common|ios|android/, mobile/pages/, mobile/fixtures/)api/ — platform-agnostic HTTP specs (often the fastest way to Arrange and to assert backend state)shared/ — cross-suite helpers and fixture factories (seed users, auth builders)—excluded from test discovery, intended for reusesetup/ — global setup run once before suites in both configs
Platform-specific UI code lives in platform-specific folders. Business logic that creates entities and prepares situations can live in shared/, api/fixtures/, or factories imported by both web and mobile specs.
tests/
  setup/
  shared/              ← shared Arrange logic (users, listings, payments, flags)
  api/
    fixtures/
  mobile/
    fixtures/
    pages/
    e2e/
      common/
      ios/
      android/
  web/
    fixtures/
    pages/
    e2e/
  playwright.config.js
  mobilewright.config.ts
Result for QA and platform teams:
- Less duplicated infrastructure — one place to update “premium user with saved card”
- Less maintenance — fix seeding once; web and mobile suites consume the same factories
- More consistency — the same world-state definitions drive cross-platform regression
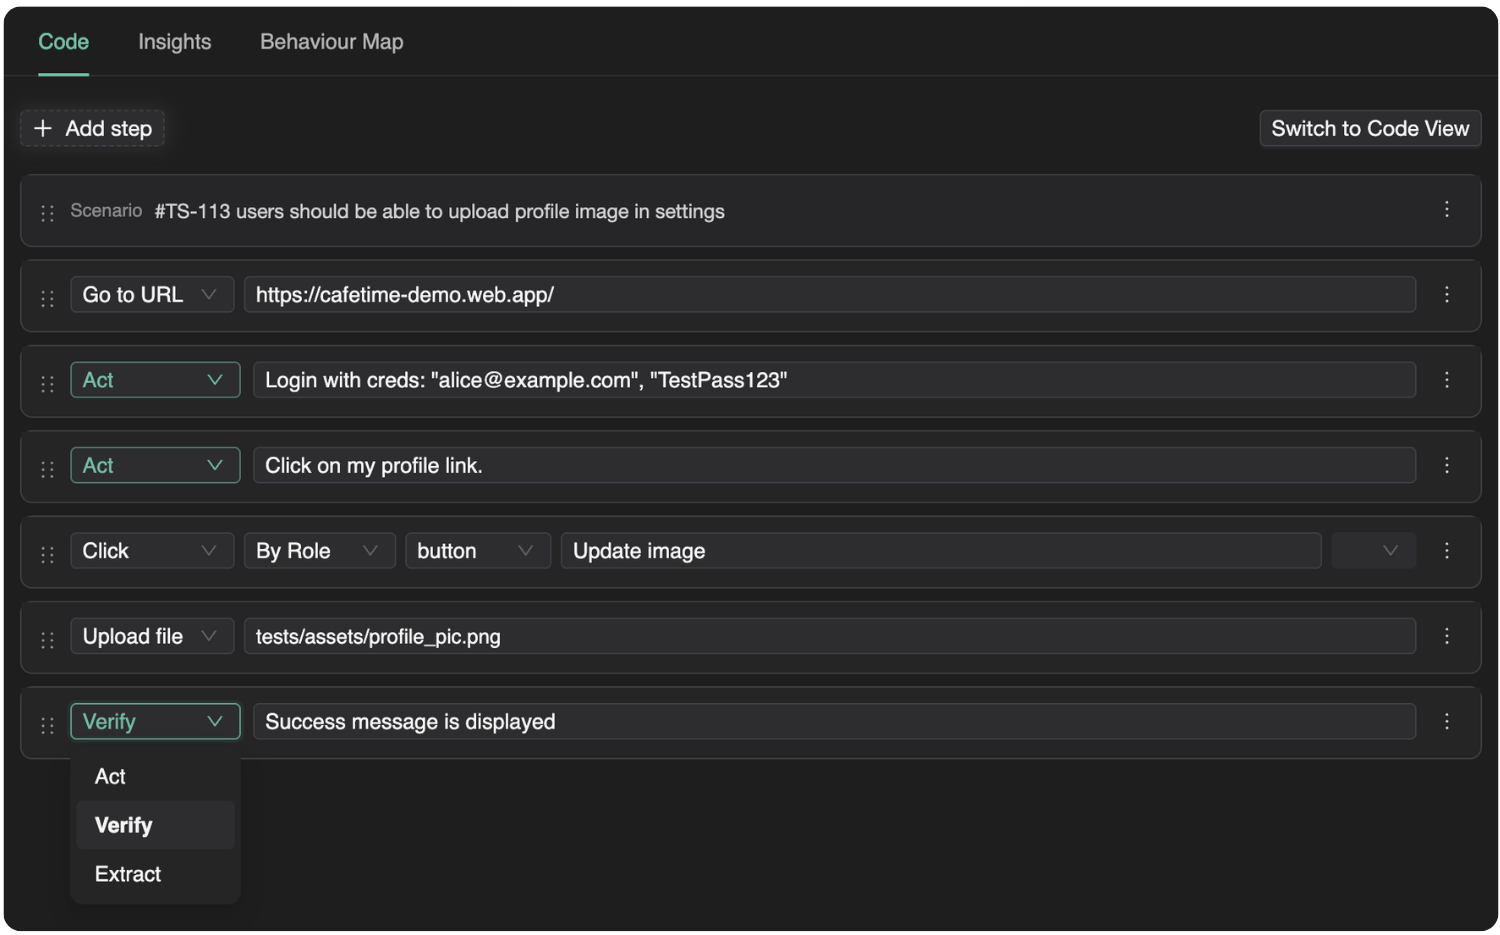
Smart Steps (ai.act, ai.verify) remain web-only today; native mobile continues to use standard Mobilewright APIs for UI Act steps. For platform capabilities and CI notes, see Mobile testing.
Consolidating tests in one repo does not mean blending web and mobile into one misleading coverage number. Multi-Platform Projects keep one TestChimp project and one plans/tests Git mapping, while treating Web, iOS, and Android as first-class execution platforms everywhere insights matter.
Think of it as: shared requirements and shared Arrange code, sliced execution and analytics per surface.
| Area | What stays unified | What is platform-specific |
|---|
| Test plans | Markdown scenarios and user stories in plans/ | Coverage and execution history per platform |
| TrueCoverage | Same project, env/release/branch scope | Production RUM + test attribution per platform |
| Atlas | Same product vocabulary (screens/states) | SiteMap tree, bugs, and baselines per platform |
Requirement traceability (Test Planning)
Requirement traceability links scenarios in Git to SmartTest runs. On a Multi-Platform project, the Insights tab and scenario execution history respect an execution scope that includes platform alongside environment, release, branch, and time range.
- Choose Web, iOS, or Android to see which scenarios passed or failed on that surface.
- Drill into a user story to view execution history filtered to the platform you care about—useful when mobile lags web or when a shared scenario is covered by both
web/e2e/ and mobile/e2e/ specs.
- Folder roll-ups in Test Planning still work; the platform dimension answers questions like “Is checkout covered on iOS in QA this week?” without spinning up a second project.
Agents and CI should report runs with the correct platform identity (via @testchimp/playwright / Mobilewright reporter wiring) so linked // @Scenario: tests attribute to the right slice. Your plans can describe behaviour once; coverage status reflects where that behaviour is actually exercised.
TrueCoverage compares real user journeys (RUM) with automation coverage (test-tagged events). Each surface has its own instrumentation path—@testchimp/rum-js on web, testchimp-rum-ios and testchimp-rum-android on native—with TESTCHIMP_PROJECT_TYPE set to web, ios, or android as described in Instrumenting your app.
On Multi-Platform projects, the TrueCoverage execution scope offers the same Web / iOS / Android selector. That keeps comparisons honest:
- Production events from the iOS app are not mixed with web test runs when you evaluate gaps.
- Agents prioritizing fixtures and tests can target the platform where users actually hit the gap—for example high drop-off on Android checkout vs healthy web funnel.
Instrument every surface you ship; scope analytics one platform at a time when deciding what to automate next.
Atlas (UX bugs on the right surface)
Atlas is TestChimp’s app-structure map: screens and states, with UX and non-functional bugs tagged where ExploreChimp or SmartTests observed them. For multi-platform products, the SiteMap is not a single blurred tree—you browse and triage per platform.
- A platform selector (Web, iOS, Android) loads the screen-state tree for that execution platform.
- Bugs discovered during exploration or annotated runs are associated with screen-state context on that platform, so a layout regression on mobile does not drown in unrelated web noise.
markScreenState checkpoints in web Playwright tests and mobile Mobilewright tests feed the vocabulary ExploreChimp and Atlas use; platform-specific folders keep Act steps separate while structure stays comparable across surfaces.
That matters for engineering leads reviewing quality: you open Atlas, pick iOS, and see UX issues on the iOS SiteMap—assign owners per screen, run targeted ExploreChimp from a node, and track fix status without conflating desktop-only flows.
Arrange vs Act: what to share (and what not to)
| Phase | Web | Mobile | Share? |
|---|
| Arrange | API/fixtures/DB seed | Same backends | Yes — prefer api/, shared/, or backend fixtures |
| Act | Playwright locators & navigation | Mobilewright gestures & native selectors | No — keep under web/ and mobile/ |
| Assert | DOM + optional API probes | Native UI + optional API probes | Often partial — API assertions can be shared; UI assertions stay local |
This is the same insight as fixtures and Object Mother patterns in xUnit-style testing (xUnit Test Patterns — test fixture, Object Mother): push incidental complexity of setup out of the test body and into reusable, composable building blocks. Agents authoring tests benefit even more when Arrange is API-backed rather than repeated through slow UI clicks (fixtures in agentic automation).
How to get started
- Sign in to TestChimp and open Add project.
- Choose project type Multi-Platform (web + native mobile in one codebase).
- Connect Git and map your
plans/ and tests/ folders (same workflow as web-only projects).
- Run your usual agent workflow—for example
/testchimp test after a PR—using the TestChimp skill on Claude or Cursor.
Docs to read next:
If your team already runs separate web and mobile automation repos, migrating Arrange into shared/ and api/ first—before moving UI specs—is usually the lowest-risk path. You keep platform runners; you stop duplicating the world behind them.
Frequently asked questions
No. Multi-Platform is one project and one scaffold where both Playwright and Mobilewright configs and folder layouts coexist. Separate Web and Mobile project types still exist when you only need one surface.
Do I have to abandon Appium to use this?
TestChimp’s native path is Mobilewright, not Appium. Teams often adopt it when they want Playwright-like authoring and shared TypeScript with web suites. If you are standardized on Appium, compare effort to maintain duplicate Arrange code versus migrating Act layers over time while centralizing setup in API tests first.
Can API tests really replace UI for Arrange?
For many domains, yes—and Playwright’s request context (and direct HTTP clients in api/*.spec.js) are the fastest, least flaky way to reach a given situation. UI Act remains necessary to validate what users see and tap; UI Arrange is usually optional once APIs or admin seeds exist (QA in production).
What’s the biggest win if we already have Playwright on web?
The win is often consolidation of test infrastructure, not “another mobile runner.” Mobilewright lets mobile join the same repo conventions as web so agents and engineers maintain one mental model for fixtures, plans, and CI.
If plans and tests are in one repo, is coverage merged across web and mobile?
No—not by default. Requirement coverage, TrueCoverage comparisons, and Atlas navigation use an explicit platform dimension on Multi-Platform projects (Web, iOS, Android). Shared scenarios in plans/ can be linked from both web/ and mobile/ tests; the platform scope shows where those links actually ran and passed.
Further reading
TestChimp
Playwright & Mobilewright
Patterns & quality engineering
Try it
- TestChimp — create a Multi-Platform project and connect your repository. Feedback welcome via your usual support channel or community touchpoints linked from the product.
Shipping both web and mobile? The duplication you feel in test automation is often in the Arrange layer—not in the product. Multi-Platform Projects let you maintain that layer once, run Playwright and Mobilewright where users actually interact, and still read requirements, TrueCoverage, and Atlas with clear per-platform signal.