How to Run an Exploration
In brief: Configure an exploration by selecting SmartTest scope, recipe, target environment/release, journey limits, and optional custom instructions—then run from the app or CLI skill.
You can run ExploreChimp—targeted UX analytics along SmartTest journeys—in two ways: locally through code agents (Playwright + /testchimp commands in your repository), or on the TestChimp platform (product UI, recipes, and Atlas). Both paths reuse the same analytics idea: checkpointed telemetry tied to screen–state markers so findings map to your product vocabulary.
Locally via Code Agents
Use this path when a coding agent (for example in your IDE) should drive Playwright SmartTests with the @testchimp/playwright runtime and ExploreChimp enabled. The primary command is /testchimp explore: ExploreChimp is the main task—you choose which UI specs to run, without the full PR workflow from /testchimp test.
How /testchimp explore works
ExploreChimp is not an unconstrained crawl of arbitrary URLs. It reuses the same browser journeys your SmartTests already execute, then sends structured telemetry (DOM, screenshots, console, optional network and metrics) to TestChimp for analysis.
The unit of attribution is the markScreenState Playwright fixture (registered via installTestChimp in your merged tests/fixtures): each await markScreenState('Screen', 'State') marks a stable UI boundary. Analytics for the interval before a call attach to the previous checkpoint; screenshot and DOM for the current checkpoint attach to that name. Without meaningful markScreenState calls, the pipeline has little structure for bug filing and Atlas alignment—see Screen-State Annotations and Creating Smart Tests.
Typical agent flow:
- SmartTests use
test/expectfrom fixtures that callinstallTestChimpsomarkScreenStateand the reporter apply—see Playwright runtime plugin. - Environment —
TESTCHIMP_API_KEY,EXPLORECHIMP_ENABLED,TESTCHIMP_BATCH_INVOCATION_ID(or project id file), and any network / defaults documented underplans/knowledge/ai-test-instructions.md→## ExploreChimpwhen you use network analysis. - Scope — The agent runs the chosen Playwright files or folders; correlation uses the batch id so TestChimp can dedupe and attribute work.
Full command reference, prerequisites table, and “what targeted exploratory analytics means”: /testchimp explore.
Same ExploreChimp inside /testchimp test and /testchimp evolve
The runtime and telemetry model are the same as /testchimp explore; only when ExploreChimp runs and who picks scope differ:
| Command | ExploreChimp role |
|---|---|
/testchimp test | Optional Phase 5 after Validate, only when the approved branch plan opts in (cost and target specs). Same flags and markScreenState expectations as a dedicated explore pass. See /testchimp test. |
/testchimp evolve | Optional, plan-gated step on TrueCoverage-prioritized or otherwise high-signal UI slices after new/changed tests pass and markers are trustworthy. See /testchimp evolve. |
/testchimp explore | Primary task: exploration analytics on a deliberately scoped set of UI SmartTests without running the full PR pipeline. |
So /testchimp explore is the dedicated entry point; /testchimp test and /testchimp evolve can include the same ExploreChimp pass when your written plan says so.
On TestChimp Platform
The sections below describe running explorations from the TestChimp web app: recipes, credits, and UI entry points. They complement the local agent + Playwright path above.
Entry Points
There are several entry points for running explorations, each suited for different use cases:
Via Agent Explorations Tab
- Navigate to the Explorations section
- Click "New Exploration"
- Select the recipe you want to use
- Configure the exploration settings (see Introduction to Explorations for common settings)
- Configure any recipe-specific settings
- Click "Start Exploration"
This entry point gives you full control over the recipe selection and all configuration options.
Via SmartTests Tab
You can run explorations directly from the SmartTests section:
Guided by a SmartTest
- Navigate to the SmartTests section
- Right-click on any test
- Select "Run ExploreChimp"
- Choose the recipe (defaults to Bug Source Analytics if SmartTests are present)
- Configure the exploration settings
- ExploreChimp will navigate your app guided by that SmartTest
Guided by a Test Folder
- Navigate to the SmartTests section
- Right-click on any test folder
- Select "Run ExploreChimp"
- Choose the recipe (defaults to Bug Source Analytics if SmartTests are present)
- Configure the exploration settings
- ExploreChimp will run tests within that scope, creating journeys for each test (up to the configured number of journeys)
- TestChimp intelligently picks the next test to run based on which test covers the most untested ground in the given scope of the test tree
Via Screen Tree Viewer (Screen-Targeted Explorations)
For screen-targeted explorations:
- Navigate to Atlas
- Find the screen or screen-state you want to explore
- Click the 3-dot menu (⋮) next to the screen or screen-state node
- Select "Run ExploreChimp" from the menu
- The exploration modal opens with:
- The selected screen-state(s) pre-populated as target screen-states
- The "Limit analytics to following screens" setting enabled by default
- All known tests considered for selection
- Choose the recipe and configure settings
- Click "Start Exploration"
This workflow is ideal for:
- Focused testing: Testing specific features or workflows
- Efficient credit usage: Running analytics only on areas of interest
- Targeted bug discovery: Finding issues in specific parts of your application
Exploration Configuration
When you start an exploration, you can configure various settings:
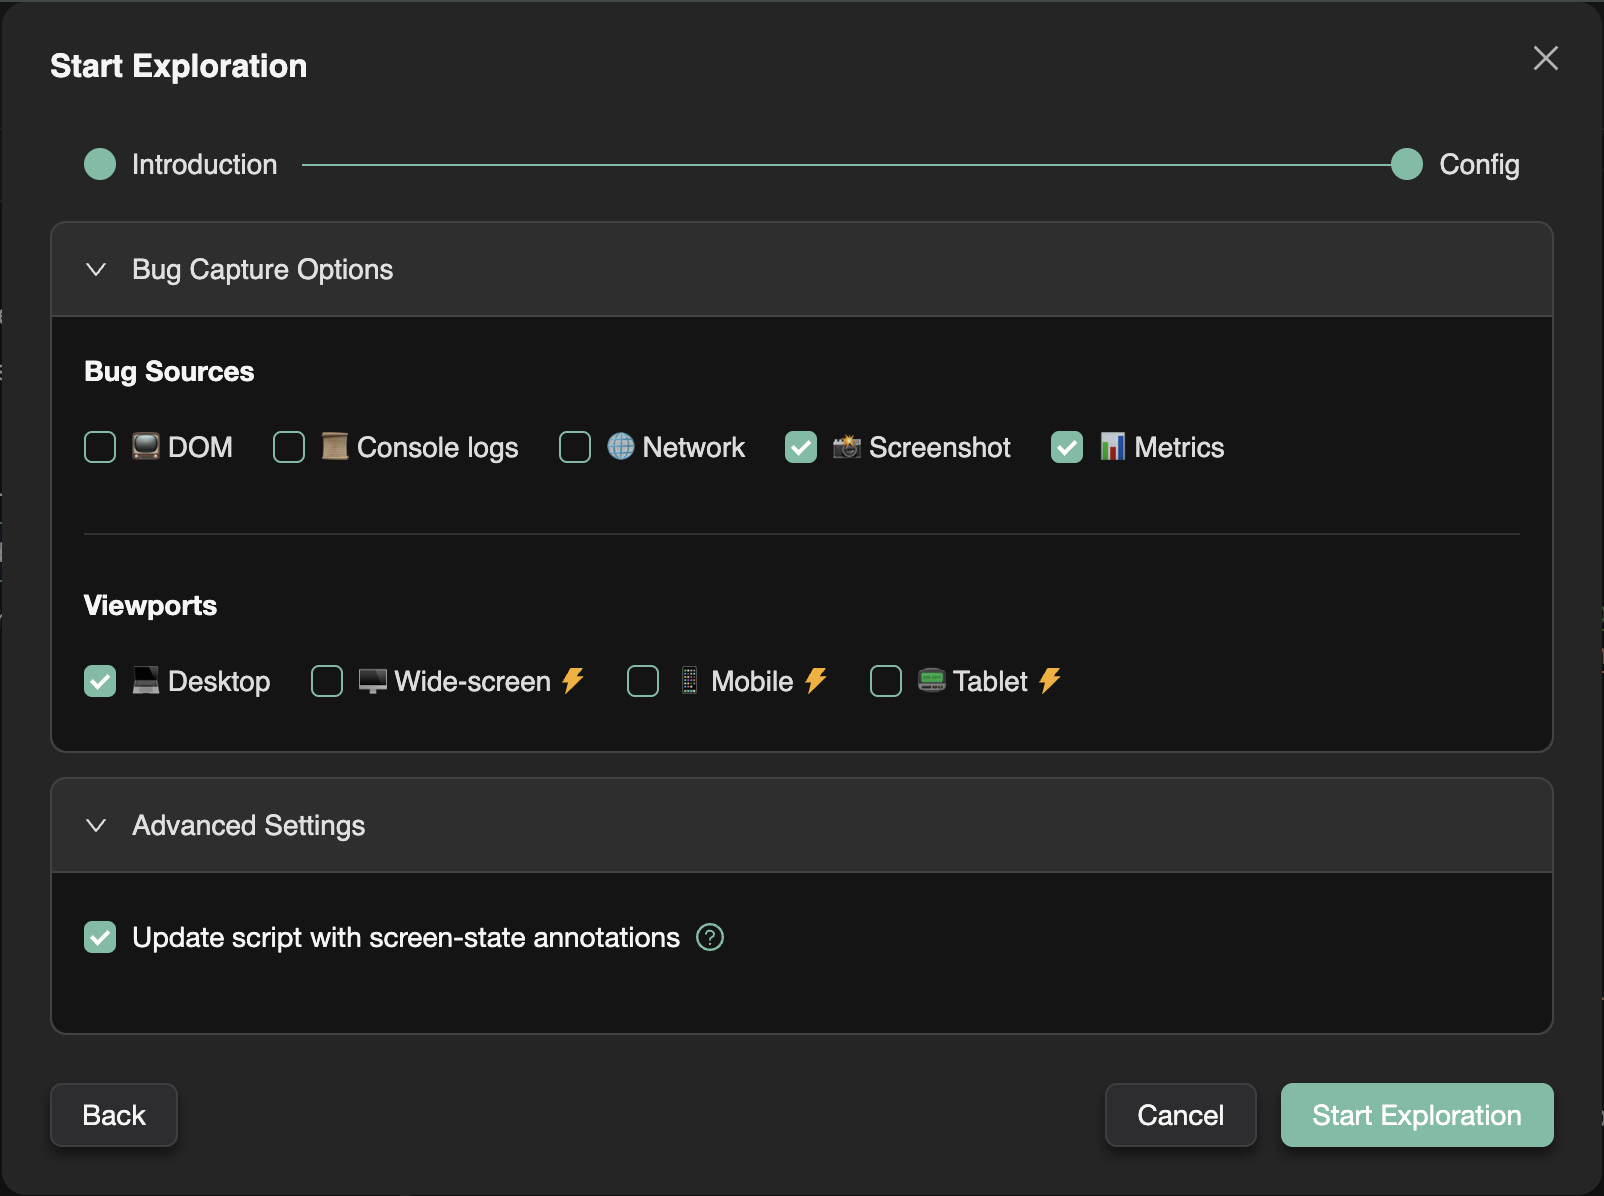
Common Settings
All explorations share common configuration options (see Introduction to Explorations for details):
- Advanced settings (test creation config, target screen-state config, update screen-state annotations)
- Limits (max credits, max journeys)
- Release and model selection
Recipe-Specific Settings
Each recipe may have additional configuration options specific to its purpose. Refer to the individual recipe documentation for details:
- Bug Source Analytics Recipe
- Screen-State Discovery Recipe
- Theme Tester Recipe
- Localization Tester Recipe
- Form Validation Tester Recipe
Limiting Analytics to Specific Screen-States
By default, ExploreChimp runs analytics (bug source analysis) after each screen-state change it encounters. However, you can limit analytics to run only when the agent is in specific screen-states of interest.
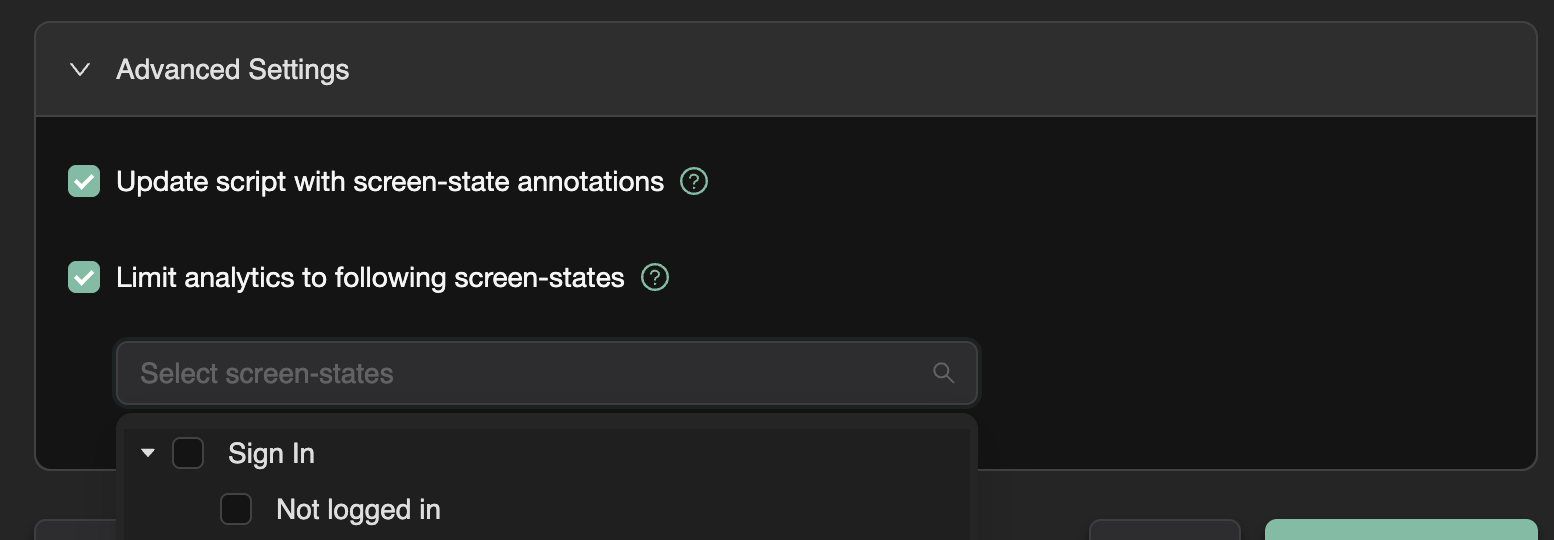
How it works:
- Enable the "Limit analytics to following screens" checkbox in the Advanced Settings section
- Select the screens where you want analytics to run using the multi-select tree dropdown
- Analytics will be skipped for screen-states that don't match your selection
This feature is particularly useful when:
- You want to focus on specific areas of your application
- You want to reduce credit consumption by analyzing only critical screen-states
- You're running targeted explorations on specific features or workflows
FAQ
Can I run explorations from CI?
Explorations are typically triggered from TestChimp UI or /testchimp explore/explore phases; pair with branch preview URLs for PR UX checks.
What environment URL is used?
The environment configured in project settings—often QA or a PR preview aligned with branch-specific SmartTest execution.
How long do explorations take?
Depends on journey count, app depth, and recipe; credits consume at screen-state changes not every click.