Requirement Traceability
In brief: TestChimp traceability is code-native: SmartTests declare which scenario files they cover, enabling live coverage views tied to executions and explorations.
Overview
Requirement traceability connects your test executions to user stories and scenarios, providing real-time visibility into test coverage and execution status. TestChimp's folder-based organization enables insights at any granularity — from individual scenarios up to entire feature areas.
The Problem with Traditional Approaches
Traditional requirement traceability typically involves:
- Multiple sources of truth: User stories in Jira, test cases elsewhere, mappings in spreadsheets
- Manually maintained spreadsheets: Excel files that inevitably go stale and require constant updates
- Flat structures: No way to view coverage rolled up by feature area or team
- No filtering: Can't easily answer "what's the coverage for high-priority items due next week?"
TestChimp solves this by providing requirement traceability as a built-in capability, with folder-based organization that enables insights at any level of granularity.
Coverage at Any Folder Level
The Power of Folder Organization
Because TestChimp organizes user stories and scenarios in folders, you get coverage insights at every level of your hierarchy:
stories/
├── authentication/        ← See coverage for all auth stories
│   ├── login.md
│   ├── registration.md
│   └── password-reset.md
├── checkout/              ← See coverage for checkout module
│   ├── cart.md
│   └── payment.md
└── admin/                 ← See coverage for admin features
    └── user-management.md
Select any folder in the explorer to see aggregated coverage for all stories and scenarios within that scope.
Organize by Your Dimensions
Structure folders to match how your team thinks about the product:
| Organization Strategy | Example Structure | Use Case |
|---|---|---|
| By Feature Area | checkout/, auth/, search/ | Product-centric teams |
| By Owner/Team | team-a/, team-b/, platform/ | Multi-team organizations |
| By Component | frontend/, api/, mobile/ | Component-based architecture |
| By Release | v2.0/, v2.1/, backlog/ | Release-focused planning |
Mix and match to create the hierarchy that works for your team.
Viewing Coverage in Test Planning
The Insights Tab
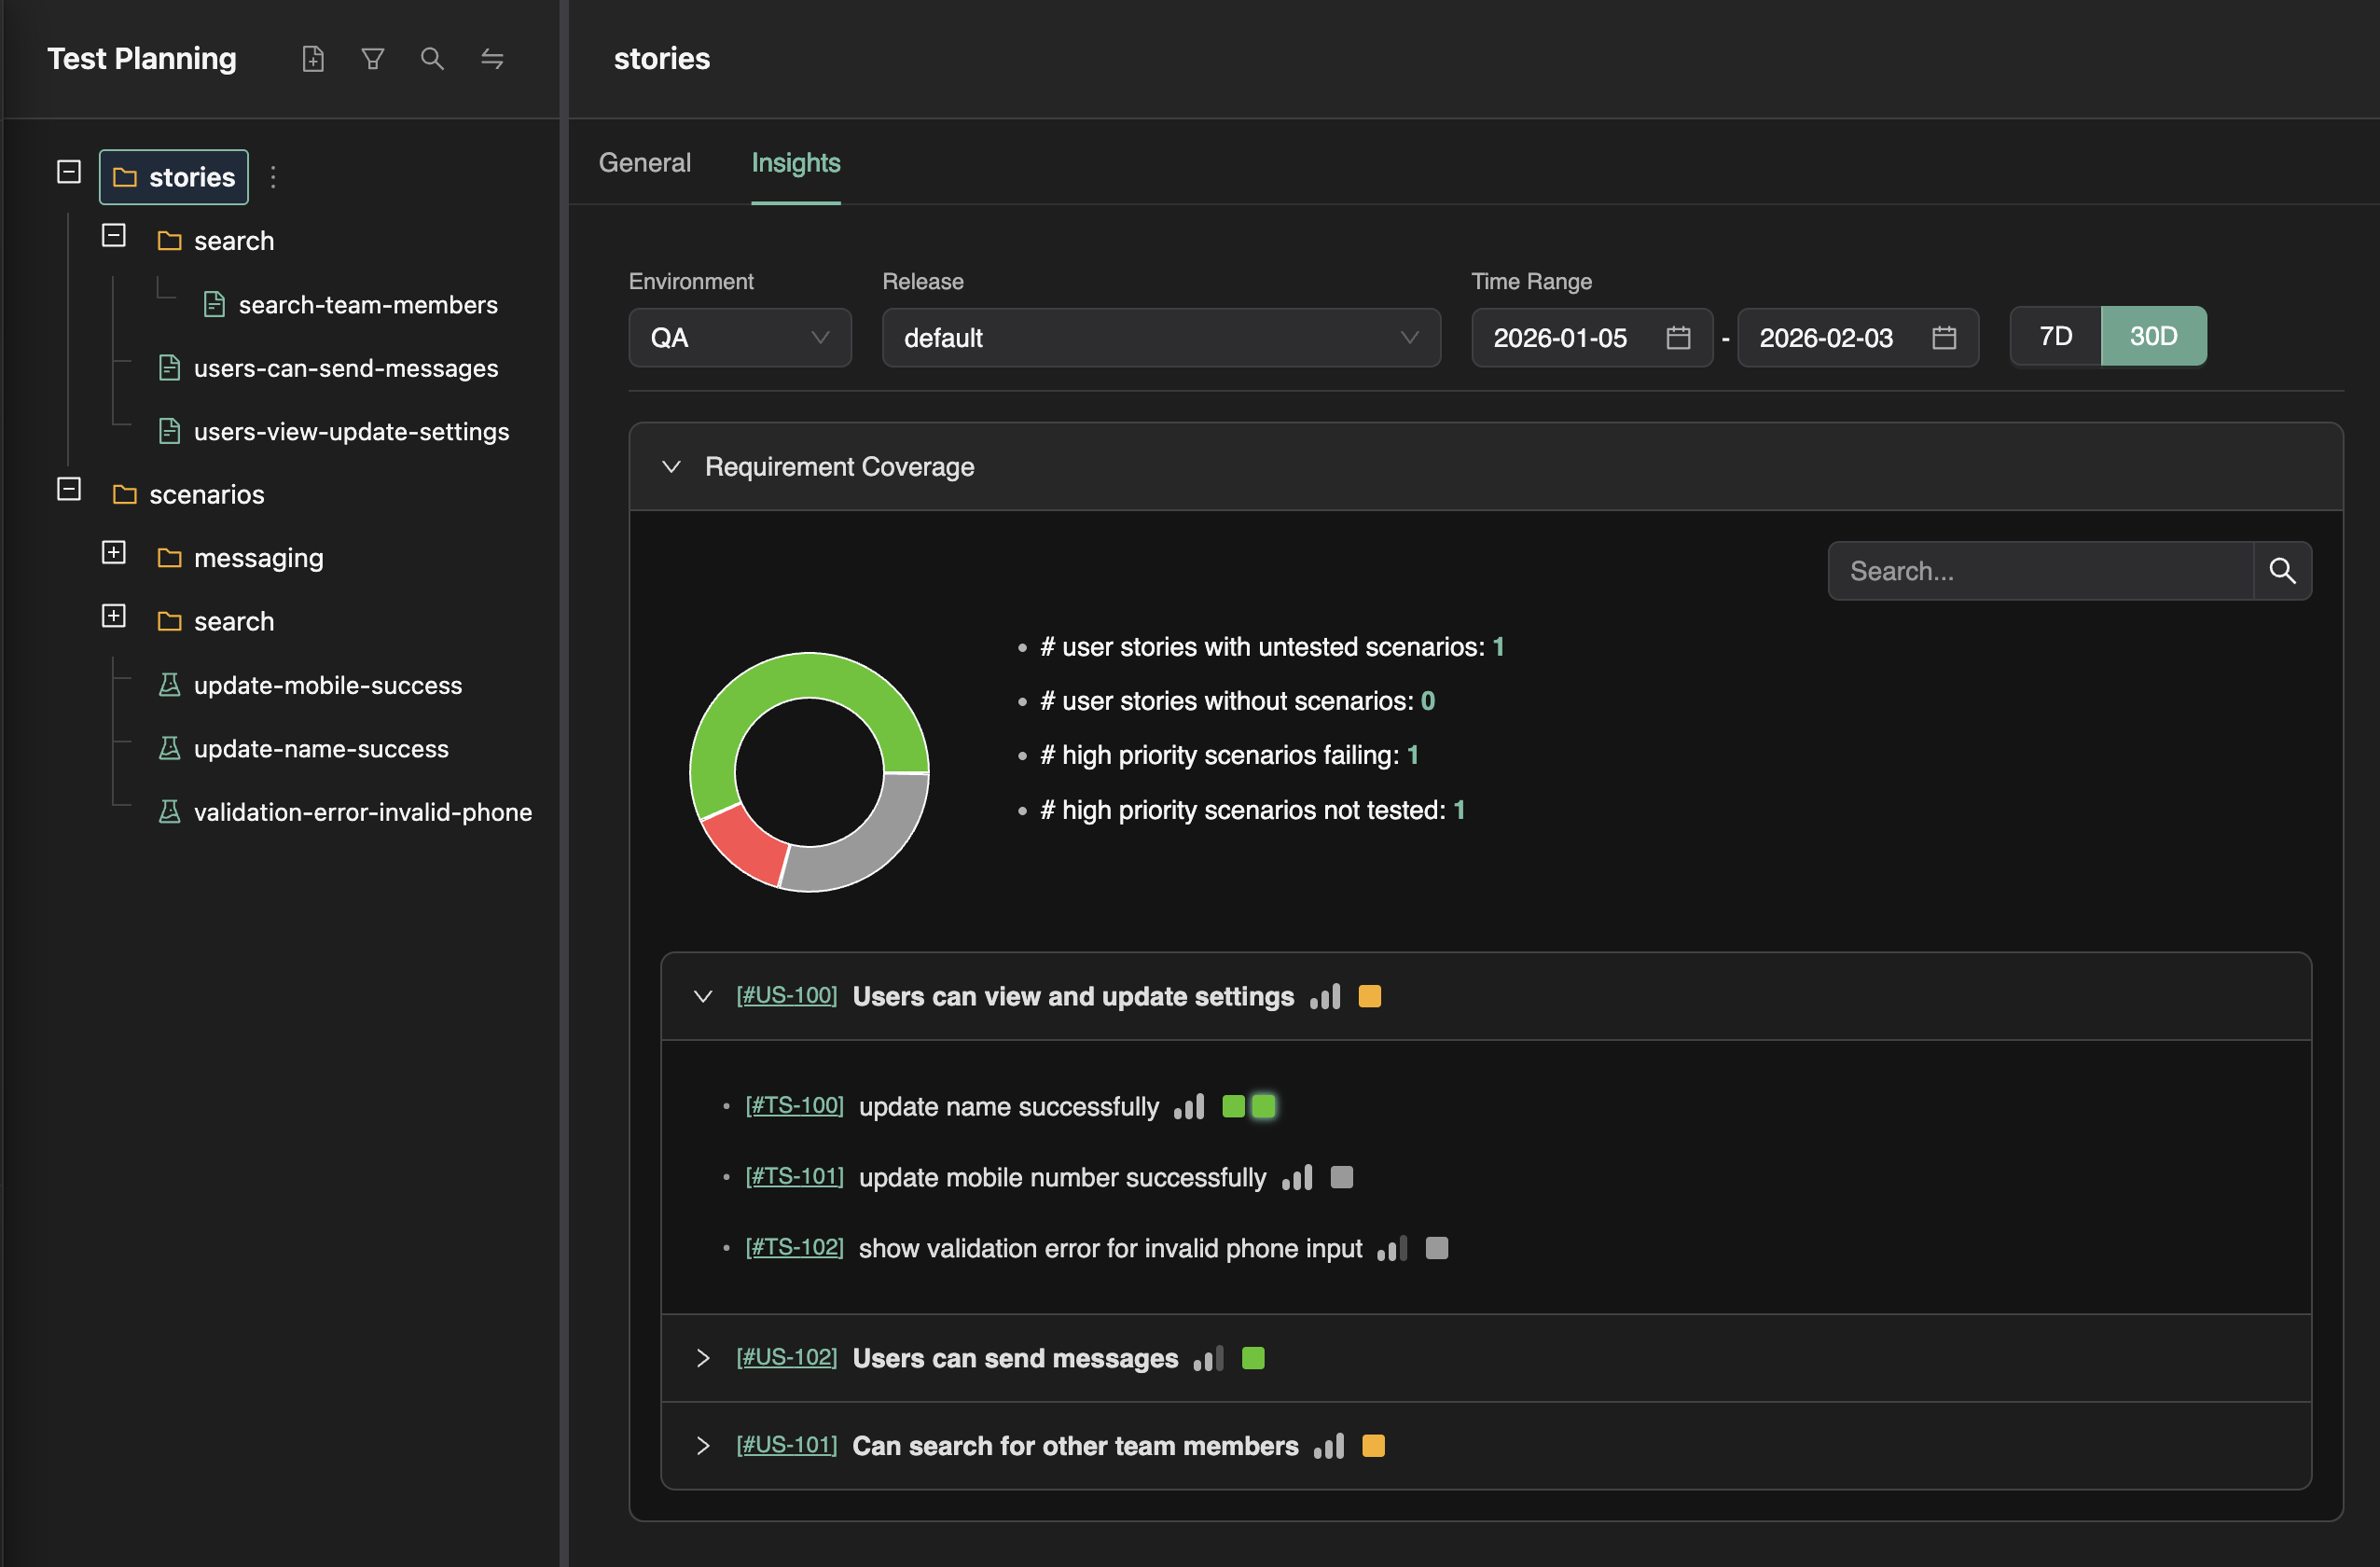
When viewing any folder or file in Test Planning:
- Navigate to the Insights tab
- Open the Requirement Coverage section
- Configure your execution scope:
- Environment: Select the environment (e.g., QA, staging, production)
- Release: Filter by specific release or version
- Time Range: Specify the date range for test executions
What You'll See
The coverage view shows:
- User stories in scope: All stories within the selected folder
- Linked scenarios: Scenarios connected to each story
- Execution status: Pass/fail indicators for each scenario
- Coverage gaps: Stories or scenarios without test coverage
- Roll-up metrics: Aggregate pass rates at the folder level
Drill-Down Capability
Click on any user story to see:
- Its linked scenarios
- Execution history for each scenario
- Which tests cover each scenario
- Recent pass/fail trends
Filtering for Targeted Reports
Using Explorer Filters
The Test Planning explorer supports filters that narrow down which stories are considered:
- Click the Filter button in the explorer toolbar
- Add filter conditions:
- Priority: High, Medium, Low
- Status: Draft, In Review, Approved
- Labels: Any tags you've applied
- Due Date: Before, after, or within a range
Combining Folders and Filters
The power comes from combining folder scope with filters:
"Show me coverage for high-priority user stories in the checkout folder that are due next week"
This translates to:
- Select the
stories/checkout/folder - Apply filters:
priority = high,due_date < next_week - View the Insights tab
You now see a focused report answering exactly that question.
Example Filter Scenarios
| Question | Folder | Filters |
|---|---|---|
| What's our auth coverage? | authentication/ | None |
| High-priority gaps? | Root (stories/) | priority = high, status = approved |
| Team A's failing tests? | team-a/ | None (view failures in Insights) |
| Q1 release readiness? | releases/q1/ | status = approved |
| Overdue items? | Root | due_date < today |
Linking Tests to Scenarios
How to Link
In your test scripts, add a comment to link to a scenario:
test('successful login', async ({ page }) => {
  // @Scenario: Login - Valid Credentials Success
  await page.goto('/login');
  await page.fill('[data-testid="email"]', 'user@example.com');
  await page.fill('[data-testid="password"]', 'validpassword');
  await page.click('[data-testid="login-button"]');
  await expect(page).toHaveURL('/dashboard');
});
TestChimp automatically:
- Links the test to the matching scenario
- Tracks execution results across all test runs
- Updates coverage data in real-time
For more details, see Linking Scenarios from SmartTests.
Test Execution Sources
Coverage data comes from two sources:
- Direct platform execution: Tests run from the TestChimp Web IDE
- CI pipeline execution: Tests run via Playwright with
@testchimp/playwright
Both sources are automatically tracked and aggregated.
Actionable Reporting
Identifying Coverage Gaps
The Insights view highlights:
- Uncovered scenarios: Scenarios with no linked tests (shown with warning indicators)
- No execution data: Scenarios that have tests but no recent executions
- Failing scenarios: Tests that are currently failing (shown in red)
Making Decisions
Use coverage data to answer key questions:
| Question | How to Answer |
|---|---|
| Are we ready to release? | Check coverage for the release folder, filter by approved stories |
| Where should we add tests? | Look for uncovered high-priority scenarios |
| What's broken? | Filter to show failing scenarios |
| Which team needs help? | Compare coverage across team folders |
Best Practices
Folder Organization
- Mirror your product: Structure folders like your application architecture
- Keep it shallow: 2-3 levels deep is usually sufficient
- Use consistent naming: Establish conventions across the team
- Create an archive: Move deprecated items rather than deleting
Linking Tests
- Link early: Add
// @Scenario:comments when writing tests - Match exactly: Scenario titles must match precisely
- One scenario per test: Avoid linking multiple scenarios to one test
- Update when renaming: Keep links in sync if scenario titles change
Using Filters
- Save common queries: Remember useful filter combinations
- Start broad, narrow down: Begin with folder selection, then add filters
- Use labels strategically: Apply labels that support your reporting needs
- Filter for stakeholders: Create focused views for different audiences
Continuous Improvement
- Review weekly: Check coverage gaps during sprint planning
- Track trends: Monitor coverage changes over time
- Set targets: Establish coverage goals for critical areas
- Automate CI: Ensure all test runs report back to TestChimp
Technical Setup
CI Integration
Configure your CI pipeline to report executions:
npm install @testchimp/playwright
// playwright.config.ts
export default defineConfig({
  reporter: [
    ['@testchimp/playwright/reporter', {
      apiKey: process.env.TESTCHIMP_API_KEY,
      projectId: process.env.TESTCHIMP_PROJECT_ID,
    }]
  ],
});
For complete setup instructions, see Run SmartTests in CI with Playwright Runner.
Summary
Requirement traceability in TestChimp provides:
- Folder-level insights: Coverage aggregated at any level of your hierarchy
- Flexible filtering: Narrow down to exactly the stories you care about
- Actionable data: Identify gaps, failures, and progress at a glance
- Automatic tracking: No manual spreadsheet updates required
- Real-time updates: Coverage data reflects the latest test executions
Combined with the file-first approach, you get requirement traceability that scales with your team and integrates with your development workflow.
FAQ
Do I need a separate traceability tool?
No—// @Scenario comments in SmartTests plus synced markdown plans replace manual matrices when combined with TestChimp insights.
Can one test cover multiple scenarios?
Yes—add multiple // @Scenario lines; insights attribute coverage to each linked scenario file.
How do explorations affect traceability?
Exploration bugs tag screen-states on the same SmartTest journeys, extending traceability beyond pass/fail to UX findings.
How does this compare to Jira-only traceability?
Plans live in Git next to tests; links are in code reviewers see in PRs—not brittle ticket IDs in an external UI only.